Yamaha DTX452K DTX402K/DTX432K/DTX452K Owners Manual - Page 19
Step 9, Attaching the cymbal holders, Assembling the cymbal pads
 |
View all Yamaha DTX452K manuals
Add to My Manuals
Save this manual to your list of manuals |
Page 19 highlights
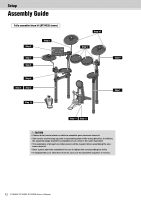
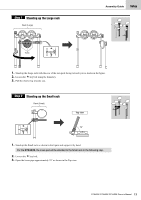
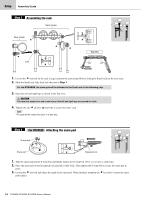
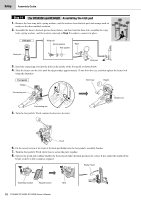
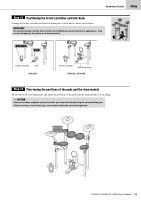
Step 9 Attaching the cymbal holders Assembly Guide Setup Playing position 1. Loosen the four key bolts at the ends of the tom 1/2 part. 2. Insert the cymbal holders into the ends of the top 1/2 part. Then adjust the angles of the cymbal holders until they are ori- ented as shown in the figure. NOTE The two cymbal holders are identical. • When correctly inserted, the tips of the cymbal holders will protrude slightly from the bottom of the tom part. • When correctly oriented, the cymbal holders will bend in the back from your playing position. 3. Tighten the four key bolts to secure the cymbal holders in place. Step 10 Assembling the cymbal pads Sensor (bumps) The crash cymbal, which has the sticker labeled "CRASH" on the rear side and has some bumps on the front side, is for the left. The normal cymbal, which is identical with the hi-hat cymbal, is for the right. 1. Remove the wing nut and the upper felt pad from the cymbal holder. (Do not remove the lower felt pad.) 2. Place the cymbal pad on the cymbal holder, with the holder passing through the central hole. 3. Replace the felt pad removed in Step 1 above the cymbal pad. 4. Tighten the wing nut to secure the cymbal pad in place. Wing nut Felt pad Cymbal pad Felt pad Cymbal holder DTX402K DTX432K DTX452K Owner's Manual 17
-
 1
1 -
2
-
3
-
4
-
5
-
6
-
7
-
8
-
9
-
10
-
11
-
12
-
13
-
 14
14 -
 15
15 -
 16
16 -
 17
17 -
 18
18 -
 19
19 -
 20
20 -
 21
21 -
 22
22 -
 23
23 -
 24
24 -
25
-
26
-
27
-
28
-
29
-
30
-
31
-
32
-
33
-
34
-
35
-
36
-
37
-
38
-
39
-
40
-
41
-
42
-
43
-
44
-
45
-
46
-
47
-
48
-
49
-
50
-
51
-
52
-
53
-
54
-
55
-
56
-
57
-
58
-
59
-
60
-
61
-
62
-
63
-
64
-
65
-
66
-
67
-
68
-
69
-
70
-
71
-
72
 |
 |
