Yamaha MMP1 MMP1 Firmware Update Guide - Page 6
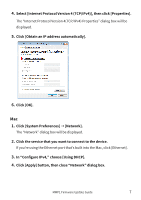
■ TCP/IP settings of computer, Windows
 |
View all Yamaha MMP1 manuals
Add to My Manuals
Save this manual to your list of manuals |
Page 6 highlights
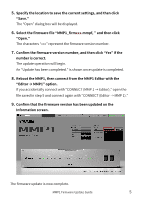
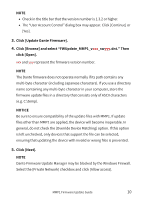
■ TCP/IP settings of computer Before you update the Dante firmware, you must change your computer's TCP/IP settings. After updating the firmware, return the TCP/IP settings to their original settings. Windows 1. Open the "Network and Sharing Center" as described below. Windows 7 Select [Start] → [Control Panel], then click or double-click [Network and Sharing Center] or [View network status and tasks]. Windows 8.1 and Windows 10 Right-click [Start] → [Control Panel], then click or double-click [Network and Sharing Center] or [View network status and tasks]. The "Network and Sharing Center" is displayed. 2. Click [Manage network connection] or [Change Adapter settings] from the "Tasks" list located in the left side of "Network and Sharing Center" window, then double-click [Local Area Connection]. The "Local Area Connection Status" dialog box will be displayed. NOTE • The "User Account Control" dialog box may appear. Click [Continue] or [Yes]. • If the "Local Area Connection properties" dialog box appears, skip ahead to step 4. 3. Click [Properties]. The "Local Area Connection properties" dialog box will be displayed. NOTE The "User Account Control" dialog box may appear. Click [Continue] or [Yes]. MMP1 Firmware Update Guide 6
-
 1
1 -
 2
2 -
 3
3 -
 4
4 -
 5
5 -
 6
6 -
 7
7 -
 8
8 -
 9
9 -
 10
10 -
 11
11 -
 12
12 -
13
-
14
 |
 |
