Yamaha PSR-550 Owner's Manual - Page 92
Multi Pad Recording, RecMenu:MultiPad, PadBank=UserPad1
 |
View all Yamaha PSR-550 manuals
Add to My Manuals
Save this manual to your list of manuals |
Page 92 highlights
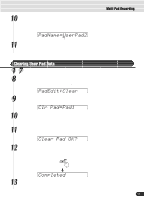
Multi Pad Recording In addition to the preset Multi Pad sets, the PSR-550 has 16 user-recordable sets that you can use to store your own creations. These original User Multi Pads can be played and used in the same way as the presets. User Multi Pad data can also be saved to and loaded from floppy disk. Your keyboard performance (using voice R1) is recorded to the User pad. Chord Match data (page 43) can also be recorded. • Multi Pad Recording page 92 • Chord Match page 94 • Naming User Pads page 94 • Clearing User Pad Data page 95 s Data that can be recorded to User pads • Note on/off (key press and release) • Velocity (strength of key press) • Pitch bend, pitch bend range • SUSTAIN button on/off • Footswitch on/off (sustain, sostenuto, soft) • Voice Change settings • Mixer settings Up to approximately 2,000 notes for all pads can be recorded to the PSR-550 Multi Pads. • User Pad data is recorded by playing voice R1 from the keyboard. Voice R2, voice L and the auto accompaniment cannot be used. • Material recorded data is retained in memory even when the STANDBY switch is turned off if batteries are installed or an AC adaptor is connected (page 136). It is nevertheless a good idea to save important data to floppy disk so that you can keep them indefinitely and build up your own data library (page 60). Multi Pad Recording 1 Press the [RECORD] button to engage the Record mode. 2 Select "MultiPad". Use the data dial, the [+/YES] button or the [-/NO] button. RecMenu:MultiPad 3 Press the [NEXT] button. PadBank=UserPad1 4 Select a Multi Pad Bank to record. Use the data dial, the [+/YES] button or the [-/NO] button. 92 The following notes and cautions are important points for you to keep in mind as you record your Multi Pad data. • Using the Metronome function (page 118) can make your recording sessions much more efficient. • Using Registration Memory (page 54) can make your recording sessions much more efficient, since various settings (such as voices, etc.) can be recalled by a single button press. When the record mode is engaged, the Registration Memory Freeze function will be turned on (it cannot be turned off while the record mode is engaged). • Whenever you record, any previously recorded material in the same track will be erased. • If the memory becomes full while recording, an alert message will appear on the display and recording will stop. • Be careful to avoid turning off the power or unplugging the AC adaptor from the outlet during recording, since this will result in the loss of recorded data. 90
-
 1
1 -
2
-
3
-
4
-
5
-
6
-
7
-
8
-
9
-
10
-
11
-
12
-
13
-
14
-
15
-
16
-
17
-
18
-
19
-
20
-
21
-
22
-
23
-
24
-
25
-
26
-
27
-
28
-
29
-
30
-
31
-
32
-
33
-
34
-
35
-
36
-
37
-
38
-
39
-
40
-
41
-
42
-
43
-
44
-
45
-
46
-
47
-
48
-
49
-
50
-
51
-
52
-
53
-
54
-
55
-
56
-
57
-
58
-
59
-
60
-
61
-
62
-
63
-
64
-
65
-
66
-
67
-
68
-
69
-
70
-
71
-
72
-
73
-
74
-
75
-
76
-
77
-
78
-
79
-
80
-
81
-
82
-
83
-
84
-
85
-
86
-
 87
87 -
 88
88 -
 89
89 -
 90
90 -
 91
91 -
 92
92 -
 93
93 -
 94
94 -
 95
95 -
 96
96 -
 97
97 -
98
-
99
-
100
-
101
-
102
-
103
-
104
-
105
-
106
-
107
-
108
-
109
-
110
-
111
-
112
-
113
-
114
-
115
-
116
-
117
-
118
-
119
-
120
-
121
-
122
-
123
-
124
-
125
-
126
-
127
-
128
-
129
-
130
-
131
-
132
-
133
-
134
-
135
-
136
-
137
-
138
-
139
-
140
-
141
-
142
-
143
-
144
-
145
-
146
-
147
-
148
-
149
-
150
-
151
-
152
-
153
-
154
-
155
-
156
-
157
-
158
-
159
-
160
 |
 |
