Yamaha PSR-550 Owner's Manual - Page 99
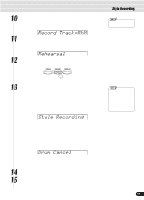
Record Track=RhM, Style Recording, Drum Cancel, Rehearsal, Select a Rhythm track to be recorded.
 |
View all Yamaha PSR-550 manuals
Add to My Manuals
Save this manual to your list of manuals |
Page 99 highlights
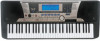
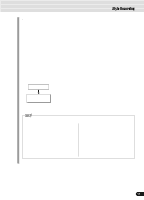
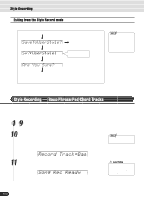
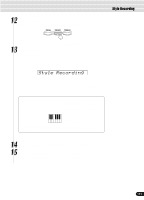
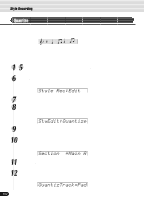
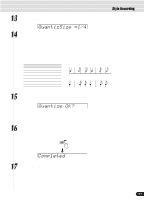
10 Select a Rhythm track to be recorded. Select "RHYTHM MAIN" or "RHYTHM SUB" with the data dial, the [+/YES] button or the [-/NO] button. Record Track=RhM 11 Press the [NEXT] button to display the Reharsal screen. The beat indicator dots will flash at the currently set tempo, indicating that the record ready (Synchro Start) mode is engaged. Rehearsal 12 Select one of the Drum Kits. Select the desired kit by pressing the [VOICE R1] button (page 26). Style Recording • Only one track can be recorded at a time. To return to the original display, press the [EXIT] button (page 17). 13 Start recording. You can start recording with one of the following ways: • Press the [START/STOP] button. The following will start to play back: the style selected in step #4, the section selected in step #8 and the rhythm track selected in step #10. • Press the [SYNC START] button to enable synchronized standby (page 25), then play a key on the keyboard. Playback starts as described in the first method above. Style Recording Since the rhythm pattern plays back repeatedly, you can record by overdubbing - listening to the pattern and playing the desired keys. Look at the icons printed under the keys indicating the percussion sounds that are assigned to each key. You can also delete certain percussion sounds in the following way: 1) Press the [NEXT] button. Drum Cancel 2) Press the key on the keyboard corresponding to the instrument you want to cancel. 3) To return to the original display, press the [BACK] button. 14 Press the [START/STOP] button to stop recording. 15 Press the [RECORD] button to exit from the Record mode. You should save the recorded data before leaving the recording mode. (Refer to page 100 for details.) • For recording the RHYTHM tracks, the instrument symbols printed on the front edge of the panel show you the instrument assignments to each key. See "Keyboard Percussion" on page 31 for playing each drum/ percussion sound. 99 97
-
 1
1 -
2
-
3
-
4
-
5
-
6
-
7
-
8
-
9
-
10
-
11
-
12
-
13
-
14
-
15
-
16
-
17
-
18
-
19
-
20
-
21
-
22
-
23
-
24
-
25
-
26
-
27
-
28
-
29
-
30
-
31
-
32
-
33
-
34
-
35
-
36
-
37
-
38
-
39
-
40
-
41
-
42
-
43
-
44
-
45
-
46
-
47
-
48
-
49
-
50
-
51
-
52
-
53
-
54
-
55
-
56
-
57
-
58
-
59
-
60
-
61
-
62
-
63
-
64
-
65
-
66
-
67
-
68
-
69
-
70
-
71
-
72
-
73
-
74
-
75
-
76
-
77
-
78
-
79
-
80
-
81
-
82
-
83
-
84
-
85
-
86
-
87
-
88
-
89
-
90
-
91
-
92
-
93
-
 94
94 -
 95
95 -
 96
96 -
 97
97 -
 98
98 -
 99
99 -
 100
100 -
 101
101 -
 102
102 -
 103
103 -
 104
104 -
105
-
106
-
107
-
108
-
109
-
110
-
111
-
112
-
113
-
114
-
115
-
116
-
117
-
118
-
119
-
120
-
121
-
122
-
123
-
124
-
125
-
126
-
127
-
128
-
129
-
130
-
131
-
132
-
133
-
134
-
135
-
136
-
137
-
138
-
139
-
140
-
141
-
142
-
143
-
144
-
145
-
146
-
147
-
148
-
149
-
150
-
151
-
152
-
153
-
154
-
155
-
156
-
157
-
158
-
159
-
160
 |
 |