Yamaha PSR-A5000 PSR-A5000 Owners Manual - Page 112
PSR-A5000, Owner's Manual, M.Pad Creator
 |
View all Yamaha PSR-A5000 manuals
Add to My Manuals
Save this manual to your list of manuals |
Page 112 highlights
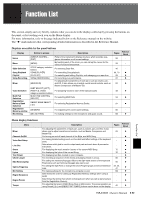
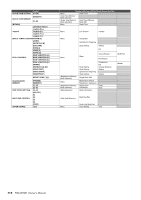
Menu Description Metronome Live Control Assignable Panel Lock Demo Voice Edit Style Creator Song Recording M.Pad Creator Voice Setting Style Setting Song Setting Chord Tutor Scale Tune Master Tune Transpose Keyboard MIDI Utility Expansion Wireless LAN* Time* For making settings of the metronome and the [RESET/TAP TEMPO] button. Determines the functions assigned to the LIVE CONTROL knobs and joystick. Determines the functions assigned to the pedals, assignable buttons, and the shortcuts on the Home display. For locking the panel settings. When the panel settings are locked, nothing happens even when pressing any panel buttons. For calling up the Demo display. For editing the preset Voices to create your own Voices. The display differs depending on whether an Organ Flutes Voice or another kind of Voice is selected. For creating a Style by editing the preset Style, or by recording Style channels one by one. For recording your performance. (This is same as the [RECORDING] button on the panel.) For creating a Multi Pad by editing an existing preset Multi Pad, or by recording a new one. Determines the detailed settings of the keyboard parts, such as the pitch for each part, and Voice Set filter. For making Style playback related settings such as OTS Link timing, Dynamics Control, etc. For making Song playback related settings such as Guide function, Channel settings, etc. Indicates how to play chords that correspond to the specified chord names. For adjusting scales to play music you want to play. For fine-tuning the pitch of the entire instrument. For transposing the pitch of the entire sound in semitones, or just the sound of the keyboard or MIDI Song. Determines the Touch Response of the keyboard. For making MIDI-related settings. For making global settings, managing the USB flash drives, initializing the instrument to the factory default, or backing up the data stored in the instrument, etc. For installing Expansion Packs for adding extra contents downloaded from the website or created on your own by using the Yamaha Expansion Manager. For making settings for connecting the instrument to a smart device via the wireless LAN function. For making settings of the time shown on the display. * This icon appears only when the optional USB Wireless LAN adaptor is connected. Pages 37 56 57, 97 37 32 - - 87 - - - 78 55 - 98 - - Reference Manual 112 PSR-A5000 Owner's Manual
-
 1
1 -
2
-
3
-
4
-
5
-
6
-
7
-
8
-
9
-
10
-
11
-
12
-
13
-
14
-
15
-
16
-
17
-
18
-
19
-
20
-
21
-
22
-
23
-
24
-
25
-
26
-
27
-
28
-
29
-
30
-
31
-
32
-
33
-
34
-
35
-
36
-
37
-
38
-
39
-
40
-
41
-
42
-
43
-
44
-
45
-
46
-
47
-
48
-
49
-
50
-
51
-
52
-
53
-
54
-
55
-
56
-
57
-
58
-
59
-
60
-
61
-
62
-
63
-
64
-
65
-
66
-
67
-
68
-
69
-
70
-
71
-
72
-
73
-
74
-
75
-
76
-
77
-
78
-
79
-
80
-
81
-
82
-
83
-
84
-
85
-
86
-
87
-
88
-
89
-
90
-
91
-
92
-
93
-
94
-
95
-
96
-
97
-
98
-
99
-
100
-
101
-
102
-
103
-
104
-
105
-
106
-
 107
107 -
 108
108 -
 109
109 -
 110
110 -
 111
111 -
 112
112 -
 113
113 -
 114
114 -
 115
115 -
 116
116 -
 117
117 -
118
-
119
-
120
-
121
-
122
-
123
-
124
-
125
-
126
-
127
-
128
-
129
-
130
-
131
-
132
-
133
-
134
-
135
-
136
 |
 |