Yamaha PSR-A5000 PSR-A5000 Owners Manual - Page 73
Using Song Position Markers (MIDI Songs only), Entering Song Position Markers
 |
View all Yamaha PSR-A5000 manuals
Add to My Manuals
Save this manual to your list of manuals |
Page 73 highlights
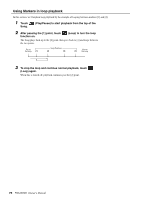
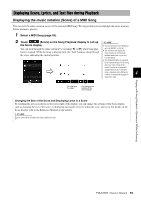
Using Song Position Markers (MIDI Songs only) Song Position markers (SP1-SP4) can be placed in the MIDI Song data. These not only let you navigate quickly and easily through the MIDI Song data, but also let you set up convenient playback loops-allowing you to create dynamic Song arrangements "on the fly," as you perform. Singing with Song Playback-Operations While Performing Entering Song Position Markers 1 Select the desired MIDI Song (page 68), and start playback (page 70). 4 2 Enter the Song Position markers. 2-1 Touch (Song Position Memorize) to turn it on. 2-2 When the Song reaches the point at which you wish to enter a marker, touch the desired marker number ([1]-[4]) on the display. The corresponding Song Position marker is entered, and Song Position Memorize is automatically turned off. 3 As desired, enter other markers in the same way as step 2. 4 Pause Song Playback (page 70). 5 Save the Song. 5-1 Touch the Song name to call up the Song Selection Display. 5-2 Save the Song file (page 33). NOTICE The entered marker settings will be lost if you change to another Song or you turn the power off without executing the Save operation. About the status of Song Position [1]-[4] • Off: Song Position is not entered to the button. • Green: Song Position is entered to the button. • Red (flashes): Playback jump is ready. See below ("Jumping to a Song Position Marker during playback"). • Red: The Song Position has been passed and Song playback continues to the next Song button. Jumping to a Song Position Marker during playback Simply touching the one of the Song Position [1]-[4] during Song playback jumps to the corresponding position, after the current played measure reaches its end. (The button will flash in red, indicating that playback jump is ready.) You can cancel the jump by touching the same Song Position again before the actual jump. Starting playback from a specific Marker First, touch one of Song Position [1]-[4] while Song playback is stopped, and then start playback (page 70). PSR-A5000 Owner's Manual 73
-
 1
1 -
2
-
3
-
4
-
5
-
6
-
7
-
8
-
9
-
10
-
11
-
12
-
13
-
14
-
15
-
16
-
17
-
18
-
19
-
20
-
21
-
22
-
23
-
24
-
25
-
26
-
27
-
28
-
29
-
30
-
31
-
32
-
33
-
34
-
35
-
36
-
37
-
38
-
39
-
40
-
41
-
42
-
43
-
44
-
45
-
46
-
47
-
48
-
49
-
50
-
51
-
52
-
53
-
54
-
55
-
56
-
57
-
58
-
59
-
60
-
61
-
62
-
63
-
64
-
65
-
66
-
67
-
 68
68 -
 69
69 -
 70
70 -
 71
71 -
 72
72 -
 73
73 -
 74
74 -
 75
75 -
 76
76 -
 77
77 -
 78
78 -
79
-
80
-
81
-
82
-
83
-
84
-
85
-
86
-
87
-
88
-
89
-
90
-
91
-
92
-
93
-
94
-
95
-
96
-
97
-
98
-
99
-
100
-
101
-
102
-
103
-
104
-
105
-
106
-
107
-
108
-
109
-
110
-
111
-
112
-
113
-
114
-
115
-
116
-
117
-
118
-
119
-
120
-
121
-
122
-
123
-
124
-
125
-
126
-
127
-
128
-
129
-
130
-
131
-
132
-
133
-
134
-
135
-
136
 |
 |
