Yamaha PSR-A5000 PSR-A5000 Owners Manual - Page 42
Adjusting the tempo, Changing the Chord Fingering type, RESET/TAP TEMPO] button, Single Finger
 |
View all Yamaha PSR-A5000 manuals
Add to My Manuals
Save this manual to your list of manuals |
Page 42 highlights
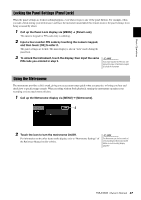
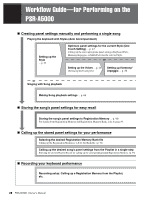
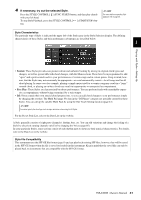
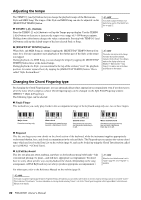
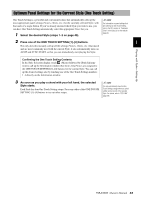
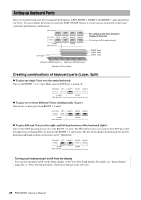
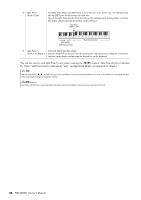
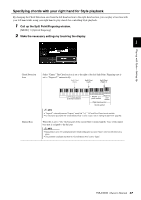
Adjusting the tempo The TEMPO [-] and [+] buttons let you change the playback tempo of the Metronome, Style and MIDI Song. The tempo of the Style and MIDI Song can also be adjusted via the [RESET/TAP TEMPO] button. TEMPO [-]/[+] buttons Press the TEMPO [-] or [+] button to call up the Tempo pop-up display. Use the TEMPO [-]/[+] buttons to decrease or increase the tempo over a range of 5-500 beats per minute. Holding down either button changes the value continuously. Pressing both TEMPO [-] and [+] buttons calls up the default tempo of the last selected Style or Song. NOTE If you want to adjust the tempo of an Audio Song, use the Time Stretch function on page 72. [RESET/TAP TEMPO] button When Style and MIDI Song are stopped, tapping the [RESET/TAP TEMPO] button (four times for a 4/4 time signature) starts playback of the rhythm part of the Style at the tempo you tapped. During playback of a MIDI Song, you can change the tempo by tapping the [RESET/TAP TEMPO] button twice at the desired tempo. During playback of a Style, you can rewind to the top of the section ("reset" the playback position, for stutter repeat effects) by tapping the [RESET/TAP TEMPO] button. This is called "Style Section Reset." NOTE This button can also be set to change the tempo during Style playback, instead of Section Reset. The setting is made on the display called up via [MENU] [Metronome] [Tap Tempo]. For details, refer to the Reference Manual on the website. Changing the Chord Fingering type By changing the Chord Fingering type, you can automatically produce appropriate accompaniment even if you don't press all of the notes which comprise a chord. Chord fingering type can be changed via the Split Point/Fingering window: [MENU] [Split & Fingering]. The following types can be selected: Single Finger This method lets you easily play chords in the accompaniment range of the keyboard using only one, two or three fingers. Major chord Press the root key only. Minor chord Simultaneously press the root key and a black key to its left. Seventh chord Simultaneously press the root key and a white key to its left. Minor seventh chord Simultaneously press the root key and both a white and black key to its left. Fingered This lets you finger your own chords on the chord section of the keyboard, while the instrument supplies appropriately orchestrated rhythm, bass, and chord accompaniment in the selected Style. The Fingered type recognizes the various chord types which are listed on the Data List on the website (page 9), and can be looked up using the Chord Tutor function called up via [MENU] [Chord Tutor]. AI Full Keyboard This lets you play just about anything, anywhere on the keyboard using both hands-like conventional playing of a piano-and still have appropriate accompaniment. You don't have to worry about specific ways to play/indicate the chords. (Depending on the song arrangement, AI Full Keyboard may not always produce appropriate accompaniment.) NOTE When the chord detection area is set to "Upper" (page 47), only "Fingered*" is available. For other types, refer to the Reference Manual on the website (page 9). NOTE In the case of a specific fingering type (Fingered, Fingered On Bass, AI Fingered), you can create a state in which no chord is input by entering a special chord named "Cancel." This is called as "Chord Cancel." For more information on entering chords including "Cancel," refer to the "Chord Types Recognized in the Fingered Mode" in the Reference Manual on the website. 42 PSR-A5000 Owner's Manual
-
 1
1 -
2
-
3
-
4
-
5
-
6
-
7
-
8
-
9
-
10
-
11
-
12
-
13
-
14
-
15
-
16
-
17
-
18
-
19
-
20
-
21
-
22
-
23
-
24
-
25
-
26
-
27
-
28
-
29
-
30
-
31
-
32
-
33
-
34
-
35
-
36
-
 37
37 -
 38
38 -
 39
39 -
 40
40 -
 41
41 -
 42
42 -
 43
43 -
 44
44 -
 45
45 -
 46
46 -
 47
47 -
48
-
49
-
50
-
51
-
52
-
53
-
54
-
55
-
56
-
57
-
58
-
59
-
60
-
61
-
62
-
63
-
64
-
65
-
66
-
67
-
68
-
69
-
70
-
71
-
72
-
73
-
74
-
75
-
76
-
77
-
78
-
79
-
80
-
81
-
82
-
83
-
84
-
85
-
86
-
87
-
88
-
89
-
90
-
91
-
92
-
93
-
94
-
95
-
96
-
97
-
98
-
99
-
100
-
101
-
102
-
103
-
104
-
105
-
106
-
107
-
108
-
109
-
110
-
111
-
112
-
113
-
114
-
115
-
116
-
117
-
118
-
119
-
120
-
121
-
122
-
123
-
124
-
125
-
126
-
127
-
128
-
129
-
130
-
131
-
132
-
133
-
134
-
135
-
136
 |
 |