Yamaha R-N303D R-N303/R-N303D Owner s Manual - Page 49
Configuring the system settings (ADVANCED SETUP menu), ADVANCED SETUP menu items
 |
View all Yamaha R-N303D manuals
Add to My Manuals
Save this manual to your list of manuals |
Page 49 highlights
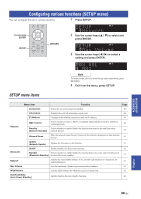
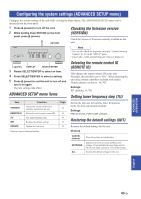
Configuring the system settings (ADVANCED SETUP menu) Configuring the system settings (ADVANCED SETUP menu) Configure the system settings of the unit while viewing the front display. The ADVANCED SETUP menu can be operated from the front panel. 1 Press A (power) to turn off the unit. Checking the firmware version 2 While holding down RETURN on the front panel, press A (power). RETURN (VERSION) Check the version of firmware currently installed on the unit. PHONES SPEAKERS DISPLAY MODE MEMORY BAND PRESET BASS TREBLE TUNING INPUT SELECT PUSH ENTER RETURN CONNECT VOLUME Note • You can also check the firmware version in "Update (Network Update)" (p. 41) in the "SETUP" menu. • It may take a while until the firmware version is displayed. A (power) DISPLAY SELECT/ENTER 3 Rotate SELECT/ENTER to select an item. 4 Press SELECT/ENTER to select a setting. 5 Press A (power) to set the unit to turn off and turn it on again. The new settings take effect. ADVANCED SETUP menu items Selecting the remote control ID (REMOTE ID) This changes the remote control ID on the unit. Normally, this should be set to "ID1". When operating the unit using remote controllers included with certain Yamaha players, set this to "AUTO". Settings ID1 (default), AUTO Setting tuner frequency step (TU) Item VERSION REMOTE ID TU* INIT UPDATE Function Checks the version of firmware currently installed on the unit. Selects the unit's remote control ID. Sets tuner frequency step. Restores the default settings. Updates the firmware. * Only for Asia and General models Page 43 43 43 43 44 Selects the step size for locating tuner frequencies. (Only for Asia and General models) Settings FM100/AM10, FM50/AM9 (default) Restoring the default settings (INIT) Restores the default settings for the unit. Choices CANCEL (default) NETWORK ALL Does not perform an initialization. Initializes all of the network and Bluetooth settings. If you initialize the unit, all presets for the network input sources (p. 36) will be cleared. Restores the default settings for the unit. ADVANCED OPERATION English 43 En
-
 1
1 -
2
-
3
-
4
-
5
-
6
-
7
-
8
-
9
-
10
-
11
-
12
-
13
-
14
-
15
-
16
-
17
-
18
-
19
-
20
-
21
-
22
-
23
-
24
-
25
-
26
-
27
-
28
-
29
-
30
-
31
-
32
-
33
-
34
-
35
-
36
-
37
-
38
-
39
-
40
-
41
-
42
-
43
-
 44
44 -
 45
45 -
 46
46 -
 47
47 -
 48
48 -
 49
49 -
 50
50 -
 51
51 -
 52
52 -
 53
53 -
 54
54 -
55
-
56
-
57
-
58
-
59
-
60
-
61
-
62
-
63
-
64
-
65
-
66
-
67
-
68
-
69
-
70
-
71
-
72
-
73
-
74
-
75
-
76
-
77
-
78
-
79
-
80
-
81
-
82
-
83
-
84
-
85
-
86
-
87
-
88
-
89
-
90
-
91
-
92
-
93
-
94
-
95
-
96
-
97
-
98
-
99
-
100
-
101
-
102
-
103
-
104
-
105
-
106
-
107
-
108
-
109
-
110
-
111
-
112
-
113
-
114
-
115
-
116
-
117
-
118
-
119
-
120
-
121
-
122
-
123
-
124
-
125
-
126
-
127
-
128
-
129
-
130
-
131
-
132
-
133
-
134
-
135
-
136
-
137
-
138
-
139
-
140
-
141
-
142
-
143
-
144
-
145
-
146
-
147
-
148
-
149
-
150
-
151
-
152
-
153
-
154
-
155
-
156
-
157
-
158
-
159
-
160
-
161
-
162
-
163
-
164
-
165
-
166
-
167
-
168
-
169
-
170
-
171
-
172
-
173
-
174
-
175
-
176
-
177
-
178
-
179
-
180
-
181
-
182
-
183
-
184
-
185
-
186
 |
 |
