Yamaha R-N602 Owners Manual - Page 16
Connecting the speakers - australia
 |
View all Yamaha R-N602 manuals
Add to My Manuals
Save this manual to your list of manuals |
Page 16 highlights
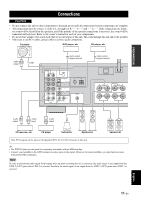
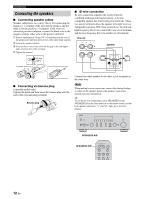
Connections Connecting the speakers ■ Connecting speaker cables Speaker cables have two wires. One is for connecting the negative (-) terminal of the unit and the speaker, and the other is for the positive (+) terminal. If the wires are colored to prevent confusion, connect the black wire to the negative and the other wire to the positive terminal. a Remove approximately 10 mm (3/8") of insulation from the ends of the speaker cable and twist the bare wires of the cable firmly together. b Loosen the speaker terminal. c Insert the bare wires of the cable into the gap on the side (upper right or bottom left) of the terminal. d Tighten the terminal. a 10 mm (3/8") ■ Bi-wire connection Bi-wire connection separates the woofer from the combined midrange and tweeter section. A bi-wire compatible speaker has four binding post terminals. These two sets of terminals allow the speaker to be split into two independent sections. With these connections, the mid and high frequency drivers are connected to one set of terminals and the low frequency driver to another set of terminals. This unit SPEAK A Speaker B c b d ■ Connecting via banana plug (Australia model only) Tighten the knob and then insert the banana plug into the end of the corresponding terminal. Banana plug Connect the other speaker to the other set of terminals in the same way. Note When making bi-wire connections, remove the shorting bridges or cables on the speaker. Refer to the speakers' instruction manuals for more information. y To use the bi-wire connections, press SPEAKERS A and SPEAKERS B on the front panel or on the remote control so that both speaker indicators ("A" and "B") light up on the front display. PHONES SPEAKERS A B 5V 1A DIMMER DISPLAY MODE MEMORY CLEAR BAND PRESET TUNING INPUT BASS TREBLE BALANCE LOUDNESS FLAT -30dB SELECT PUSH - ENTER L R RETURN CONNECT PURE DIRECT VOLUME SPEAKERS A/B SPEAKERS A/B SPEAKERS A B PHONO SLEEP COAX 1 COAX 2 BLUETOOTH OPT 1 OPT 2 CD 12 En
-
 1
1 -
2
-
3
-
4
-
5
-
6
-
7
-
8
-
9
-
10
-
 11
11 -
 12
12 -
 13
13 -
 14
14 -
 15
15 -
 16
16 -
 17
17 -
 18
18 -
 19
19 -
 20
20 -
 21
21 -
22
-
23
-
24
-
25
-
26
-
27
-
28
-
29
-
30
-
31
-
32
-
33
-
34
-
35
-
36
-
37
-
38
-
39
-
40
-
41
-
42
-
43
-
44
-
45
-
46
-
47
-
48
-
49
-
50
-
51
-
52
-
53
-
54
-
55
-
56
-
57
-
58
-
59
-
60
-
61
-
62
-
63
-
64
-
65
-
66
 |
 |
