Yamaha R-N602 Owners Manual - Page 21
Using the WPS push button, configuration
 |
View all Yamaha R-N602 manuals
Add to My Manuals
Save this manual to your list of manuals |
Page 21 highlights
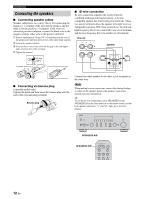
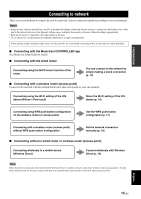
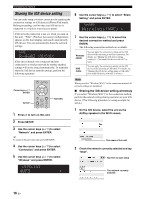
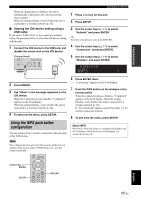
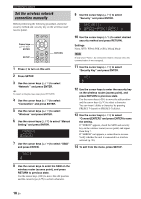
PREPARATION When the sharing process finishes, the unit is automatically connected to the selected network (access point). When the setting finishes, verify whether the unit is connected to a wireless network (p. 20). ■ Sharing the iOS device setting using a USB cable If you select "USB Cable" as the connection method, follow the procedure below to share the iOS device setting with the unit. 1 Connect the iOS device to the USB jack, and disable the screen lock on the iOS device. This unit (front) PHONES SPEAKERS A B 5V 1A DIMMER DISPLAY MODE MEMORY CLEAR INPUT BASS TREBLE Connecting to network 1 Press A to turn on this unit. 2 Press SETUP. 3 Use the cursor keys (B / C) to select "Network" and press ENTER. y To return to the previous state, press RETURN. 4 Use the cursor keys (B / C) to select "Connection" and press ENTER. 5 Use the cursor keys (B / C) to select "Wireless" and press ENTER. WIRELESS WPS 2 Press ENTER. 3 Tap "Allow" in the message appeared on the iOS device. When the connection process finishes, "Completed" appears on the front display. When the setting finishes, verify whether the unit is connected to a wireless network (p. 20). 4 To exit from the menu, press SETUP. Using the WPS push button configuration You can easily set up a wireless connection with one push of the WPS button. Note This configuration does not work if the security method of your wireless router (access point) is WEP. In this case, use other connection method. 6 Press ENTER twice. "Connecting" appears on the front display. 7 Push the WPS button on the wireless router (access point). When the connection process finishes, "Completed" appears on the front display. When the setting finishes, verify whether the unit is connected to a wireless network (p. 20). If "Not connected" appears, repeat from Step 1 or try another connection method. 8 To exit from the menu, press SETUP. About WPS WPS (Wi-Fi Protected Setup) is a standard established by the Wi-Fi Alliance, which allows easy establishment of a wireless home network. MEMORY PRESET Cursor keys B / C ENTER SETUP ENTER HOME RETURN SETUP VOLUME OPTION NOW PLAYING MUTE RETURN English 17 En
-
 1
1 -
2
-
3
-
4
-
5
-
6
-
7
-
8
-
9
-
10
-
11
-
12
-
13
-
14
-
15
-
 16
16 -
 17
17 -
 18
18 -
 19
19 -
 20
20 -
 21
21 -
 22
22 -
 23
23 -
 24
24 -
 25
25 -
 26
26 -
27
-
28
-
29
-
30
-
31
-
32
-
33
-
34
-
35
-
36
-
37
-
38
-
39
-
40
-
41
-
42
-
43
-
44
-
45
-
46
-
47
-
48
-
49
-
50
-
51
-
52
-
53
-
54
-
55
-
56
-
57
-
58
-
59
-
60
-
61
-
62
-
63
-
64
-
65
-
66
 |
 |
