Yamaha RM1x Owner's Manual - Page 100
Editing Existing Events, Inserting Events - midi cc messages
 |
View all Yamaha RM1x manuals
Add to My Manuals
Save this manual to your list of manuals |
Page 100 highlights
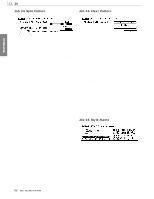
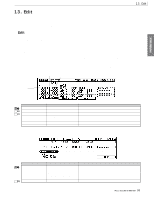
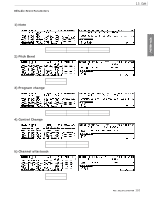
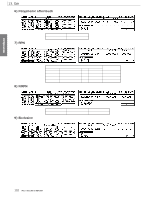
PATTERN MODE 13.Edit Editing Existing Events To edit the data in the edit display, use Display Knob 1 (POINTER) or the vertical cursor buttons to move the pointer to an event you want to edit, use the lateral cursor buttons to move the cursor to the data item you want to edit, then edit as required via either the [NO -1] and [YES +1] buttons or keyboard (the keyboard can be used for note entry as well as numeric entry as described on page 26). The edited event will flash on the display. Press the F4 function button (DO!) to actually enter the edited data (the event will stop flashing). To abort an edit simply move the pointer to a new event location without pressing the F4 (DO!) function button. Inserting Events To insert an event use Display Knob 1 (POINTER) or the vertical cursor buttons to move the pointer to an event which is at the location at which you want to insert the new event, and press the F3 function button (Insert). The EDIT Insert display will appear. Use Display Knob 1 to select the type of event you want to insert. Then use the cursor buttons to move to data items within the even shown on the display and edit as required. The precise insert location can also be specified in this way. The types of events available for insertion are listed below. When the desired event has been specified, press the F4 function button (DO!) to actually insert the event, or the [EXIT] button to abort and return to the main editing display. Please note that values for "Exc" events (system exclusive) must be entered in hexadecimal format. [Event type list] Event type Function Note (Note number) These messages convey keyboard performance data. Each message includes a specific note number which corresponds to the key which is pressed, a velocity, and a gate time. PB (Pitch Bend) This message conveys movements of the PITCH BEND Knob PC (Program Change) This message is used to select voices. Refer to the separate List Book for a complete listing of the RM1x voices. CC (Control Change) These messages control volume or pan etc. Each controller has its own control number CAT (Channel aftertouch) This message conveys the pressure which is applied to the keyboard after playing a note in order to create tonal changes (for an entire MIDI channel) PAT (Polyphonic aftertouch) This message conveys the pressure that is applied to the keyboard after playing a note (for individual note numbers) RPN (Registered Parameter Number) This message is used to specify part parameters such as Pitch Bend Sensitivity or Tuning etc NRPN (Non Registered Parameter Number) This message is used to set sound parameters such as vibrato or detune, etc. Exc (System Exclusive) A type of MIDI message used to exchange data unique to a specific model or type of device. XG RPN (XG Registered Parameter Number) RPN data using an XG parameter name XG NRPN (XG Non Regitered Parameter Number) NRPN data using an XG parameter name XG Exc System (XG System Exclusive) System Exclusive (XG System) message using an XG parameter name. XG Exc Effect (XG Effect System Exclusive) System Exclusive (XG Effect) message using an XG parameter name. XG Exc Multi (XG Multi part System Exclusive) System Exclusive (XG Multi part) message using an XG parameter name. XG Exc Drum (XG Drum setup System Exclusive) System Exclusive (XG Drum setup) message using an XG parameter name. n • Refer to the "MIDI Data Format" section of the separate List Book for details. • XG is a tone generator format developed by Yamaha which expands the GM specification to provide the richer expressiveness and upward data compatibility that is demanded by today's more sophisticated computer peripheral environment. 100 RM1x SEQUENCE REMIXER
-
 1
1 -
2
-
3
-
4
-
5
-
6
-
7
-
8
-
9
-
10
-
11
-
12
-
13
-
14
-
15
-
16
-
17
-
18
-
19
-
20
-
21
-
22
-
23
-
24
-
25
-
26
-
27
-
28
-
29
-
30
-
31
-
32
-
33
-
34
-
35
-
36
-
37
-
38
-
39
-
40
-
41
-
42
-
43
-
44
-
45
-
46
-
47
-
48
-
49
-
50
-
51
-
52
-
53
-
54
-
55
-
56
-
57
-
58
-
59
-
60
-
61
-
62
-
63
-
64
-
65
-
66
-
67
-
68
-
69
-
70
-
71
-
72
-
73
-
74
-
75
-
76
-
77
-
78
-
79
-
80
-
81
-
82
-
83
-
84
-
85
-
86
-
87
-
88
-
89
-
90
-
91
-
92
-
93
-
94
-
 95
95 -
 96
96 -
 97
97 -
 98
98 -
 99
99 -
 100
100 -
 101
101 -
 102
102 -
 103
103 -
 104
104 -
 105
105 -
106
-
107
-
108
-
109
-
110
-
111
-
112
-
113
-
114
-
115
-
116
-
117
-
118
-
119
-
120
-
121
-
122
-
123
-
124
-
125
-
126
-
127
-
128
-
129
-
130
-
131
-
132
-
133
-
134
-
135
-
136
-
137
-
138
-
139
-
140
-
141
-
142
-
143
-
144
-
145
-
146
-
147
-
148
-
149
-
150
-
151
-
152
-
153
-
154
 |
 |