Yamaha RM1x Owner's Manual - Page 13
OCT DOWN] and [OCT UP] Buttons - midi controller
 |
View all Yamaha RM1x manuals
Add to My Manuals
Save this manual to your list of manuals |
Page 13 highlights
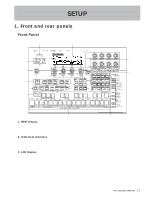
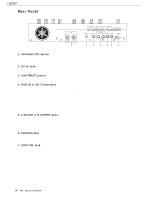
SETUP 12. [EXIT] Button The [EXIT] button takes you out of any function selected by the function buttons, or the edit or job modes (described below), directly back to the current main mode (e.g. SONG or PATTERN). 13. Sequencer Buttons and Indicators The sequencer buttons control recording and playback in the PATTERN, PATTERN CHAIN, and SONG modes. REC e PLAY p STOP s r & f t Activates the record-ready mode in the RM1x PATTERN and SONG modes. The red REC button indicator will light, then recording will begin as soon as the p button is pressed. The e button can be pressed again to cancel the record-ready mode before recording is actually started by pressing the p button. Starts playback from the current point in the pattern or song if the record-ready mode is not active, or recording from the same point if the record-ready mode is active. The green PLAY indicator flashes at the current BPM during recording and playback. Stops playback or recording. Fast reverse and forward. Press the r or f button to rapidly move through the pattern or song in the corresponding direction. Top. Instantly returns to the first beginning of the current song or pattern (i.e. the first beat of the first measure). 14. Keyboard This 26-note keyboard makes it possible to program the RM1x without having to connect an external MIDI keyboard. It's even polyphonic, so you can directly enter chords as well as single notes. The only thing it lacks is velocity sensitivity. The RM1x does, however, accept velocity information from an external MIDI keyboard. The keyboard also performs a range of functions as specified by the keyboard mode button (below): track selection, transposition, numeric data entry, track mute/solo, and section selection. The "black keys" also perform a range of other functions, such as selecting specific track ranges and memorizing a number of track mute setups. 15. Keyboard Mode Buttons These buttons modify the function of the RM1x keyboard for track selection, transposition, numeric data entry, track mute/ solo, and section selection. Details are provided in the "Basic Operation" section beginning on page 23. 16. [OCT DOWN] and [OCT UP] Buttons Although the range of the RM1x keyboard is a little over two octaves, the [OCT DOWN] and [OCT UP] buttons allow the pitch of the keyboard to be shifted down or up in octave steps, over a range of 8 (+/- 4) octaves. Each time the [OCT DOWN] button is pressed the pitch of the keyboard is shifted down by one octave, until the lower limit is reached. The [OCT UP] button shifts the pitch of the keyboard up in the same way. The current amount of octave shift is indicated on the LCD display. 17. [SHIFT] Button The [SHIFT] button is used to access several secondary or "background" functions that you might only need in special situations. For example, the [SHIFT] button can be used when you want to "solo" a track instead of muting it via the [MUTE] keyboard mode button. The [SHIFT] button can also be used in conjunction with the Display Knobs: hold the [SHIFT] button while rotating a knob for faster data selection. 18. [ARPEGGIO ON] Button Turns the RM1x's automatic arpeggio feature on or off (page 62). The [ARPEGGIO ON] button indicator will light when the ARPEGGIO feature is on. 19. [TAP/ENTER] Button This dual-purpose button is used both for tap-entry of BPM values (page 20), and to enter numeric values (page 26). RM1x SEQUENCE REMIXER 13
-
 1
1 -
2
-
3
-
4
-
5
-
6
-
7
-
 8
8 -
 9
9 -
 10
10 -
 11
11 -
 12
12 -
 13
13 -
 14
14 -
 15
15 -
 16
16 -
 17
17 -
 18
18 -
19
-
20
-
21
-
22
-
23
-
24
-
25
-
26
-
27
-
28
-
29
-
30
-
31
-
32
-
33
-
34
-
35
-
36
-
37
-
38
-
39
-
40
-
41
-
42
-
43
-
44
-
45
-
46
-
47
-
48
-
49
-
50
-
51
-
52
-
53
-
54
-
55
-
56
-
57
-
58
-
59
-
60
-
61
-
62
-
63
-
64
-
65
-
66
-
67
-
68
-
69
-
70
-
71
-
72
-
73
-
74
-
75
-
76
-
77
-
78
-
79
-
80
-
81
-
82
-
83
-
84
-
85
-
86
-
87
-
88
-
89
-
90
-
91
-
92
-
93
-
94
-
95
-
96
-
97
-
98
-
99
-
100
-
101
-
102
-
103
-
104
-
105
-
106
-
107
-
108
-
109
-
110
-
111
-
112
-
113
-
114
-
115
-
116
-
117
-
118
-
119
-
120
-
121
-
122
-
123
-
124
-
125
-
126
-
127
-
128
-
129
-
130
-
131
-
132
-
133
-
134
-
135
-
136
-
137
-
138
-
139
-
140
-
141
-
142
-
143
-
144
-
145
-
146
-
147
-
148
-
149
-
150
-
151
-
152
-
153
-
154
 |
 |
