Yamaha RX-V2200 Owner'w Manual - Page 28
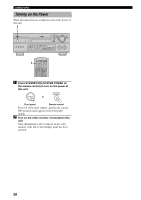
from each speaker is the, When the adjustment is
 |
View all Yamaha RX-V2200 manuals
Add to My Manuals
Save this manual to your list of manuals |
Page 28 highlights
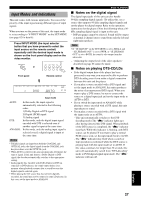
ADJUSTING THE SPEAKER OUTPUT LEVELS LEFT RIGHT CENTER LEFT SURROUND RIGHT SURROUND REAR CENTER The state of the test tone output is also shown on the monitor by an image of the audio listening room. This is convenient for adjusting each speaker level. TEST DOLBY SUR. LEFT Front panel display also indicates from which speaker the test tone is output in the order of TEST LEFT¡TEST CENTER¡TEST RIGHT¡ TEST R SUR.¡TEST REAR CNTR¡TEST L SUR. Note • If the test tone cannot be heard, turn down the volume, set this unit in the standby mode and check the speaker connections. 3 Press -/+ repeatedly to adjust the output level of the effect speakers so that the output level coming from each speaker is the same. While adjusting, the test tone is heard from the selected speaker. y • You can stop the sequence temporarily by holding down k / n. 4 When the adjustment is TEST complete, press TEST to stop the test tone. Notes • The tonal quality of the center speaker can be adjusted by using "5 CENTER GEQ" on the SET MENU (see page 60). • If "1A CENTER SP" on the SET MENU is set to NONE, the center channel sound is automatically output from the left and right main speakers. • If "1C REAR L/R SP" on the SET MENU is set to NONE, the output level of the rear right, left and center speakers cannot be adjusted in step 3. The test tone will be circulated in the order of LEFT¡CENTER¡RIGHT¡LEFT..., skipping the rear right and left speakers and the rear center speaker. • If "1D REAR CT SP" on the SET MENU is set to NONE, the out level of the rear center speaker cannot be adjusted in step 3. The test tone will be circulated in the order of LEFT¡CENTER¡RIGHT¡RIGHT SURROUND¡LEFT SURROUND¡LEFT ..., skipping the rear center speaker. y • It is not necessary to readjust the speaker level once it is set as long as you do not change the speakers. You can enjoy listening to or watching the input source with the desired volume by adjusting the volume key. • You can increase the output levels of the effect speakers (center, left rear and right rear and rear center) to +10 dB. If the output level of these speakers is lower than that of the main speakers even after you have increased the output level of these speakers up to +10 dB, set "1F MAIN LEVEL" on the SET MENU to -10 dB (see page 59). This setting decreases the main speaker output level to about one-third of the normal level. After you have set "1F MAIN LEVEL" on the SET MENU to -10 dB, adjust the levels for the center and rear speakers again. 24
-
 1
1 -
2
-
3
-
4
-
5
-
6
-
7
-
8
-
9
-
10
-
11
-
12
-
13
-
14
-
15
-
16
-
17
-
18
-
19
-
20
-
21
-
22
-
 23
23 -
 24
24 -
 25
25 -
 26
26 -
 27
27 -
 28
28 -
 29
29 -
 30
30 -
 31
31 -
 32
32 -
 33
33 -
34
-
35
-
36
-
37
-
38
-
39
-
40
-
41
-
42
-
43
-
44
-
45
-
46
-
47
-
48
-
49
-
50
-
51
-
52
-
53
-
54
-
55
-
56
-
57
-
58
-
59
-
60
-
61
-
62
-
63
-
64
-
65
-
66
-
67
-
68
-
69
-
70
-
71
-
72
-
73
-
74
-
75
-
76
-
77
-
78
-
79
-
80
-
81
-
82
-
83
-
84
-
85
-
86
-
87
-
88
 |
 |
