Yamaha SW1000XG SW1000XG Owners Manual - Page 36
Insert Dialog, Audio Part Unit
 |
View all Yamaha SW1000XG manuals
Add to My Manuals
Save this manual to your list of manuals |
Page 36 highlights
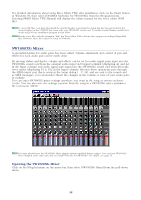
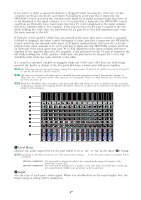
5 Send Button When you click on this button, the setting information in the SW1000XG Mixer is sent as MIDI data through the MIDI output port selected in the Setup dialog (→ P. 34) to the XG tone generator (sound card). 6 Insert Button Opens the Insert Dialog. The parameter settings made in the SW1000XG Mixer will be inserted/entered into the song as system exclusive data events. Insert Dialog Track Select the track for insertion. This is connected to "Track" on the setup dialog (→ P. 34). Meas Specify the measure for insertion. Beat Specify the insertion position in beat units. Clock Specify the insertion position in clock units. Interval Time ......When multiple events are being inserted, specify the insertion interval from event to event in clock units. Offset When you check the box by clicking on it, only event parameter settings that are different than the initial SW1000XG Mixer settings will be inserted into the song as events. This avoids having the song data become too loaded with repeated insertions of events with the same values. n When inserting events in the song using Offset, a SW1000XG Mixer initial settings event must be previously inserted at the beginning of the song. After specifying the track for insertion in the Track box, specify the position in the song using Meas (measure), Beat, and Clock units, and click the [OK] button. The current effect, pan, and volume settings will be inserted as events in the specified track at the specified location. To cancel the operation before finishing it, click [Cancel]. The dialog will close, and the events will not be inserted. 7 Record Button When this button is clicked, song playback will begin (from the current location), and at the same time, recording of every parameter for the SW1000XG Mixer (knob or slider) operation will begin. When this button is again clicked, song playback and recording of parameter operations will stop. During recording, every movement of a knob or slider will be recorded. When you want parameters like pan and volume are changed continuously, this function is extremely useful because it lets you record smooth changes in the values. Audio Part Unit The knobs and sliders for the various audio part settings, like volume, pan, and effects are arranged vertically for each part. From left to right: Part 1, Part 2, Part 3, and so on. The part on the far right side is part 14. Each control can be easily adjusted by clicking or dragging with the mouse. 36
-
 1
1 -
2
-
3
-
4
-
5
-
6
-
7
-
8
-
9
-
10
-
11
-
12
-
13
-
14
-
15
-
16
-
17
-
18
-
19
-
20
-
21
-
22
-
23
-
24
-
25
-
26
-
27
-
28
-
29
-
30
-
 31
31 -
 32
32 -
 33
33 -
 34
34 -
 35
35 -
 36
36 -
 37
37 -
 38
38 -
 39
39 -
 40
40 -
 41
41 -
42
-
43
-
44
-
45
-
46
-
47
-
48
 |
 |
