Yamaha YSP 1000 Owner's Manual - Page 37
Parallel to Wall, MOUNTING Mounting
 |
UPC - 027108924274
View all Yamaha YSP 1000 manuals
Add to My Manuals
Save this manual to your list of manuals |
Page 37 highlights
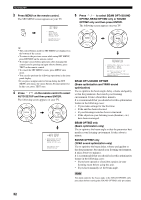
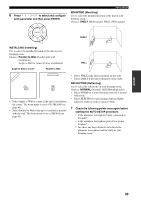
6 Press / / / to select and configure each parameter and then press ENTER. AUTO SETUP MOUNTING (Mounting) Use to select the mounted position of the unit in your listening room. Choices: SHELF (Shelf mount), WALL (Wall mount) ENTER SHELF INSTALLING (Installing) Use to select the installed position of the unit in your listening room. Choices: Parallel to Wall (Parallel with wall installation), Angle to Wall or corner (Corner installation) Angle to Wall or corner Parallel to Wall WALL • Select Angle to Wall or corner if the unit is installed in the corner. The beam mode is set to ST+3BEAM (see page 43). • Select Parallel to Wall if the unit is installed in parallel with the wall. The beam mode is set to 5BEAM (see page 43). • Select WALL if the unit is mounted on the wall. • Select SHELF if the unit is mounted on the shelf. REFLECTING (Reflecting) Use to select the reflectivity of your listening room. Choices: NORMAL (Normal), HI ECHO (High echo) • Select NORMAL if your listening room has a normal reflectivity. • Select HI ECHO if your listening room has highly reflective surfaces such as concrete walls. 7 Check the following points once again before starting the AUTO SETUP procedure. • Is the optimizer microphone firmly connected to this unit? • Is the optimizer microphone placed in a proper location? • Are there any large obstacles in between the optimizer microphone and the walls in your listening room? SETUP 33
-
 1
1 -
2
-
3
-
4
-
5
-
6
-
7
-
8
-
9
-
10
-
11
-
12
-
13
-
14
-
15
-
16
-
17
-
18
-
19
-
20
-
21
-
22
-
23
-
24
-
25
-
26
-
27
-
28
-
29
-
30
-
31
-
 32
32 -
 33
33 -
 34
34 -
 35
35 -
 36
36 -
 37
37 -
 38
38 -
 39
39 -
 40
40 -
 41
41 -
 42
42 -
43
-
44
-
45
-
46
-
47
-
48
-
49
-
50
-
51
-
52
-
53
-
54
-
55
-
56
-
57
-
58
-
59
-
60
-
61
-
62
-
63
-
64
-
65
-
66
-
67
-
68
-
69
-
70
-
71
-
72
-
73
-
74
-
75
-
76
-
77
-
78
-
79
-
80
-
81
-
82
-
83
-
84
-
85
-
86
-
87
-
88
-
89
-
90
-
91
-
92
-
93
-
94
-
95
-
96
-
97
-
98
-
99
-
100
-
101
-
102
-
103
-
104
-
105
-
106
 |
 |
