Yamaha YSP 1000 Owner's Manual - Page 88
Test Left, Test Center, Test Right, Test Sur.r, Test Subwoofer, Front L +1.0db, Center -2.5db, Sur.r
 |
UPC - 027108924274
View all Yamaha YSP 1000 manuals
Add to My Manuals
Save this manual to your list of manuals |
Page 88 highlights
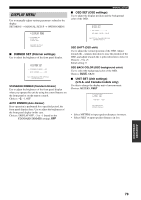
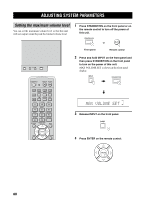
ADJUSTING SYSTEM PARAMETERS 2 Press / to select the speaker you want to adjust. The front panel display changes as follows. ■ Using the audio output being played back You can also manually adjust the speaker levels while playing back an input source such as a DVD. ENTER TEST LEFT TEST CENTER TEST RIGHT TEST SUR.R TEST SUR.L Notes • All the speaker levels cannot be adjusted when the stereo mode is selected as the beam mode (see page 44). • FRONT L/R cannot be adjusted when the stereo plus 3 mode is selected as the beam mode (see page 43). • Only CENTER can be adjusted when the target mode is selected as the beam mode (see page 45). SPORTS 0 OFF +10 SURROUND CH LEVEL CINEMA DSP MENU TEST SUBWOOFER Note TEST SUBWOOFER is only available when a subwoofer is connected to this unit and SWFR is selected for BASS OUT in SOUND MENU (see page 75). 3 Press / to adjust speaker volumes. TEST ENTER RETURN 1 Press CH LEVEL repeatedly (or press CH LEVEL and then / ) to select the speaker you want to adjust. The front panel display changes as follows. CH LEVEL ENTER or Control range: -10 dB to +10 dB 4 Press VOLUME +/- on the remote control to adjust the volume level of this unit. VOLUME 5 Press TEST when you have completed all your adjustments. TEST y To adjust the output level of your subwoofer, set BASS OUT to BOTH or SWFR (page 75). CH LEVEL ENTER FRONT L +1.0dB CENTER -2.5dB FRONT R +1.0dB SUR.R +2.0dB SUR.L +2.0dB SWFR --dB 84
-
 1
1 -
2
-
3
-
4
-
5
-
6
-
7
-
8
-
9
-
10
-
11
-
12
-
13
-
14
-
15
-
16
-
17
-
18
-
19
-
20
-
21
-
22
-
23
-
24
-
25
-
26
-
27
-
28
-
29
-
30
-
31
-
32
-
33
-
34
-
35
-
36
-
37
-
38
-
39
-
40
-
41
-
42
-
43
-
44
-
45
-
46
-
47
-
48
-
49
-
50
-
51
-
52
-
53
-
54
-
55
-
56
-
57
-
58
-
59
-
60
-
61
-
62
-
63
-
64
-
65
-
66
-
67
-
68
-
69
-
70
-
71
-
72
-
73
-
74
-
75
-
76
-
77
-
78
-
79
-
80
-
81
-
82
-
 83
83 -
 84
84 -
 85
85 -
 86
86 -
 87
87 -
 88
88 -
 89
89 -
 90
90 -
 91
91 -
 92
92 -
 93
93 -
94
-
95
-
96
-
97
-
98
-
99
-
100
-
101
-
102
-
103
-
104
-
105
-
106
 |
 |
