ZyXEL PLA450 v2 Quick Start Guide - Page 13
only access your network if it has the correct, to set your
 |
View all ZyXEL PLA450 v2 manuals
Add to My Manuals
Save this manual to your list of manuals |
Page 13 highlights
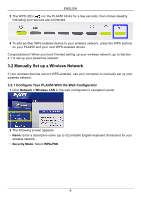
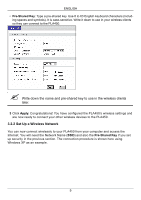
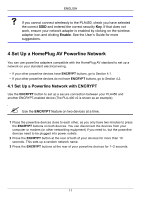
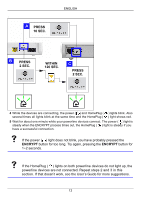
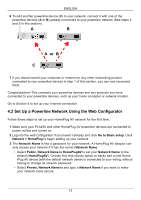
ENGLISH 6 To add another powerline device (C) to your network, connect it with one of the powerline devices (A or B) already connected to your powerline network (See steps 2 and 3 in this section). A B A or B C 7 If you disconnected your computer or modem (or any other networking product connected to your powerline device) in step 1 of this section, you can now reconnect them. Congratulations! This connects your powerline devices and any products you have connected to your powerline devices, such as your home computer or network modem. Go to Section 5 to set up your Internet connection. 4.2 Set Up a Powerline Network Using the Web Configurator Follow these steps to set up your HomePlug AV network for the first time. 1 Make sure your PLA450 and other HomePlug AV powerline devices are connected to power outlets and turned on. 2 Log into the web configurator if you haven't already and click Go to Basic setup. Click Network > HomePlug to begin setting up your network. 3 The Network Name is like a password for your network. A HomePlug AV adaptor can only access your network if it has the correct Network Name. • Select Public, Network Name is HomePlugAV to set your Network Name to the default (HomePlugAV). Choose this less secure option to easily add a new HomePlug AV device (with the default network name) is connected to your wiring, without having to change its network password. • Select Private, Network Name is and type a Network Name if you want to make your network more secure. 13
-
 1
1 -
2
-
3
-
4
-
5
-
6
-
7
-
 8
8 -
 9
9 -
 10
10 -
 11
11 -
 12
12 -
 13
13 -
 14
14 -
 15
15 -
 16
16 -
 17
17 -
 18
18 -
19
-
20
-
21
-
22
-
23
-
24
-
25
-
26
-
27
-
28
-
29
-
30
-
31
-
32
-
33
-
34
-
35
-
36
-
37
-
38
-
39
-
40
-
41
-
42
-
43
-
44
-
45
-
46
-
47
-
48
-
49
-
50
-
51
-
52
-
53
-
54
-
55
-
56
-
57
-
58
-
59
-
60
-
61
-
62
-
63
-
64
-
65
-
66
-
67
-
68
-
69
-
70
-
71
-
72
-
73
-
74
-
75
-
76
-
77
-
78
-
79
-
80
-
81
-
82
-
83
-
84
-
85
-
86
-
87
-
88
-
89
-
90
-
91
-
92
-
93
-
94
-
95
-
96
-
97
-
98
-
99
-
100
-
101
-
102
-
103
 |
 |
