ZyXEL PLA450 v2 Quick Start Guide - Page 15
Set Your PLA450's IP Address, Add New Member, Troubleshooting, Network > LAN, Get from DHCP Server - firmware
 |
View all ZyXEL PLA450 v2 manuals
Add to My Manuals
Save this manual to your list of manuals |
Page 15 highlights
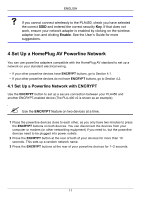
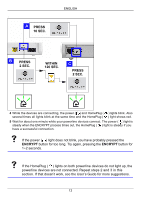
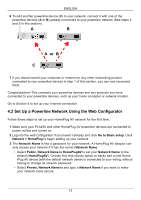
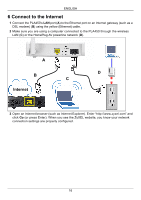
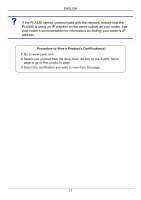
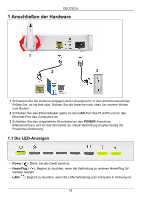
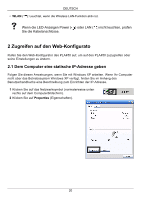
ENGLISH • If a device fails to appear in the table, try adding it in the Add New Member section. See Troubleshooting for more suggestions. 8 When you are finished setting up your powerline network, connect your powerline adapters to the devices you want on your network, such as computers and a router for connection to the Internet. See the diagram on page 3 for an example. 9 Congratulations! You have set up your powerline network. Go to the next section to configure your PLA450's IP address. V If you cannot access the powerline network, make sure that the network password is the same on all of your powerline adapters and that the DAKs for your powerline devices are typed correctly. If that doesn't work, make sure your powerline adapters are HomePlug AV compliant and have the latest firmware installed. See the User's Guide for more suggestions. 5 Set Your PLA450's IP Address Set your PLA450's IP address to be on your network. 1 Click Network > LAN in the navigation panel. • Select Get from DHCP Server to get an IP address from a DHCP server on your network. If you have a router, it likely includes a DHCP server function. • To use a specific (fixed) IP address, select User Defined LAN IP and enter it. You only need to change the subnet mask or default gateway if you have specific ones for the PLA450 to use. 2 Click Apply. Use the PLA450's new IP settings to connect to it. 3 Return your computer's IP address/subnet mask to their previous settings before you changed them in section 2.1. The PLA450 is now ready to connect to your switch or router. 15
-
 1
1 -
2
-
3
-
4
-
5
-
6
-
7
-
8
-
9
-
 10
10 -
 11
11 -
 12
12 -
 13
13 -
 14
14 -
 15
15 -
 16
16 -
 17
17 -
 18
18 -
 19
19 -
 20
20 -
21
-
22
-
23
-
24
-
25
-
26
-
27
-
28
-
29
-
30
-
31
-
32
-
33
-
34
-
35
-
36
-
37
-
38
-
39
-
40
-
41
-
42
-
43
-
44
-
45
-
46
-
47
-
48
-
49
-
50
-
51
-
52
-
53
-
54
-
55
-
56
-
57
-
58
-
59
-
60
-
61
-
62
-
63
-
64
-
65
-
66
-
67
-
68
-
69
-
70
-
71
-
72
-
73
-
74
-
75
-
76
-
77
-
78
-
79
-
80
-
81
-
82
-
83
-
84
-
85
-
86
-
87
-
88
-
89
-
90
-
91
-
92
-
93
-
94
-
95
-
96
-
97
-
98
-
99
-
100
-
101
-
102
-
103
 |
 |
