2005 Lexus GX 470 Navigation Manual - Page 39
2005 Lexus GX 470 Manual

Page 39 highlights
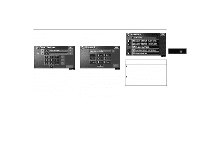
DESTINATION INPUT AND ROUTE GUIDANCE - Destination input by "Coordinates" Touch the "Coordinates" switch on the "Destination" screen. - Destination input by "Phone #" Touch the "Phone "Destination" screen. #" switch on the INFORMATION D If there is no match for the telephone number inputted, a list of identical numbers but with different area codes will be displayed. D To set a memory point as a destination using the phone number, the number must be registered previously. (See page 74.) Input the latitude and the longitude. When the input is finished, touch the "OK" switch. When you touch the switch of the desired point, the screen changes and displays the map location of the selected destination and the route preference. (See " - Entering destination" on page 40.) Input a telephone number. After inputting a telephone number, touch the "OK" switch, and the screen changes and displays the map location of the selected destination and the road preference. (See " - Entering destination" on page 40.) If there is more than one site having the same number, the following screen appears. 39
-
 1
1 -
2
-
3
-
4
-
5
-
6
-
7
-
8
-
9
-
10
-
11
-
12
-
13
-
14
-
15
-
16
-
17
-
18
-
19
-
20
-
21
-
22
-
23
-
24
-
25
-
26
-
27
-
28
-
29
-
30
-
31
-
32
-
33
-
 34
34 -
 35
35 -
 36
36 -
 37
37 -
 38
38 -
 39
39 -
 40
40 -
 41
41 -
 42
42 -
 43
43 -
 44
44 -
45
-
46
-
47
-
48
-
49
-
50
-
51
-
52
-
53
-
54
-
55
-
56
-
57
-
58
-
59
-
60
-
61
-
62
-
63
-
64
-
65
-
66
-
67
-
68
-
69
-
70
-
71
-
72
-
73
-
74
-
75
-
76
-
77
-
78
-
79
-
80
-
81
-
82
-
83
-
84
-
85
-
86
-
87
-
88
-
89
-
90
-
91
-
92
-
93
-
94
-
95
-
96
-
97
-
98
-
99
-
100
-
101
-
102
-
103
-
104
-
105
-
106
-
107
-
108
-
109
-
110
-
111
-
112
-
113
-
114
-
115
-
116
-
117
-
118
-
119
-
120
-
121
-
122
-
123
-
124
-
125
-
126
-
127
-
128
-
129
-
130
-
131
-
132
-
133
-
134
-
135
-
136
-
137
-
138
-
139
-
140
-
141
-
142
-
143
-
144
-
145
-
146
-
147
-
148
-
149
-
150
-
151
-
152
-
153
-
154
-
155
-
156
-
157
-
158
-
159
-
160
-
161
-
162
-
163
-
164
-
165
-
166
-
167
-
168
-
169
-
170
-
171
-
172
-
173
-
174
-
175
-
176
-
177
-
178
-
179
-
180
-
181
-
182
-
183
-
184
-
185
-
186
-
187
-
188
-
189
-
190
-
191
-
192
-
193
-
194
-
195
 |
 |
