2006 Lexus GS 300 User Guide - Page 47
2006 Lexus GS 300 Manual
Page 47 highlights
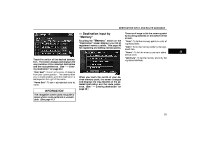
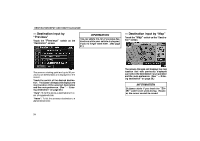
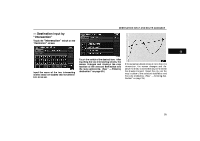
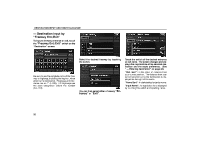
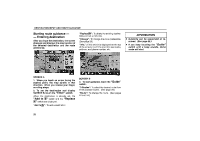
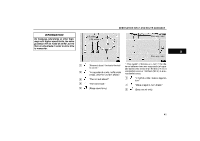
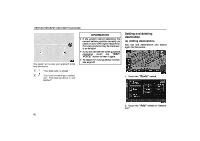
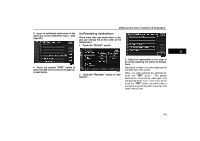
DESTINATION INPUT AND ROUTE GUIDANCE Starting route guidance - - Entering destination After you input the destination, the screen changes and displays the map location of the selected destination and the route preference. "Replace ": To delete the existing destinations and set a new one. "Change": To change the route preference. (See page 39.) "Info.": If this switch is displayed on the top of the screen, touch the switch to see name, address, and phone number, etc. INFORMATION D Guidance can be suspended or resumed. (See page 62.) D If you keep touching the "Guide" switch until a beep sounds, Demo mode will start. SCREEN A 1. When you touch an arrow facing the desired point, the map scrolls in that direction. When you release your finger, scrolling stops. 2. To set the destination and display SCREEN B, touch the "Enter" switch. When the destination is already set, the "Add to " switch and the "Replace " switch are displayed. "Add to ": To add a destination. SCREEN B 3. To start guidance, touch the "Guide" switch. "3 Routes": To select the desired route from three possible routes. (See page 39.) "Route": To change the route. (See pages 42 and 44.) 38
-
 1
1 -
2
-
3
-
4
-
5
-
6
-
7
-
8
-
9
-
10
-
11
-
12
-
13
-
14
-
15
-
16
-
17
-
18
-
19
-
20
-
21
-
22
-
23
-
24
-
25
-
26
-
27
-
28
-
29
-
30
-
31
-
32
-
33
-
34
-
35
-
36
-
37
-
38
-
39
-
40
-
41
-
 42
42 -
 43
43 -
 44
44 -
 45
45 -
 46
46 -
 47
47 -
 48
48 -
 49
49 -
 50
50 -
 51
51 -
 52
52 -
53
-
54
-
55
-
56
-
57
-
58
-
59
-
60
-
61
-
62
-
63
-
64
-
65
-
66
-
67
-
68
-
69
-
70
-
71
-
72
-
73
-
74
-
75
-
76
-
77
-
78
-
79
-
80
-
81
-
82
-
83
-
84
-
85
-
86
-
87
-
88
-
89
-
90
-
91
-
92
-
93
-
94
-
95
-
96
-
97
-
98
-
99
-
100
-
101
-
102
-
103
-
104
-
105
-
106
-
107
-
108
-
109
-
110
-
111
-
112
-
113
-
114
-
115
-
116
-
117
-
118
-
119
-
120
-
121
-
122
-
123
-
124
-
125
-
126
-
127
-
128
-
129
-
130
-
131
-
132
-
133
 |
 |
