2006 Lincoln Navigator Owner Guide 2nd Printing - Page 40
2006 Lincoln Navigator Manual
Page 40 highlights
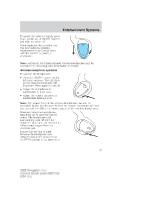
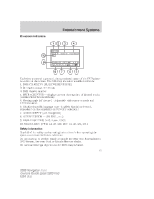
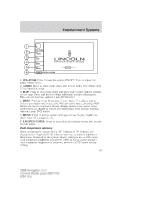
Entertainment Systems • DVDs are formatted by regions. This DVD system can only play region 1 DVDs (DVDs manufactured for U.S. and Canada). This unit is designed to play commercially pressed 4.75 in (12 cm) audio compact discs and DVDs only. Due to technical incompatibility, certain recordable and re-recordable compact discs may not function correctly when used in Ford DVD/CD players. Irregular shaped discs, discs with a scratch protection film attached, and discs with homemade paper (adhesive) labels should not be inserted into the player. The label may peel and cause the disc to become jammed. It is recommended that homemade discs be identified with permanent felt tip marker rather than adhesive labels. Ballpoint pens may damage discs. Please contact your dealer for further information. Inserting a CD/DVD Partially insert the CD/DVD into the slot and the system will fully pull in the disc. Inserting the disc too far could cause the disc to jam in the system. Inserting a CD/DVD into the DVD player automatically turns the power ON and playback should begin. The counter is automatically reset to 0:00:00. Removing a CD/DVD 1. Press the STOP/EJECT control to stop playback. 2. Press the STOP/EJECT control again to eject the CD/DVD. If the CD/DVD is not removed within the allotted time, the system will pull the CD/DVD back into the system for safety purposes. If the CD/DVD will not eject from the system, press and hold the EJECT control for approximately 2 seconds. The disc should eject whether the vehicle ignition is ON or OFF. Playing an auxiliary device 1. Connect the video line from your video device to the YELLOW auxiliary input jack. 2. Connect the left and right audio lines to the WHITE and RED auxiliary input jacks respectively. 3. Press the MODE control until DVD/CD AUX (no disc in player) or DVD/CD play (disc in player) illuminates in the radio display. If a disc is in the system, playback should begin. To enable the aux inputs, press the STOP control or press the AUX control on the DVD player. 40 2006 Navigator (nav) Owners Guide (post-2002-fmt) USA (fus)
-
 1
1 -
2
-
3
-
4
-
5
-
6
-
7
-
8
-
9
-
10
-
11
-
12
-
13
-
14
-
15
-
16
-
17
-
18
-
19
-
20
-
21
-
22
-
23
-
24
-
25
-
26
-
27
-
28
-
29
-
30
-
31
-
32
-
33
-
34
-
 35
35 -
 36
36 -
 37
37 -
 38
38 -
 39
39 -
 40
40 -
 41
41 -
 42
42 -
 43
43 -
 44
44 -
 45
45 -
46
-
47
-
48
-
49
-
50
-
51
-
52
-
53
-
54
-
55
-
56
-
57
-
58
-
59
-
60
-
61
-
62
-
63
-
64
-
65
-
66
-
67
-
68
-
69
-
70
-
71
-
72
-
73
-
74
-
75
-
76
-
77
-
78
-
79
-
80
-
81
-
82
-
83
-
84
-
85
-
86
-
87
-
88
-
89
-
90
-
91
-
92
-
93
-
94
-
95
-
96
-
97
-
98
-
99
-
100
-
101
-
102
-
103
-
104
-
105
-
106
-
107
-
108
-
109
-
110
-
111
-
112
-
113
-
114
-
115
-
116
-
117
-
118
-
119
-
120
-
121
-
122
-
123
-
124
-
125
-
126
-
127
-
128
-
129
-
130
-
131
-
132
-
133
-
134
-
135
-
136
-
137
-
138
-
139
-
140
-
141
-
142
-
143
-
144
-
145
-
146
-
147
-
148
-
149
-
150
-
151
-
152
-
153
-
154
-
155
-
156
-
157
-
158
-
159
-
160
-
161
-
162
-
163
-
164
-
165
-
166
-
167
-
168
-
169
-
170
-
171
-
172
-
173
-
174
-
175
-
176
-
177
-
178
-
179
-
180
-
181
-
182
-
183
-
184
-
185
-
186
-
187
-
188
-
189
-
190
-
191
-
192
-
193
-
194
-
195
-
196
-
197
-
198
-
199
-
200
-
201
-
202
-
203
-
204
-
205
-
206
-
207
-
208
-
209
-
210
-
211
-
212
-
213
-
214
-
215
-
216
-
217
-
218
-
219
-
220
-
221
-
222
-
223
-
224
-
225
-
226
-
227
-
228
-
229
-
230
-
231
-
232
-
233
-
234
-
235
-
236
-
237
-
238
-
239
-
240
-
241
-
242
-
243
-
244
-
245
-
246
-
247
-
248
-
249
-
250
-
251
-
252
-
253
-
254
-
255
-
256
-
257
-
258
-
259
-
260
-
261
-
262
-
263
-
264
-
265
-
266
-
267
-
268
-
269
-
270
-
271
-
272
-
273
-
274
-
275
-
276
-
277
-
278
-
279
-
280
-
281
-
282
-
283
-
284
-
285
-
286
-
287
-
288
-
289
-
290
-
291
-
292
-
293
-
294
-
295
-
296
-
297
-
298
-
299
-
300
-
301
-
302
-
303
-
304
-
305
-
306
-
307
-
308
-
309
-
310
-
311
-
312
-
313
-
314
-
315
-
316
-
317
-
318
-
319
-
320
-
321
-
322
-
323
-
324
-
325
-
326
-
327
-
328
-
329
-
330
-
331
-
332
-
333
-
334
-
335
-
336
-
337
-
338
-
339
-
340
-
341
-
342
-
343
-
344
-
345
-
346
-
347
-
348
-
349
-
350
-
351
-
352
-
353
-
354
-
355
-
356
-
357
-
358
-
359
-
360
-
361
-
362
-
363
-
364
-
365
-
366
-
367
-
368
-
369
-
370
-
371
-
372
-
373
-
374
-
375
-
376
-
377
-
378
-
379
-
380
-
381
-
382
-
383
-
384
-
385
-
386
-
387
-
388
-
389
-
390
-
391
-
392
 |
 |