1997 Mercury Grand Marquis Owner Guide 1st Printing - Page 194
1997 Mercury Grand Marquis Manual

Page 194 highlights
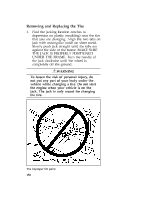
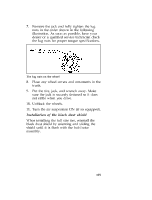
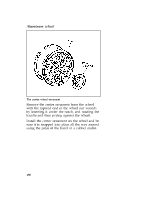
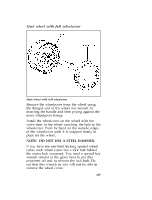
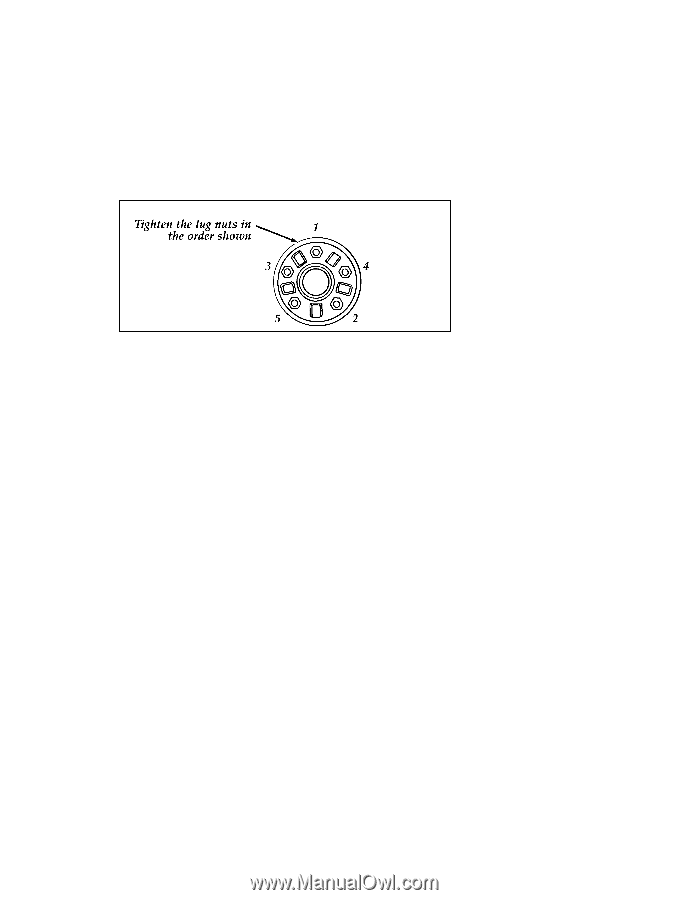
7. Remove the jack and fully tighten the lug nuts in the order shown in the following illustration. As soon as possible, have your dealer or a qualified service technician check the lug nuts for proper torque specifications. The lug nuts on the wheel 8. 9. Place any wheel covers and ornaments in the trunk. Put the tire, jack, and wrench away. Make sure the jack is securely fastened so it does not rattle when you drive. 10. Unblock the wheels. 11. Turn the air suspension ON (if so equipped). Installation of the black dust shield When installing the full size tire, reinstall the black dust shield by orienting and sliding the shield until it is flush with the hub/rotor assembly. 195
-
 1
1 -
2
-
3
-
4
-
5
-
6
-
7
-
8
-
9
-
10
-
11
-
12
-
13
-
14
-
15
-
16
-
17
-
18
-
19
-
20
-
21
-
22
-
23
-
24
-
25
-
26
-
27
-
28
-
29
-
30
-
31
-
32
-
33
-
34
-
35
-
36
-
37
-
38
-
39
-
40
-
41
-
42
-
43
-
44
-
45
-
46
-
47
-
48
-
49
-
50
-
51
-
52
-
53
-
54
-
55
-
56
-
57
-
58
-
59
-
60
-
61
-
62
-
63
-
64
-
65
-
66
-
67
-
68
-
69
-
70
-
71
-
72
-
73
-
74
-
75
-
76
-
77
-
78
-
79
-
80
-
81
-
82
-
83
-
84
-
85
-
86
-
87
-
88
-
89
-
90
-
91
-
92
-
93
-
94
-
95
-
96
-
97
-
98
-
99
-
100
-
101
-
102
-
103
-
104
-
105
-
106
-
107
-
108
-
109
-
110
-
111
-
112
-
113
-
114
-
115
-
116
-
117
-
118
-
119
-
120
-
121
-
122
-
123
-
124
-
125
-
126
-
127
-
128
-
129
-
130
-
131
-
132
-
133
-
134
-
135
-
136
-
137
-
138
-
139
-
140
-
141
-
142
-
143
-
144
-
145
-
146
-
147
-
148
-
149
-
150
-
151
-
152
-
153
-
154
-
155
-
156
-
157
-
158
-
159
-
160
-
161
-
162
-
163
-
164
-
165
-
166
-
167
-
168
-
169
-
170
-
171
-
172
-
173
-
174
-
175
-
176
-
177
-
178
-
179
-
180
-
181
-
182
-
183
-
184
-
185
-
186
-
187
-
188
-
 189
189 -
 190
190 -
 191
191 -
 192
192 -
 193
193 -
 194
194 -
 195
195 -
 196
196 -
 197
197 -
 198
198 -
 199
199 -
200
-
201
-
202
-
203
-
204
-
205
-
206
-
207
-
208
-
209
-
210
-
211
-
212
-
213
-
214
-
215
-
216
-
217
-
218
-
219
-
220
-
221
-
222
-
223
-
224
-
225
-
226
-
227
-
228
-
229
-
230
-
231
-
232
-
233
-
234
-
235
-
236
-
237
-
238
-
239
-
240
-
241
-
242
-
243
-
244
-
245
-
246
-
247
-
248
-
249
-
250
-
251
-
252
-
253
-
254
-
255
-
256
-
257
-
258
-
259
-
260
-
261
-
262
-
263
-
264
-
265
-
266
-
267
-
268
-
269
-
270
-
271
-
272
-
273
-
274
-
275
-
276
-
277
-
278
-
279
-
280
-
281
-
282
-
283
-
284
-
285
-
286
-
287
-
288
-
289
-
290
-
291
-
292
-
293
-
294
-
295
-
296
-
297
-
298
-
299
-
300
-
301
-
302
-
303
-
304
-
305
 |
 |
195
7.
Remove the jack and fully tighten the lug
nuts in the order shown in the following
illustration. As soon as possible, have your
dealer or a qualified service technician check
the lug nuts for proper torque specifications.
The lug nuts on the wheel
8.
Place any wheel covers and ornaments in the
trunk.
9.
Put the tire, jack, and wrench away. Make
sure the jack is securely fastened so it does
not rattle when you drive.
10. Unblock the wheels.
11. Turn the air suspension ON (if so equipped).
Installation of the black dust shield
When installing the full size tire, reinstall the
black dust shield by orienting and sliding the
shield until it is flush with the hub/rotor
assembly.