2006 Saab 9-5 Owner's Manual - Page 251
2006 Saab 9-5 Manual
Page 251 highlights
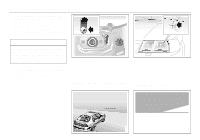
Car care and technical information • The vehicle should be fully assembled and all other work stopped while headlight aiming is being done. • The vehicle should not have any snow, ice or mud attached to it. • Tires should be inflated to the prescribed pressure. • Close all doors. • Rock the vehicle to stabilize the suspension. Headlight aiming is done with the vehicle low beam lamps. The high beam lamps will be correctly aimed if the low beam lamps are aimed properly. 251 1 2 IB1950 4 1 2 3 4 3 Wall or garage door 25 ft (7.6 m) between wall and headlight lens. Measurement from the ground to the low beam aiming marker on the headlight lens. Same measurement as (3) but substract 2 inches for vehicles with halogen lamps and 3 inches for vehicles with xenon lamps. If you find that the headlight needs adjustment follow these steps: 1 Open the hood and locate the vertical aiming device. 2 Locate the marker on the lens. 3 Measure the distance from the ground to the aim marker on each lens. Subtract 2 inches if the vehicle is equipped with halogen lamps, record this distance. Subtract 3 inches if the vehicle is equipped with xenon lamps, record this distance. 4 At the wall or other flat surface, measure from the ground to the recorded distance (see point 4) and draw a horizontal line the width of the vehicle.
-
 1
1 -
2
-
3
-
4
-
5
-
6
-
7
-
8
-
9
-
10
-
11
-
12
-
13
-
14
-
15
-
16
-
17
-
18
-
19
-
20
-
21
-
22
-
23
-
24
-
25
-
26
-
27
-
28
-
29
-
30
-
31
-
32
-
33
-
34
-
35
-
36
-
37
-
38
-
39
-
40
-
41
-
42
-
43
-
44
-
45
-
46
-
47
-
48
-
49
-
50
-
51
-
52
-
53
-
54
-
55
-
56
-
57
-
58
-
59
-
60
-
61
-
62
-
63
-
64
-
65
-
66
-
67
-
68
-
69
-
70
-
71
-
72
-
73
-
74
-
75
-
76
-
77
-
78
-
79
-
80
-
81
-
82
-
83
-
84
-
85
-
86
-
87
-
88
-
89
-
90
-
91
-
92
-
93
-
94
-
95
-
96
-
97
-
98
-
99
-
100
-
101
-
102
-
103
-
104
-
105
-
106
-
107
-
108
-
109
-
110
-
111
-
112
-
113
-
114
-
115
-
116
-
117
-
118
-
119
-
120
-
121
-
122
-
123
-
124
-
125
-
126
-
127
-
128
-
129
-
130
-
131
-
132
-
133
-
134
-
135
-
136
-
137
-
138
-
139
-
140
-
141
-
142
-
143
-
144
-
145
-
146
-
147
-
148
-
149
-
150
-
151
-
152
-
153
-
154
-
155
-
156
-
157
-
158
-
159
-
160
-
161
-
162
-
163
-
164
-
165
-
166
-
167
-
168
-
169
-
170
-
171
-
172
-
173
-
174
-
175
-
176
-
177
-
178
-
179
-
180
-
181
-
182
-
183
-
184
-
185
-
186
-
187
-
188
-
189
-
190
-
191
-
192
-
193
-
194
-
195
-
196
-
197
-
198
-
199
-
200
-
201
-
202
-
203
-
204
-
205
-
206
-
207
-
208
-
209
-
210
-
211
-
212
-
213
-
214
-
215
-
216
-
217
-
218
-
219
-
220
-
221
-
222
-
223
-
224
-
225
-
226
-
227
-
228
-
229
-
230
-
231
-
232
-
233
-
234
-
235
-
236
-
237
-
238
-
239
-
240
-
241
-
242
-
243
-
244
-
245
-
 246
246 -
 247
247 -
 248
248 -
 249
249 -
 250
250 -
 251
251 -
 252
252 -
 253
253 -
 254
254 -
 255
255 -
 256
256 -
257
-
258
-
259
-
260
-
261
-
262
-
263
-
264
-
265
-
266
-
267
-
268
-
269
-
270
-
271
-
272
-
273
-
274
-
275
-
276
-
277
-
278
-
279
-
280
-
281
-
282
-
283
-
284
-
285
-
286
-
287
-
288
 |
 |
