3Com ADSL Wireless 11g Firewall Router User Guide - Page 51
User Name, Password, Retype Password, Service Name, assigned by ISP, IP address, Subnet Mask
 |
UPC - 662705905136
View all 3Com ADSL Wireless 11g Firewall Router manuals
Add to My Manuals
Save this manual to your list of manuals |
Page 51 highlights
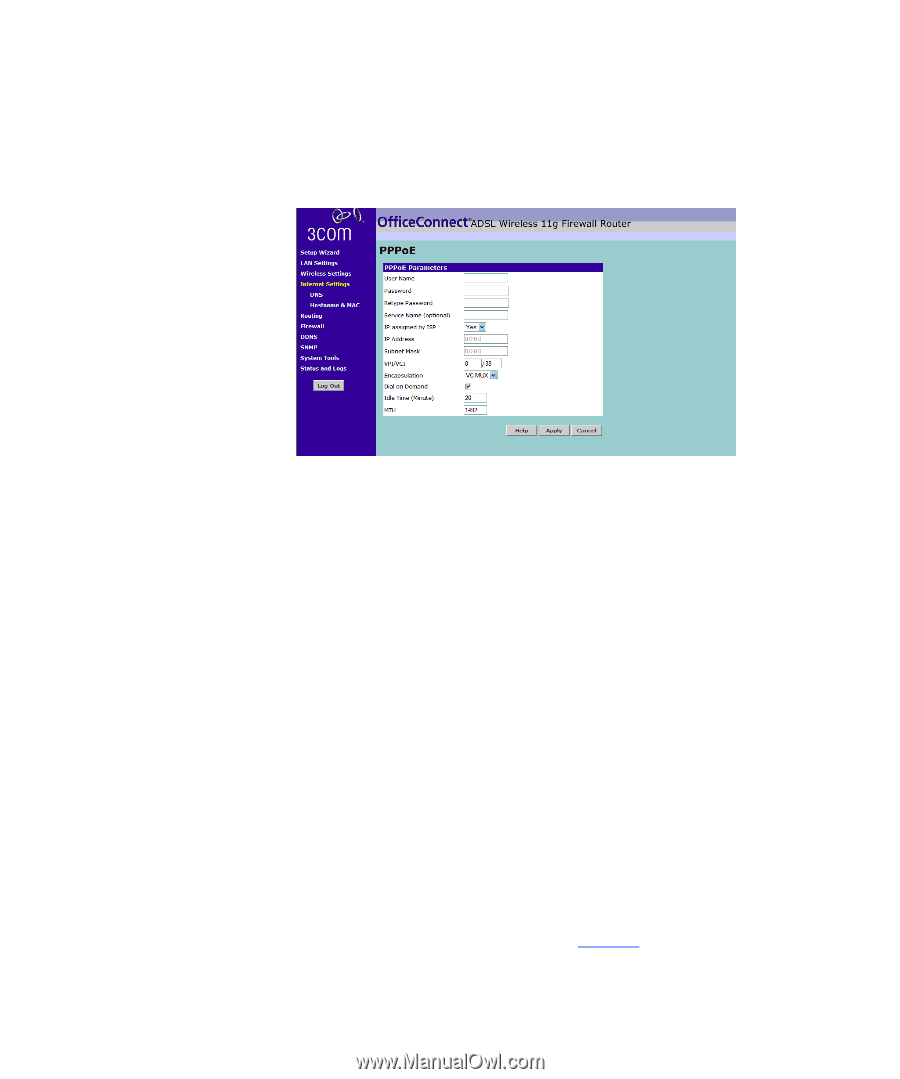
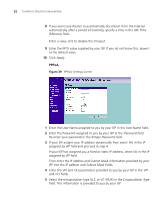
PPPoE Figure 38 PPPoE Settings Screen Internet Settings 51 1 Enter the User Name assigned to you by your ISP in the User Name field. 2 Enter the Password assigned to you by your ISP in the Password field. Re-enter your password in the Retype Password field. 3 Enter your PPP over Ethernet service name in the Service Name text box. Not all ISPs require a service name. Only enter a service name if your ISP requires it. 4 If your ISP assigns your IP address dynamically then select Yes in the IP assigned by ISP field and proceed to step 5. If your ISP has assigned you a fixed or static IP address, select No in the IP assigned by ISP field. Then enter the IP address and Subnet Mask information provided by your ISP into the IP address and Subnet Mask fields. 5 Enter the VPI and VCI parameters provided to you by your ISP in the VPI and VCI fields. 6 Select the encapsulation type (LLC or VC MUX) in the Encapsulation Type field. This information will have been provided to you by your ISP. 7 If you want your Router to connect to the Internet every time a PC needs to access it, check the Dial on Demand checkbox. If this box is not checked, then you will have to manually connect and disconnect using the buttons on the Status Screen (see page 39).
-
 1
1 -
2
-
3
-
4
-
5
-
6
-
7
-
8
-
9
-
10
-
11
-
12
-
13
-
14
-
15
-
16
-
17
-
18
-
19
-
20
-
21
-
22
-
23
-
24
-
25
-
26
-
27
-
28
-
29
-
30
-
31
-
32
-
33
-
34
-
35
-
36
-
37
-
38
-
39
-
40
-
41
-
42
-
43
-
44
-
45
-
 46
46 -
 47
47 -
 48
48 -
 49
49 -
 50
50 -
 51
51 -
 52
52 -
 53
53 -
 54
54 -
 55
55 -
 56
56 -
57
-
58
-
59
-
60
-
61
-
62
-
63
-
64
-
65
-
66
-
67
-
68
-
69
-
70
-
71
-
72
-
73
-
74
-
75
-
76
-
77
-
78
-
79
-
80
-
81
-
82
-
83
-
84
-
85
-
86
-
87
-
88
-
89
-
90
-
91
-
92
-
93
-
94
-
95
-
96
-
97
-
98
-
99
-
100
-
101
-
102
-
103
-
104
-
105
-
106
-
107
-
108
-
109
-
110
-
111
-
112
-
113
-
114
-
115
-
116
-
117
-
118
 |
 |