3Com ADSL Wireless 11g Firewall Router User Guide - Page 62
Client IP Filters, Enable, Apply, Enable Filtering Function, Delete
 |
UPC - 662705905136
View all 3Com ADSL Wireless 11g Firewall Router manuals
Add to My Manuals
Save this manual to your list of manuals |
Page 62 highlights
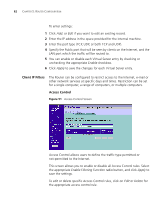
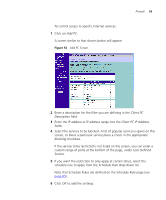
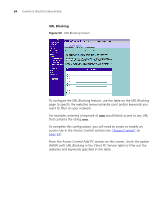
62 CHAPTER 5: ROUTER CONFIGURATION To enter settings: 1 Click Add, or Edit if you want to edit an existing record. 2 Enter the IP address in the space provided for the internal machine. 3 Enter the port type (TCP, UDP, or both TCP and UDP). 4 Specify the Public port that will be seen by clients on the Internet, and the LAN port which the traffic will be routed to. 5 You can enable or disable each Virtual Server entry by checking or unchecking the appropriate Enable checkbox. 6 Click Apply to save the changes for each Virtual Server entry. Client IP Filters The Router can be configured to restrict access to the Internet, e-mail or other network services at specific days and times. Restriction can be set for a single computer, a range of computers, or multiple computers. Access Control Figure 51 Access Control Screen Access Control allows users to define the traffic type permitted or not-permitted to the Internet. This screen allows you to enable or disable all Access Control rules. Select the appropriate Enable Filtering Function radio button, and click Apply to save the settings. To edit or delete specific Access Control rules, click on Edit or Delete for the appropriate access control rule.
-
 1
1 -
2
-
3
-
4
-
5
-
6
-
7
-
8
-
9
-
10
-
11
-
12
-
13
-
14
-
15
-
16
-
17
-
18
-
19
-
20
-
21
-
22
-
23
-
24
-
25
-
26
-
27
-
28
-
29
-
30
-
31
-
32
-
33
-
34
-
35
-
36
-
37
-
38
-
39
-
40
-
41
-
42
-
43
-
44
-
45
-
46
-
47
-
48
-
49
-
50
-
51
-
52
-
53
-
54
-
55
-
56
-
 57
57 -
 58
58 -
 59
59 -
 60
60 -
 61
61 -
 62
62 -
 63
63 -
 64
64 -
 65
65 -
 66
66 -
 67
67 -
68
-
69
-
70
-
71
-
72
-
73
-
74
-
75
-
76
-
77
-
78
-
79
-
80
-
81
-
82
-
83
-
84
-
85
-
86
-
87
-
88
-
89
-
90
-
91
-
92
-
93
-
94
-
95
-
96
-
97
-
98
-
99
-
100
-
101
-
102
-
103
-
104
-
105
-
106
-
107
-
108
-
109
-
110
-
111
-
112
-
113
-
114
-
115
-
116
-
117
-
118
 |
 |
