3Com ADSL Wireless 11g Firewall Router User Guide - Page 58
RIP Parameters, Select the RIP Mode
 |
UPC - 662705905136
View all 3Com ADSL Wireless 11g Firewall Router manuals
Add to My Manuals
Save this manual to your list of manuals |
Page 58 highlights
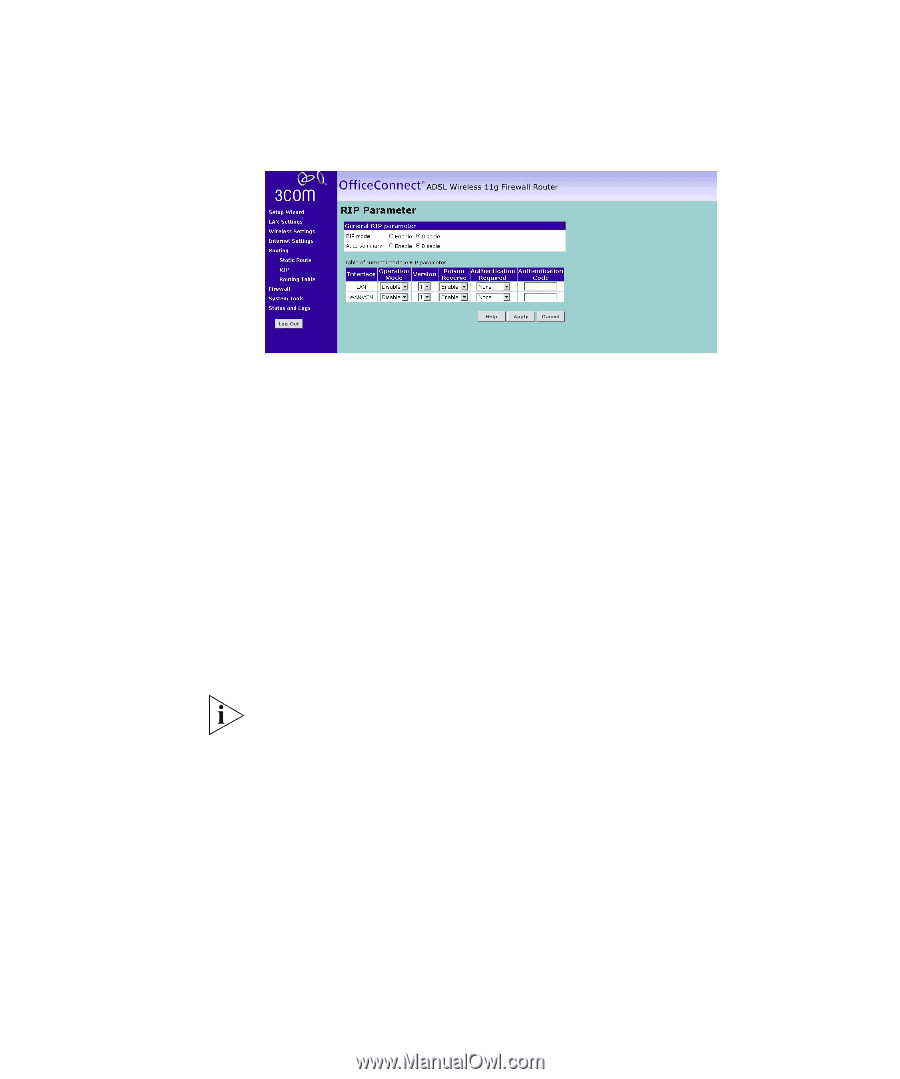
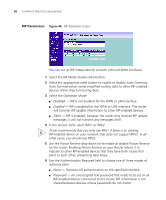
58 CHAPTER 5: ROUTER CONFIGURATION RIP Parameters Figure 46 RIP Parameter Screen You can set up RIP independently on both LAN and WAN interfaces. 1 Select the RIP Mode Enable radio button. 2 Select the appropriate radio button to enable or disable Auto Summary. Auto Summarization sends simplified routing data to other RIP-enabled devices rather than full routing data. 3 Select the Operation Mode: ■ Disabled - RIP is not enabled for the WAN or LAN interface. ■ Enabled - RIP is enabled for the WAN or LAN interface. The router will transmit RIP update information to other RIP-enabled devices. ■ Silent - RIP is enabled, however the router only receives RIP update messages, it will not transmit any messages itself. 4 In the Version field, select RIPv1 or RIPv2. 3Com recommends that you only use RIPv1 if there is an existing RIP-enabled device on your network that does not support RIPv2. In all other cases, you should use RIPv2. 5 Use the Poison Reverse drop-down list to enable or disable Poison Reverse on the router. Enabling Poison Reverse on your Router allows it to indicate to other RIP-enabled devices that they have both routes that point to each other, preventing data loops. 6 Use the Authentication Required field to choose one of three modes of authentication: ■ None - Switches off authentication on the specified interface. ■ Password - An unencrypted text password that needs to be set on all RIP-enabled devices connected to this router. RIP information is not shared between devices whose passwords do not match.
-
 1
1 -
2
-
3
-
4
-
5
-
6
-
7
-
8
-
9
-
10
-
11
-
12
-
13
-
14
-
15
-
16
-
17
-
18
-
19
-
20
-
21
-
22
-
23
-
24
-
25
-
26
-
27
-
28
-
29
-
30
-
31
-
32
-
33
-
34
-
35
-
36
-
37
-
38
-
39
-
40
-
41
-
42
-
43
-
44
-
45
-
46
-
47
-
48
-
49
-
50
-
51
-
52
-
 53
53 -
 54
54 -
 55
55 -
 56
56 -
 57
57 -
 58
58 -
 59
59 -
 60
60 -
 61
61 -
 62
62 -
 63
63 -
64
-
65
-
66
-
67
-
68
-
69
-
70
-
71
-
72
-
73
-
74
-
75
-
76
-
77
-
78
-
79
-
80
-
81
-
82
-
83
-
84
-
85
-
86
-
87
-
88
-
89
-
90
-
91
-
92
-
93
-
94
-
95
-
96
-
97
-
98
-
99
-
100
-
101
-
102
-
103
-
104
-
105
-
106
-
107
-
108
-
109
-
110
-
111
-
112
-
113
-
114
-
115
-
116
-
117
-
118
 |
 |