AIWA XH-A1000 Operating Instructions - Page 11
Setting Power Economizing Mode, Channel Multi-amplifier System, Built-in Subwoofer System - stereo
 |
View all AIWA XH-A1000 manuals
Add to My Manuals
Save this manual to your list of manuals |
Page 11 highlights
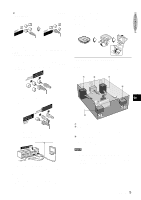
To change the brightness level of the display 1 Press FL DISPLAY twice so that the current mode is displayed. 2 Within 4 seconds, turn MULTI JOG to select the dimmer mode. The modes are displayed cyclically as below. The mode will be automatically set after 4 seconds. 3. 1 Press ECO. The current power-economizing mode status (ECO OFF/ECO ON/ECO AUTO) will be displayed. DIM-OFF: The normal display. DIMMER 1: The illumination of the display is dimmer than usual. DIMMER 2: The illumination of the display is dimmer than DIMMER 1. DIMMER 3: The illumination of the display is dimmer than DIMMER 2. The spectrum analyzer and the button lamps light off. To change the spectrum analyzer display 1 Press FL DISPLAY three times so that the current mode is displayed. 2 Within 4 seconds, turn MULTI JOG to select the spectrum analyzer display. The modes are displayed cyclically as below. The mode will be automatically set after 4 seconds. NORMAL REVERSE PEAK 2 Turn MULTI JOG within 4 seconds to change the power-economizing mode. 3 Within 4 seconds, press ENTER to set the selected power-economizing mode. Standby power consumption If the power-economizing mode is OFF: 55 W If the power-economizing mode is ON or AUTO: 1.9 W NOTE To view the clock when all the display lights turn off, press CLOCK so that the time is displayed for 4 seconds. SETTING POWER ECONOMIZING MODE MULTI JOG ENTER ECO CLOCK Setting this unit to power economizing mode reduces power consumption as follows. ECO ON • When the power is turned off, all the display lights turn off, and only the indicator on POWER lights; however, when the clock is not set, the window turns to the demo display. • When the power turns on due to timer recording (page 30), the display brightness level is set to "DIMMER 3", all button lamps are off, and the volume is set to the minimum level (0). • The display brightens only when operating the unit. When the unit has not been used for 10 seconds, the brightness level switches to the dimmer mode previously selected. (If the display brightness level is set to "DIM-OFF", the brightness does not change. When the level is "DIMMER 3", the button lamps are also turned off.) ECO AUTO • In addition to the conditions of ECO ON, if CD or tape does not play for 10 minutes or if there is no audio input from any connected external equipment for 10 minutes when VIDEO1, 2, 3, AUX or PHONO is selected as the source, the power shuts off. Exceptionally, the power does not shut off when the 5.1CH is selected. ECO OFF The economizing mode does not work. 10 ENGLISH 4-CHANNEL MULTI-AMPLIFIER SYSTEM To provide reinforcement for the ultra-low frequencies, in addition to the Left/Right 2-channel amplifier used to reproduce mud-tohigh-range frequencies, this system incorporates a second L/R 2-channel amplifier just for reproduction of ultra-low frequencies -making it, in effect, a 4-amplifier system. By utilizing discrete amplifiers for mid to-high-frequencies and low frequencies, highquality sonic reproduction that is virtually free from distortion can be realized. This Multi Amplifier System, which utilizes independent circuitry for the different frequency ranges, enables superb sonic reproduction free from distortion. BUILT-IN SUBWOOFER SYSTEM The built-in subwoofer system has a separate subwoofer cavity area that is part of the loudspeaker cabinet structure, which acts as a sonic filter to cut distortion components. (In the Multi Amplifier System, the ultra-low frequency signals transmitted from their own independent amplifier are reproduced in this area.) This separate construction gives a clear, rich definition to bass reproduction and it can realize clear, well-defined mid-to-high frequency signals. And AIWA's built-in subwoofer system incorporates a subwoofer capable of powerful, satisfying bass performance with true stereo separation.
-
 1
1 -
2
-
3
-
4
-
5
-
 6
6 -
 7
7 -
 8
8 -
 9
9 -
 10
10 -
 11
11 -
 12
12 -
 13
13 -
 14
14 -
 15
15 -
 16
16 -
17
-
18
-
19
-
20
-
21
-
22
-
23
-
24
-
25
-
26
-
27
-
28
-
29
-
30
-
31
-
32
-
33
-
34
-
35
-
36
-
37
-
38
-
39
-
40
-
41
-
42
-
43
-
44
-
45
-
46
-
47
-
48
-
49
-
50
-
51
-
52
-
53
-
54
-
55
-
56
-
57
-
58
-
59
-
60
-
61
-
62
-
63
-
64
-
65
-
66
-
67
-
68
-
69
-
70
-
71
-
72
-
73
-
74
-
75
-
76
-
77
-
78
-
79
-
80
-
81
-
82
-
83
-
84
-
85
-
86
-
87
-
88
-
89
-
90
-
91
-
92
-
93
-
94
-
95
-
96
-
97
-
98
-
99
-
100
-
101
 |
 |
