Alpine TMI-M990 Owners Manual
Alpine TMI-M990 - LCD Monitor Manual
 |
View all Alpine TMI-M990 manuals
Add to My Manuals
Save this manual to your list of manuals |
Alpine TMI-M990 manual content summary:
- Alpine TMI-M990 | Owners Manual - Page 1
GmbH Frankfurter Ring 117, 80807 München, Germany Phone 089-32 42 640 TMI-M990 OWNER'S MANUAL ALPINE ELECTRONICS OF U.K. LTD. Alpine House Fletchamstead Highway, Coventry CV4 9TW, U.K. Phone 0870-33 33 763 ALPINE ELECTRONICS FRANCE S.A.R.L. (RCS PONTOISE B 338 101 280) 98, Rue de la Belle - Alpine TMI-M990 | Owners Manual - Page 2
- Alpine TMI-M990 | Owners Manual - Page 3
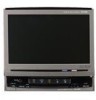
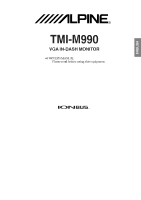
R VGA IN-DASH MONITOR • OWNER'S MANUAL Please read before using this equipment. ENGLISH TMI-M990 - Alpine TMI-M990 | Owners Manual - Page 4
- Alpine TMI-M990 | Owners Manual - Page 5
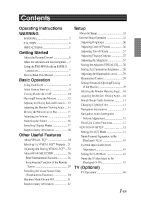
the indicators and the microphone ...7 Using the TMI-M990 with an IONBUS connection ...7 How to Read This Manual ...8 Basic Operation Using Face Cover ...9 Initial System Start-up ...9 Turning Power On or Off ...10 Opening/Closing the Monitor ...12 Adjusting the Display Back and Forwards ...13 - Alpine TMI-M990 | Owners Manual - Page 6
with the Remote Control ...48 Information In Case of Difficulty ...49 Specifications ...50 Installation and Connections Warning ...51 Caution ...52 Precautions ...52 Installation ...53 Connections (TMI-M990 Wiring Diagram) ...56 System Example ...58 LIMITED WARRANTY 2-EN - Alpine TMI-M990 | Owners Manual - Page 7
WARNING WARNING This symbol means important instructions. Failure to heed them can result in serious injury and may result in fire. INSTALL THE PRODUCT CORRECTLY SO THAT THE DRIVER CANNOT WATCH TV/ VIDEO UNLESS THE VEHICLE IS STOPPED AND THE EMERGENCY BRAKE IS APPLIED. It is dangerous (and illegal - Alpine TMI-M990 | Owners Manual - Page 8
means important instructions. Failure to heed them can result in injury or material property damage. HALT USE IMMEDIATELY IF A PROBLEM APPEARS. Failure to do so may cause personal injury or damage to the product. Return it to your authorized Alpine dealer or the nearest Alpine Service Center for - Alpine TMI-M990 | Owners Manual - Page 9
When the If you have problems, do not attempt to car is parked, the selection is made as repair the unit yourself. Return it to your described in the Owner's Manual. Alpine dealer or the nearest Alpine Service Station for servicing. Installation Location Make sure the TMI-M990 will not be installed - Alpine TMI-M990 | Owners Manual - Page 10
Getting Started About the Remote Control Notes on Using the Remote Controlmmmmmmmmmmm Point the remote control transmitter at the remote control sensor. If connected to an IONBUS compatible head unit, even if you point the remote control at the remote control sensor on the head unit, the operation - Alpine TMI-M990 | Owners Manual - Page 11
separately). For more information, refer to the PXI-H990 Operating Instructions. Lit when the display is on. Brightness sensor Detects the " on page 38, "Changing Lighting Color" on page 41.) Using the TMI-M990 with an IONBUS connection This unit connects to IONBUS compatible head units, and can - Alpine TMI-M990 | Owners Manual - Page 12
Getting How to Read Started This Manual This manual details how to operate the TMI-M990 and the supplied remote control RUE-4199. Basic on another page. When connected with an IONBUS compatible head unit: • The picture source can be switched from the head unit. For details, see Operating from the - Alpine TMI-M990 | Owners Manual - Page 13
Basic Operation POWER Reset switch V.SEL/DISP.OFF Using Face Cover An anti-theft face cover is provided with the TMI-M990. Put the face cover onto the TMI-M990 when you leave the vehicle. Be sure to remove the anti-theft face cover when you drive. Initial System Start-up Immediately after - Alpine TMI-M990 | Owners Manual - Page 14
on an IONBUS compatible head unit when it is connected: When the head unit power is switched off, the TMI-M990 power is also switched off. The power cannot be switched off from the TMI-M990. Supplement See page 18 for supplementary information. Turning Power On or Off Some of this unit's functions - Alpine TMI-M990 | Owners Manual - Page 15
is also switched on, and when the head unit is switched off, the TMI-M990 is also switched off. For details, refer to the head unit Operating Instructions. • The power cannot be switched off from the TMI-M990. • When the system switch on this unit is set to STANDALONE, the power will not turn on - Alpine TMI-M990 | Owners Manual - Page 16
SETUP /FLAT /O/C VISUAL EQ /TILT /TILT OPEN/CLOSE / SETUP Opening/Closing the Monitor 12-EN ○ ○ ○ ○ ○ ○ • The TMI-M990 is a precision device. With gentle handling, its unique capabilities can be enjoyed for a long time. • When the movable monitor is opened, do not place any object on the - Alpine TMI-M990 | Owners Manual - Page 17
, then contact your Alpine dealer. Do not force the display. You may damage your TMI-M990. • The display activates using the values stored for angle adjustment and back and forward adjustment. See "Adjusting the Display Back and Forwards" (this page), and "Adjusting the Monitor Viewing Angle" (page - Alpine TMI-M990 | Owners Manual - Page 18
changes continuously. • You can also adjust the display angle by selecting from one of 10 levels. For details, see the Setup operation "Adjusting the Monitor Viewing Angle" on page 40. • The adjustment angle is stored, but depending on the motion, the position can be a shifted from the original - Alpine TMI-M990 | Owners Manual - Page 19
to the previous angle from being flat after 10 seconds. • If an excessive force is added to the monitor when the monitor is flat, putting an object on the back of the monitor for example, it may cause a malfunction. Adjusting the Volume The following operation is performed with the supplied remote - Alpine TMI-M990 | Owners Manual - Page 20
of the button will cycle through the modes as follows: NAVI. AUX-1 AUX-2 AUX-3 DVD When connected with an IONBUS compatible head unit: • The picture source can be switched from the head unit. For details, see Operating from the Head Unit "Switching the Source", page 47. Supplement See page 19 - Alpine TMI-M990 | Owners Manual - Page 21
source. Each press changes the display modes as follows: NORMAL WIDE CINEMA Supplement See page 19 for supplementary information. ○ ○ In Cinema mode, the monitor displays a normal picture by stretching out the picture horizontally and vertically. This mode is good for displaying a cinema type - Alpine TMI-M990 | Owners Manual - Page 22
Off The power does not switch off by simply closing the display. The TMI-M990 stores the state before the ignition key switches off. For example, if depending on the status of the ignition key (engine key). For the setup operation, "Setting Automatic Opening/Closing of the Monitor", page 39. - Alpine TMI-M990 | Owners Manual - Page 23
Viewing Angle Description If the monitor touches an obstacle while the angle is being adjusted, the unit stops the screen immediately. Should this happen, remove the obstacle and press / TILT or / - Alpine TMI-M990 | Owners Manual - Page 24
OPEN/CLOSE / SETUP About VISUAL EQTM To display the Setup screen: To watch a video source, your vehicle must be parked with the ignition key in the ACC or ON ambient light conditions, then store your settings on the TMI-M990. 1 Select VISUAL EQ ON mode by pressing VISUAL EQ. VISUAL EQ ON OFF 20-EN - Alpine TMI-M990 | Owners Manual - Page 25
LINK AUX-1 When switched ON, the selected VISUAL EQ property name is displayed. • "OFF" is set on this unit when the power is first turned on. Press VISUAL EQ to display "FLAT". 2 Press and hold VISUAL EQ for at least 2 seconds. The VISUAL EQ SETUP screen is - Alpine TMI-M990 | Owners Manual - Page 26
for movies with a lot of dark scenes. SOFT: Suppresses screen glare. Suitable when watching CG or animation. SHARP: Sharpens the picture. Suitable when the picture is not clear. HIGH CONTRAST: Increases the screen contrast. Suitable for new movies. USER 1/2: Accesses the adjustment value stored in - Alpine TMI-M990 | Owners Manual - Page 27
EQ V.SEL/DISP.OFF /TILT /TILT OPEN/CLOSE / SETUP Adjusting and Storing VISUAL EQTM You can store up to two of your image adjustments. The picture brightness, color, tint, contrast and sharpness can be adjusted. VISUAL EQ ON OFF • When VISUAL EQ is ON, the selected VISUAL EQ property name is - Alpine TMI-M990 | Owners Manual - Page 28
Sharpness" (page 36 to 37). 4 Adjust the selected item by pressing / TILT. / TILT or 5 When adjusting another item, repeat steps 3 and 4. 6 When the picture settings are complete, press OPEN/CLOSE / SETUP or VISUAL EQ and select V.EQ MEMORY. When you press OPEN/CLOSE / SETUP, you move to - Alpine TMI-M990 | Owners Manual - Page 29
8 Press V.SEL/DISP.OFF. The stored adjustments are applied to the current video image. • To recall the stored adjustment values, see "Selecting the VISUAL EQTM Property" (page 21). • After selecting the manufacturer's setting of VISUAL EQ property (NIGHT - Alpine TMI-M990 | Owners Manual - Page 30
Features /FLAT WIDE/R.SEL /O/C R.SEL/ WIDE VISUAL EQ OPEN/CLOSE / /TILT /TILT SETUP DISP./A.MEMO About REAR SELECTOR With a rear monitor connected to the TMI-M990, its adjustments may be set using the REAR SELECTOR screen. The following steps 1 to 4 are common operations for the REAR SELECTOR - Alpine TMI-M990 | Owners Manual - Page 31
item. Changing the setting item by pressing / TILT. / TILT or 4 LINK LINK Rear monitor 1 (AUX OUT1), Rear monitor 2 (AUX OUT2) status display. (See page 28) Remote control output display When rear monitor remote control operation is valid, indicator is displayed. (See page 29) • When you press - Alpine TMI-M990 | Owners Manual - Page 32
unit (TV, VCR, Video Game, etc.) DVD*3: The picture from the S video output compatible Alpine head unit is output to the rear monitor. *1 If not connected to an IONBUS compatible head unit, AUX OUT1 is fixed to LINK. It is then used as audio output for the front (TMI-M990). *2 Only displayed when - Alpine TMI-M990 | Owners Manual - Page 33
external monitor connected to AUX OUT2 is enabled. Remote control operation of the source selected for AUX OUT2 only, is possible. *4 Can be set only when an IONBUS compatible head unit is connected. • When set to REAR-1/2, remote control operation cannot be performed on the FRONT (TMI-M990). In - Alpine TMI-M990 | Owners Manual - Page 34
On the TMI-M990, you can watch video from the AUX or NAVI. while listening to the FM, AM or a CD on the head unit. 1 Change to your preferred source (FM, AM, CD etc.) on the head unit. For details, see the head unit operating instructions. Press V.SEL/DISP.OFF. The TMI-M990 picture source changes - Alpine TMI-M990 | Owners Manual - Page 35
unit is connected. • To output the AUX, NAVI. mode sound of TMI-M990 during simultaneous operation, change the head unit source to AUX, NAVI. mode. and switch the video to the same source as the audio. The simultaneous function can also be cleared by linking to when the DVI-9990 source switches. - Alpine TMI-M990 | Owners Manual - Page 36
by pressing 4 When adjusting another item, repeat steps 2 and 3. 5 When the picture settings are complete, press or and select V.EQ MEMORY. or to select USER1 or . The REAR SELECTOR function which switches the source of the rear monitor is allowed to set while driving. When using the head unit - Alpine TMI-M990 | Owners Manual - Page 37
TMI-M990. • For example, a sound is made when a switch is pressed, or a beep sound can be set ON/OFF when a command is received. In this way, you can change your preferred settings. (See page 34) Setting item Setting content Page Picture brightness adjustment Picture video input - Alpine TMI-M990 | Owners Manual - Page 38
Setup BAND/ SETUP /FLAT /O/C VISUAL EQ /TILT /TILT OPEN/CLOSE / SETUP General Setup Operation To display the Setup screen: To watch a video source, your vehicle must be parked with the ignition key in the ACC or ON position. To do this, follow the procedure below. 1. Bring your - Alpine TMI-M990 | Owners Manual - Page 39
The following steps 1 to 4 are common operations to each "Setting item" of GENERAL Setup. Refer to each section for details. < GENERAL setup standard operation > 2 Press VISUAL EQ or OPEN/CLOSE / SETUP, and select the item you wish to set. When you press OPEN/CLOSE / SETUP, you move to the next - Alpine TMI-M990 | Owners Manual - Page 40
Brightness Setting item: BRIGHT Setting content: -15 ~ +15 1 Adjust the brightness from -15 to +15 by pressing / TILT or / TILT. Adjusting Color of Picture Setting item: COLOR Setting content: -15 ~ +15 1 Adjust the color from -15 to +15 by pressing or / TILT. / TILT 36-EN ○ • Color - Alpine TMI-M990 | Owners Manual - Page 41
Adjusting Tint of Picture Setting item: TINT Setting content: G15 ~ R15 1 Adjust the tint from G15 to R15 by pressing or / TILT. / TILT Adjusting Display Contrast You can adjust - Alpine TMI-M990 | Owners Manual - Page 42
brightness of the TMIM990 can be dimmed. Setting item: DIMMER Setting content: ON/OFF/AUTO ON: The switch and Input indicator brightness of the TMI-M990 change to the value set in "Adjusting the Illumination Level" (refer to page 39). OFF: The illumination brightness does not change. AUTO*: When - Alpine TMI-M990 | Owners Manual - Page 43
and Input indicator brightness of the TMI-M990 can be adjusted on the TMI-M990. For example, used when slighly monitor is manually opened or closed by pressing OPEN/CLOSE / SETUP. AUTO: The display automatically opens/closes depending on the status of the ignition key (engine key). CLOSE: The monitor - Alpine TMI-M990 | Owners Manual - Page 44
Opening Angle Setting item: SLIDE Setting content: BACK/FRONT • For details, see "Adjusting the Display Back and Forwards", page 13. Adjusting the Monitor Viewing Angle Setting item: TILT Setting content: 1 ~ 10 1 • The display angle can be adjusted by pushing the main unit switches / TILT or - Alpine TMI-M990 | Owners Manual - Page 45
unit (DVI-9990). Navigation Interruption With an Alpine navigation system connected to the TMI-M990, the voice guidance of the navigation system will be mixed with the external input such as DVD play. Setting item: NAVI INT. Setting content: AUTO/VOICE/OFF AUTO: The navigation picture and voice - Alpine TMI-M990 | Owners Manual - Page 46
: OFF/ON/AUTO OFF: The main unit performs normal simultaneous operation. ON: Simultaneous function is performed when the video is in navigation mode only. When the source is other video sources, the main unit simultaneous operation is cleared linking to the source switching of the head unit. AUTO - Alpine TMI-M990 | Owners Manual - Page 47
AUX IN/S-IN SETUP The following steps 1 to 6 are for the standard AUX IN/S-IN setup. For details on the setup item details, see each setting item. < AUX IN/S-IN setup standard operation > 2 3 ○ Continued ○ ○ ○ ○ ○ ○ ○ ○ ○ ○ ○ ○ ○ ○ ○ ○ ○ Press / - Alpine TMI-M990 | Owners Manual - Page 48
Setup 4 Press VISUAL EQ or OPEN/CLOSE / SETUP, and select the preferred item setting. When you press OPEN/CLOSE / SETUP, you move to the next item, press VISUAL EQ to move to the previous item. Change the setting by pressing / TILT or / TILT. 5 6 To return to the GENERAL SETUP screen, press / - Alpine TMI-M990 | Owners Manual - Page 49
an IONBUS compatible head unit. • If connected with a DVI-9990, set "Changing Video Output" on the S-VIDEO of DVI-9990. For details, refer to the DVI-9990 instructions manual. Name the S Video Input to Be Displayed (S-IN) If a S video output compatible ALPINE head unit is connected, you can attach - Alpine TMI-M990 | Owners Manual - Page 50
TV (Optional) TV Operation When connected with a TV unit (sold separately), you can use the remote control supplied with the TMI-M990 to operate the TV. Set the AUX NAME to TV. Refer to (Setup "Name External Equipment to Be Displayed (AUX)" page 45). 1 2 3 4 5 Button Preset selection - Alpine TMI-M990 | Owners Manual - Page 51
This operation can also be performed from an ALPINE IONBUS compatible head unit. Also refer to the head unit operating instructions. List of possible operations from the head unit Switch SOURCE/POWER BAND Rotary encoder Operation explanation Changes the picture source Changes - Alpine TMI-M990 | Owners Manual - Page 52
EQ value is stored. Press and hold to turn the backlight off/on. Switches the power of the TV Tuner ON/OFF Press and hold down continuously to access/exit the SETUP screen. Video source, display mode, etc. indication. Long press for auto memory**. Switches between stereo/MONO/SAP. Tuning stations - Alpine TMI-M990 | Owners Manual - Page 53
review the items in the following checklist. This guide will help you isolate the problem if the unit is at fault. Otherwise, make sure the rest of your system is properly connected, or then consult your authorized Alpine to the instructions, the picture display - Alpine TMI-M990 | Owners Manual - Page 54
Specifications MONITOR SECTION Screen Size LCD Type Operation System Number of Picture Elements Effective Number of Picture Elements AV-INTERFACE UNIT SECTION S/N Ratio Video 40dB Audio 50dB Input Level Video 1 Vp-p (75Ω UNBALANCED) Audio 1200mV (RMS) Output Level Video 1 Vp-p (75Ω UNBALANCED) - Alpine TMI-M990 | Owners Manual - Page 55
or injury due to electrical shorts. DO NOT ALLOW CABLES TO BECOME ENTANGLED IN SURROUNDING OBJECTS. Arrange wiring and cables in compliance with the manual to prevent obstructions when driving. Cables or wiring that obstruct or hang up on places such as the steering wheel, gear lever, brake pedals - Alpine TMI-M990 | Owners Manual - Page 56
SHARP or the vehicle. When in doubt, consult METAL EDGE. your ALPINE dealer. • The TMI-M990 uses female RCA-type Route the cables and wiring away from jacks when installing. If DO NOT INSTALL IN LOCATIONS WITH it is not, problems may occur. • When installing in automobiles, HIGH MOISTURE OR DUST. - Alpine TMI-M990 | Owners Manual - Page 57
from the horizontal. Chassis Front Frame (Included) Wider edge should face down. 1 Dashboard Mounting Sleeve (Included) Mounting Bracket (Included) TMI-M990 Reinforce the monitor unit with a metal mounting strap (not supplied). Secure the ground lead of the unit to a clean metal spot using - Alpine TMI-M990 | Owners Manual - Page 58
the dashboard or rear deck with the Velcro fasteners. Lock Pin Slide the TMI-M990 into the dashboard. When the unit is in place, make sure the locking 2 • Make sure to use the supplied screw (M4 x 3) to install the monitor. If you use another screw to install the monitor, it - Alpine TMI-M990 | Owners Manual - Page 59
Switch (Sold Separately) (If the ACC power supply is not available) SPST SW (Optional) IGNITION (Red) BATTERY (Yellow) FUSE (1A) (Optional) TMI-M990 (Monitor) FUSE (7.5A) (Optional) Battery • If your vehicle has no ACC power supply, add an SPST (Single-Pole, Single-Throw) switch (sold separately - Alpine TMI-M990 | Owners Manual - Page 60
8 Ignition key (Red) p BATTERY 9 (Yellow) r GND q Battery (Black) p BATTERY 9 (Yellow) GND q Battery TMI-M990 (Black) REMOTE OUT AUX1 w (White/Brown) 4 WIDE VGA INDASH MONITOR REMOTE OUT AUX2 w (White/Brown) REMOTE OUT AUX3 To remote input lead w (White - Alpine TMI-M990 | Owners Manual - Page 61
video picture to the back-up camera. This is linked with putting the car into reverse (R). e Remote Control Input Lead (White/ Brown) Connect the external Alpine product to the remote control output lead. r Monitor to transmit the parking brake status signals to the TMI-M990. 7 Foot Brake Lead ( - Alpine TMI-M990 | Owners Manual - Page 62
N871A Navigation system (Sold Separately) KAX-551N Amplified Speaker (Sold Separately) To Audio Input terminal To Video Input terminal 1 TMI-M990 AV-Interface unit 4 6 5 2 6 Rear monitor 2 (Sold Separately) To Audio Input terminal 3 REMOTE IN (AUX2) 7 REMOTE OUT (White/Brown) (White/Brown - Alpine TMI-M990 | Owners Manual - Page 63
Audio Output terminal To Audio Input terminal 4 TMI-M990 AV-Interface unit 9 3 Rear monitor 1 (Sold Separately) To Video Input terminal To Video Input terminal Rear monitor 2 (Sold Separately) To Audio Input terminal 2 9 6 9 To Video Output terminal TV Tuner or VCR (Sold Separately) To Audio - Alpine TMI-M990 | Owners Manual - Page 64
TMI-M990 is connected with an IONBUS compatible head unit. When not connected to an IONBUS compatible head unit, change to "2:STANDALONE". • Be sure to turn the power off to the unit before changing the switch position. 2 Power Supply Connector 3 AUX Video (R). Switches the video picture to the back - Alpine TMI-M990 | Owners Manual - Page 65
System NVE-N852A/NVE-N871A Navigation system (Sold Separately) 1 TMI-M990 AV-Interface unit 2 • When the NVA-N751AS is connected the unit as possible. Your Alpine dealer carries various noise suppressors, contact them for further information. • Your Alpine dealer knows best about noise prevention - Alpine TMI-M990 | Owners Manual - Page 66
Multimedia Manager and an Ai-NET compatible CD changer 3 IONBUS compatible head unit (sold separately) 1 6 *1 t 5 (DVI-9990) 2 p 7 *1 5 3 *1 r *2 e IONBUS compatible Multimedia Manager (sold separately) w *1 3 3 y 1:SYSTEM 1 2 2:STANDALONE (PXI-H990) 9 3 *1 8 4 CD changer (Ai-NET - Alpine TMI-M990 | Owners Manual - Page 67
Multimedia Manager) t S Video Output Terminal y System Switch Change to "1:SYSTEM" when the TMI-M990 is connected with an When attaching the core to the cable from the monitor main unit, also attach to the both ends. Two pieces are attached to TMI-M990, PXI-H990, KCI-500B. *2 Connect only when - Alpine TMI-M990 | Owners Manual - Page 68
to follow instructions contained in the Owner's manual. 4 Alpine Service Center or Alpine, Alpine will pay the return shipping charges. 2 You should provide a detailed description of the problem(s) for which service is required. [HOW TO CONTACT CUSTOMER SERVICE: Should the product require service
-
 1
1 -
 2
2 -
 3
3 -
 4
4 -
 5
5 -
 6
6 -
 7
7 -
8
-
9
-
10
-
11
-
12
-
13
-
14
-
15
-
16
-
17
-
18
-
19
-
20
-
21
-
22
-
23
-
24
-
25
-
26
-
27
-
28
-
29
-
30
-
31
-
32
-
33
-
34
-
35
-
36
-
37
-
38
-
39
-
40
-
41
-
42
-
43
-
44
-
45
-
46
-
47
-
48
-
49
-
50
-
51
-
52
-
53
-
54
-
55
-
56
-
57
-
58
-
59
-
60
-
61
-
62
-
63
-
64
-
65
-
66
-
67
-
68
 |
 |
OWNER'S MANUAL
TMI-M990
TMI-M990
R
Sankei Kikaku Co., Ltd.
1-13-38, Hinodai,
Hino, Tokyo, Japan
ALPINE ELECTRONICS MARKETING, INC.
1-1-8 Nishi Gotanda,
Shinagawa-ku, Tokyo 141-0031, Japan
Phone 03-5496-8231
ALPINE ELECTRONICS OF AMERICA, INC.
19145 Gramercy Place, Torrance,
California 90501, U.S.A.
Phone 1-800-ALPINE-1 (1-800-257-4631)
ALPINE ELECTRONICS OF CANADA, INC.
7300 Warden Ave., Suite 203, Markham,
Ontario L3R 9Z6, Canada
Phone 1-800-ALPINE-1 (1-800-257-4631)
ALPINE ELECTRONICS OF AUSTRALIA PTY. LTD.
6-8 Fiveways Boulevarde Keysborough,
Victoria 3173, Australia
Phone 03-9769-0000
ALPINE ELECTRONICS GmbH
Frankfurter Ring 117, 80807 München,
Germany
Phone 089-32 42 640
ALPINE ELECTRONICS OF U.K. LTD.
Alpine House
Fletchamstead Highway,
Coventry CV4 9TW, U.K.
Phone 0870-33 33 763
ALPINE ELECTRONICS FRANCE S.A.R.L.
(RCS PONTOISE B 338 101 280)
98, Rue de la Belle Etoile, Z.I. Paris
Nord II, B.P. 50016, 95945 Roissy
Charles de Gaulle Cedex, France
Phone 01-48638989
ALPINE ITALIA S.p.A.
Viale C. Colombo 8,
20090 Trezzano Sul Naviglio (MI), Italy
Phone 02-484781
ALPINE ELECTRONICS DE ESPAÑA, S.A.
Portal de Gamarra 36, Pabellón, 32
01013 Vitoria (Alava) - APDO 133, Spain
Phone 945-283588
Designed by ALPINE Japan
Printed in Japan (S)
68-00323Z28-A