Apple M9418LL Getting Started
Apple M9418LL - iBook G4 - PowerPC 1 GHz Manual
 |
UPC - 718908612057
View all Apple M9418LL manuals
Add to My Manuals
Save this manual to your list of manuals |
Apple M9418LL manual content summary:
- Apple M9418LL | Getting Started - Page 1
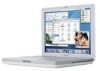
iBook G4 Getting Started Includes setup, expansion, and troubleshooting information for your iBook G4 computer - Apple M9418LL | Getting Started - Page 2
that the information in this manual is accurate. Apple is not responsible for printing or clerical errors. Apple 1 Infinite Loop Cupertino, CA 95014-2084 408-996-1010 www.apple.com Apple, the Apple logo, AirPort, Apple Store, AppleTalk, Final Cut Pro, FireWire, iBook, iCal, iMovie, iTunes, Mac - Apple M9418LL | Getting Started - Page 3
6 Basic Features of Your iBook G4 8 Additional Features of Your iBook G4 10 Setting Up 15 How Do I Turn My iBook G4 Off? 16 Calibrating Your New Battery 16 What's Next? 19 The Basics 19 Getting to Know Your iBook G4 20 Adjusting Your Display 21 Using Your Power Adapter 22 Using the Trackpad 23 - Apple M9418LL | Getting Started - Page 4
39 External Video Support (VGA, Composite, and S-Video) 41 Using Your Optical Drive 45 Connecting Speakers and Audio Devices 45 Battery 49 Security Slot Chapter 4 51 Enhancing Your Computer 51 Installing an AirPort Extreme Card or Additional Memory Chapter 5 61 Troubleshooting 61 Problems That - Apple M9418LL | Getting Started - Page 5
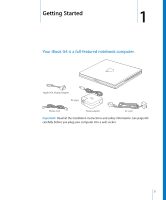
Getting Started 1 1 Your iBook G4 is a full-featured notebook computer. Apple VGA Display Adapter AC plug Phone cord Power adapter AC cord Important: Read all the installation instructions and safety information (see page 69) carefully before you plug your computer into a wall socket. 5 - Apple M9418LL | Getting Started - Page 6
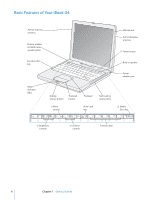
Basic Features of Your iBook G4 AirPort Extreme antenna Built-in speaker (located under speaker grille) Function (Fn) key ® Microphone AirPort Extreme antenna ® Power button Built-in speaker ¯ Power adapter port Sleep indicator light Display release button Trackpad button - Mute control - Apple M9418LL | Getting Started - Page 7
included Apple Portable Power Adapter to recharge your iBook G4 battery. AirPort Extreme antenna With an optional AirPort Extreme Card and an AirPort Extreme Base Station or other wireless hub, connect to the Internet wirelessly. For additional information about AirPort Extreme or your optical drive - Apple M9418LL | Getting Started - Page 8
Additional Features of Your iBook G4 ® Battery Security slot G Ethernet port (10/100Base-T) FireWire 400 port W Internal modem port USB 2.0 ports f Headphone port Video out port 8 Chapter 1 Getting Started - Apple M9418LL | Getting Started - Page 9
. You can also use an Apple Video Adapter (sold separately) to connect to a television, VCR, or another video device. f Headphone (audio line out) port Connect external speakers, headphones, or other sound output devices. Ç Security slot Protect your iBook G4 by connecting a security cable. For - Apple M9418LL | Getting Started - Page 10
you can set it up quickly and start using it right away. Step 1: Plug In the Power Adapter m Plug the AC plug of your power adapter into an outlet and the power adapter plug into the iBook G4 power adapter port. AC plug Important: Be sure to snap the electrical prongs on your AC plug into their - Apple M9418LL | Getting Started - Page 11
® Step 2: Connect Your Cables Next, connect your iBook G4 to a phone line, DSL modem, cable modem, or line to the modem; the wrong type of line could damage the modem. Contact your telephone service provider if you are unsure whether you have a digital telephone line. For more information about - Apple M9418LL | Getting Started - Page 12
or cable modem as shown in the modem instructions, or connect the Ethernet cord to the Ethernet hub or outlet. Then connect the other end of the cord to the computer's Ethernet port. Ethernet cord G Ethernet port (10/100Base-T) Step 3: Turn On Your iBook G4 The first time you start up your computer - Apple M9418LL | Getting Started - Page 13
you turn on the computer. It takes the computer a few moments to start up. The setup assistant launches automatically to help you. ® Power button Note: When you press the Power button to start up your computer, press it only once briefly (up to 1 second). Do not continue to hold down or press - Apple M9418LL | Getting Started - Page 14
2 Use your iBook G4 trackpad to select and move items on the screen, much as you running! Problems Turning the Computer On? Nothing happens when you press the Power button. • The battery may be drained. Make sure that you plugged the power adapter firmly into both the computer and a power source. - Apple M9418LL | Getting Started - Page 15
(®) or any key on the keyboard. Shutting Down Your iBook G4 If you aren't going to use your iBook G4 for a day or two, shut it down. To shut down your computer, do one of the following: • Choose Apple (K) > Shut Down from the menu bar. • Press the Power button (®) and click Shut Down in the dialog - Apple M9418LL | Getting Started - Page 16
the following steps sometime during the first week you have your iBook G4. To initially calibrate your battery, follow these steps: 1 Plug in the power adapter and fully charge your iBook G4 battery until the light on the power adapter plug changes to green and the onscreen meter in the menu - Apple M9418LL | Getting Started - Page 17
you're having a problem that prevents you from using your computer, see Chapter 5, "Troubleshooting," on page 61. • Check out the top ten most commonly asked questions. See Appendix D, "Top Ten Questions," on page 93. • For support information, user discussion boards, and the latest Apple software - Apple M9418LL | Getting Started - Page 18
- Apple M9418LL | Getting Started - Page 19
a few moments to let the hard disk and any optical disc in your drive stop spinning before you transport the computer. Avoid jostling or bumping your iBook G4 while discs are spinning. When using your iBook G4 or when charging the battery, it is normal for the bottom of the case to get warm. For - Apple M9418LL | Getting Started - Page 20
Your Display Once you begin working with your new iBook G4, you may need to adjust your display so that they are at the display's default resolution. To adjust the resolution on your display: m Choose Apple (K) > System Preferences from the menu bar. Open the Displays pane of System Preferences. To - Apple M9418LL | Getting Started - Page 21
computer to ensure it is engaged and power is flowing to the computer. When disconnecting the power adapter from an outlet or from the computer, pull the plug, not the cord. For safety instructions about using your power adapter, see "Plugging In the Power Adapter" on page 70. Chapter 2 The Basics - Apple M9418LL | Getting Started - Page 22
pane of System Preferences. Note: If you find that the pointer moves as you type because you accidentally brush the trackpad, you can avoid this problem by selecting the "Ignore accidental trackpad input" option in the Keyboard & Mouse pane of System Preferences. 22 Chapter 2 The Basics - Apple M9418LL | Getting Started - Page 23
Using the Keyboard Your iBook G4 keyboard has a numeric keypad incorporated in the standard keyboard list of keyboard shortcuts for many common procedures and applications. Using a Mouse If you have an Apple mouse with a USB connector, you can insert the USB connector into the USB 2.0 port and use - Apple M9418LL | Getting Started - Page 24
is running Mac OS X. Note: Mac OS 9 cannot be installed as a primary operating system on your iBook G4. When you're ready to learn more about Mac OS X and your Apple applications, see the Welcome to Panther booklet that came with your iBook G4. Also open Mac OS Help and browse the information there - Apple M9418LL | Getting Started - Page 25
OS Help and search for "System Preferences" or for the specific preference pane you want to change. Connecting to a Printer To use a printer with your iBook G4, follow the instructions that came with the printer to install required software and connect the printer. Many printers connect via a USB - Apple M9418LL | Getting Started - Page 26
to music while you work, insert a music CD in your optical drive. iTunes, an easy-to-use music player, will appear automatically on the screen. You can also connect headphones with a minijack to the headphone port of your iBook G4 for private listening right away. To learn more about iTunes, open - Apple M9418LL | Getting Started - Page 27
Mac OS website at www.apple.com/macos. Connecting a Camera or Other FireWire or USB Device If you have a digital camera, videocamera, scanner, or other device that has a FireWire or USB connector, you can connect it to your iBook G4. Follow the installation instructions that came with your device - Apple M9418LL | Getting Started - Page 28
the Internet During the initial setup, you were instructed on how to connect to the Internet. If transfer files or documents to or from your iBook G4, there are several common ways of doing it. • If you have an external hard disk drive or Zip drive or other data storage device that connects via - Apple M9418LL | Getting Started - Page 29
application to quit: 1 Press Command (x)-Option-Esc or choose Force Quit from the Apple (K) menu. The Force Quit Applications dialog appears with the application selected. 2 Click dialog. If you're experiencing other problems, see Chapter 5, "Troubleshooting," on page 61. Chapter 2 The Basics 29 - Apple M9418LL | Getting Started - Page 30
- Apple M9418LL | Getting Started - Page 31
38. • Video out port with included Apple VGA Display Adapter gives you the ability to use your iBook G4 with an external monitor or display. Use an Apple Video Adapter (sold separately) to connect a television, VCR, or other video device. See page 39. • Optical drive that allows you to play CDs. If - Apple M9418LL | Getting Started - Page 32
the device to the computer. Apple has already included software to work with many USB devices. Your computer automatically detects newly connected devices. Note: If your iBook G4 cannot find the correct software when you connect a USB device, you can either install the software that came with the - Apple M9418LL | Getting Started - Page 33
You can use USB devices, such as joysticks and keyboards, that get power from the USB connection instead of a separate power adapter with your iBook G4. However, these types of USB devices can cause your iBook G4 battery to become depleted faster. If you are using the device for an extended period - Apple M9418LL | Getting Started - Page 34
from an external FireWire hard disk. Connect an external FireWire hard disk (with a valid operating system installed on it), open the Startup Disk pane of System Preferences, and click the FireWire hard disk. Restart your computer. • Transfer files between your iBook G4 and another FireWire-equipped - Apple M9418LL | Getting Started - Page 35
FireWire Devices and Battery Power FireWire devices, such as certain external hard disk drives, can get power from the iBook G4 FireWire connection instead of a separate power adapter. However, these types of FireWire devices can cause your iBook G4 battery to become depleted faster. If a device - Apple M9418LL | Getting Started - Page 36
when you purchased your iBook G4, a card is already installed. If you do not have an AirPort Extreme Card installed and would like to install one, see "Installing an AirPort Extreme Card or Additional Memory" on page 51. The AirPort Extreme Card is compatible with both the Apple AirPort Extreme Base - Apple M9418LL | Getting Started - Page 37
from the Help Viewer menu bar. You can also find information on the Apple AirPort website at www.apple.com/airport or at www.apple.com/support. Using Bluetooth Devices If you purchased a Bluetooth® module, your iBook G4 can connect to and transfer information wirelessly to devices that use Bluetooth - Apple M9418LL | Getting Started - Page 38
port to access the Internet via an Internet service provider (ISP). The Ethernet port on your iBook G4 automatically detects other Ethernet devices. You don't products you can use with your iBook G4, check the Macintosh Products Guide at www.apple.com/guide. 38 Chapter 3 Using Your Computer - Apple M9418LL | Getting Started - Page 39
the modem. Contact your telephone service provider if you are unsure Support (VGA, Composite, and S-Video) Your computer has a video out port and an adapter that allow you to connect a display or projector with a VGA connector. Use the included Apple VGA Display Adapter to connect your iBook G4 - Apple M9418LL | Getting Started - Page 40
Apple VGA Display Adapter, and then connect the adapter to your iBook G4. Your iBook G4 automatically detects the external display. Important: To ensure that your iBook G4 menu bar. Note: Your iBook G4 doesn't support external display resolutions above 1024 x 768. 40 Chapter 3 Using Your Computer - Apple M9418LL | Getting Started - Page 41
record DVD movies and other information on DVD-R discs. Important: The optical drive on your iBook G4 supports standard circular 12 cm discs. Irregularly shaped discs or discs smaller than 12 cm are not supported. Noncircular discs may become lodged in the drive. Chapter 3 Using Your Computer 41 - Apple M9418LL | Getting Started - Page 42
install or use programs from a CD or DVD disc: 1 With the computer turned on, insert the disc (with the label facing up) into the drive slot until you feel the drive . The disc may need to be inserted nearly all the way in before the drive takes it in the rest of the way. This is normal. Note: Some - Apple M9418LL | Getting Started - Page 43
) port on your iBook G4 to the audio input ports on your stereo. Recording CD-R and CD-RW Discs If your iBook G4 has a Combo drive, you can record data top of the iTunes window, click Burn CD. For More Information • For instructions on using DVD Player, choose Help > DVD Player Help from the menu bar - Apple M9418LL | Getting Started - Page 44
Burn button. 3 Insert a blank recordable DVD disc into the drive when prompted. 4 Click the Burn button again. To record data on DVD-R battery runs down when you are burning a DVD, the burn may fail and the DVD disc will not be able to be used again. To avoid this, always use your power adapter - Apple M9418LL | Getting Started - Page 45
about using or troubleshooting sound on your computer, open Mac OS Help and search for "sound." Battery When the external power adapter is not connected, your computer draws power from its battery. Depending on the applications you use and external devices connected to your iBook G4, you may find - Apple M9418LL | Getting Started - Page 46
the power adapter is attached. When the battery level eventually drops below 95 percent, it will charge all the way to 100 percent. This saves battery life as charging is not continuously cycled on and off. Removing and Replacing the Battery To remove the battery: m Shut down your iBook G4. Turn - Apple M9418LL | Getting Started - Page 47
according to your local environmental laws and guidelines. For more information, see "Battery Disposal Information" on page 98. Charging a Battery When the power adapter that came with your computer is connected, the battery recharges whether the computer is off, on, or in sleep. However, the - Apple M9418LL | Getting Started - Page 48
time. In the Energy Saver pane of System Preferences, select the "Put the hard disk to sleep when possible" option. • Set your iBook G4 to sleep after inactivity of five minutes or less. To further save battery power, select the following options in the Energy Saver pane of System Preferences: • Set - Apple M9418LL | Getting Started - Page 49
locking device with security cable Security slot For More Information on Security Options Additional information on the software security features of your iBook G4, including multiple user passwords and file encryption, is available in Mac OS Help. Choose Help > Mac Help from the menu bar and - Apple M9418LL | Getting Started - Page 50
- Apple M9418LL | Getting Started - Page 51
for instructions on how to contact Apple for service. If you attempt to install memory and damage your equipment, such damage is not covered by the limited warranty on your computer. Installing an AirPort Extreme Card or Additional Memory You can install an AirPort Extreme Card in your iBook G4 - Apple M9418LL | Getting Started - Page 52
. Follow the steps in the next section, then proceed to "Installing an AirPort Extreme Card" on page 54 or "Installing Additional Memory" on page 55. Removing the Battery and Keyboard 1 Shut down your computer. Disconnect the power adapter, phone cord, and any other cables connected to the computer - Apple M9418LL | Getting Started - Page 53
. 3 Touch a metal surface inside the computer to discharge any static electricity from your body. • If you are installing an AirPort Extreme Card, continue to the next section. • If you are installing memory, skip to "Installing Additional Memory" on page 55. Chapter 4 Enhancing Your Computer 53 - Apple M9418LL | Getting Started - Page 54
an AirPort Extreme Card Make sure you have completed the steps in "Removing the Battery and Keyboard" on page 52. To install an AirPort Extreme Card: 1 Flip up the wire bracket and connect the end of the antenna to the AirPort Extreme Card. Slide the AirPort Extreme - Apple M9418LL | Getting Started - Page 55
52. To install additional memory: 1 If you have an AirPort Extreme Card installed, remove the card. Lift the wire bracket that holds the card, remove the card from the slot, and detach the antenna. Wire bracket To prevent scratching, don't rest your AirPort Extreme Card on your iBook G4 unless you - Apple M9418LL | Getting Started - Page 56
3 If you already have a memory card installed in the slot, remove it. Spread the tabs in the slot away from the notches in the memory card. The card should pop up slightly. 4 Insert the new memory card into the slot at a 30-degree angle. Push the card to seat it fully into the slot. 30O - Apple M9418LL | Getting Started - Page 57
6 Replace the RAM shield and AirPort Extreme Card, if you have one. Now that you've completed installing the memory card, proceed to the next section and "Making Sure Your Computer Recognizes the New Memory" on page 59. Replacing the Keyboard and Battery 1 Replace the keyboard by inserting it at an - Apple M9418LL | Getting Started - Page 58
memory module, you can lock the keyboard by turning the keyboard screw one half turn. ® 3 Replace the battery. Place the left side of the battery into the battery compartment. Gently press the right side of the battery down until the battery latch locks into place. 4 Reconnect the power adapter - Apple M9418LL | Getting Started - Page 59
, shut down your iBook G4 and check the instructions again to make sure that the memory you installed is compatible with this iBook G4 and that it is installed correctly. If you still have problems, remove the memory and consult the support information that came with the memory or contact the vendor - Apple M9418LL | Getting Started - Page 60
- Apple M9418LL | Getting Started - Page 61
Any new hardware, such as additional memory or a peripheral, that you installed. You can also find more troubleshooting information in Mac OS Help, on the Apple Support website at www.apple.com/support, and in the AppleCare Knowledge Base at kbase.info.apple.com. Problems That Prevent You From Using - Apple M9418LL | Getting Started - Page 62
the power adapter to charge the battery until at least one indicator light is glowing continuously. • If that does not work, press the Power button (®) and immediately hold down the Command (x), Option, P, and R keys until you hear the startup sound a second time. 62 Chapter 5 Troubleshooting - Apple M9418LL | Getting Started - Page 63
, see the service and support information that came with your iBook G4 for information on contacting Apple for service. If the display suddenly goes black or your system freezes Try restarting your system. 1 Unplug any devices that are connected to your iBook G4 except the power adapter. 2 Hold down - Apple M9418LL | Getting Started - Page 64
to help determine if there is a problem with one of your computer's components, such as the memory or processor. If your iBook G4 came with two Software Install and Restore DVDs, Apple Hardware Test is on the first Software Install and Restore DVD. If your iBook G4 came with a series of Software - Apple M9418LL | Getting Started - Page 65
your Internet service provider (ISP) or network administrator. If you have a problem using your computer or working with the Mac OS • If the answers to your questions are not in this manual, look in Mac OS Help for instructions and troubleshooting information. • Check the Apple Support website at - Apple M9418LL | Getting Started - Page 66
. • If you have two iBook G4 Software Install and Restore DVDs, insert the first disc into your computer. 3 Double-click the "Install Applications and Classic Support" icon. 4 Follow the onscreen instructions. Note: iCal, iChat, iMovie, iPhoto, iSync, iTunes, and Safari are part of Mac OS X. To - Apple M9418LL | Getting Started - Page 67
Specifications A A You can use System Profiler to find out detailed information about your iBook G4, such as the amount of built-in memory, hard disk size, devices connected, and the product serial number. To access the information in System Profiler, choose Apple noncondensing Power Adapter • Input: - Apple M9418LL | Getting Started - Page 68
Battery • Output: DC 10.8 V for 12-inch iBook G4, 14.4 V for 14-inch iBook G4 • Capacity: 50 WHr for 12-inch iBook G4, 62 WHr for 14-inch iBook G4 Additional information is available on the Internet at www.apple.com/ibook and www.apple.com/support. 68 Appendix A Specifications - Apple M9418LL | Getting Started - Page 69
as the optical drive slot. Storing Your iBook G4 If you are going to store your iBook G4 for an extended period of time, do one of the following to prevent your iBook G4 battery from becoming completely depleted: • Keep the power adapter connected. • Fully charge your iBook G4 battery before storing - Apple M9418LL | Getting Started - Page 70
the power adapter and remove the battery before opening the computer to perform procedures such as installing memory or removing the hard disk. Warning: Use only the power adapter that came with your iBook G4 computer. Adapters for other electronic devices (including other iBook G4 models and - Apple M9418LL | Getting Started - Page 71
pulling the plug, not the cord), remove the battery, and disconnect the phone cord if any of the following conditions exists: • You want to remove any parts. • The power cord or plug becomes frayed or otherwise damaged. • You spill something into the case. • Your computer is exposed to rain or any - Apple M9418LL | Getting Started - Page 72
can adapt over time to a higher volume of sound, which may sound normal but can be damaging to your hearing. Set your iBook G4 volume to a safe level before that happens. If you experience ringing in your ears, reduce the volume or discontinue use of earbuds or headphones with your iBook G4. Apple - Apple M9418LL | Getting Started - Page 73
of the chair so your thighs are horizontal and your feet flat on the floor. The back of the chair should support your lower back (lumbar region). Follow the manufacturer's instructions for adjusting the backrest to fit your body properly. You may have to raise your chair so your forearms and hands - Apple M9418LL | Getting Started - Page 74
you take the computer from one work location to another, or if the lighting in your work area changes. For More Information Go to www.apple.com/about/ergonomics. 74 Appendix B Care, Use, and Safety Information - Apple M9418LL | Getting Started - Page 75
Internet. Use this detailed guide to connect to the set up your connection manually. There are four service," or "online." Note: If you want to use America Online as your ISP, skip the Internet setup part of the Setup Assistant. Install America Online for Mac OS X and follow the setup instructions - Apple M9418LL | Getting Started - Page 76
(included with most Macintosh computers) into your computer's modem port and into a phone wall jack. If you are using a DSL or cable modem, follow the instructions that came with the modem to connect it to your computer. 76 Appendix C Connecting to the Internet - Apple M9418LL | Getting Started - Page 77
set up a telephone dial-up connection, gather the following information: • Service provider name • User or account name • Password • ISP phone number your system administrator or your ISP, if you don't know): • Manually • Using DHCP with a manual address • Using DHCP • Using BootP • PPP If you're - Apple M9418LL | Getting Started - Page 78
service name The information below is optional. Ask your ISP or system administrator if you need it. • DNS servers • Domain name • Proxy server Entering Your Information After gathering your specific modem, DSL, or LAN connection using these configurations: • Manual (see page 83) • DHCP (see page 84) - Apple M9418LL | Getting Started - Page 79
have the information from your ISP available (see page 77). To set up Network preferences to connect using the internal modem port: 1 Choose Apple (K) > System Preferences from the menu bar. 2 Click Network. 3 Choose Network Port Configurations from the Show pop-up menu and select the On checkbox - Apple M9418LL | Getting Started - Page 80
5 Choose Internal Modem from the Show pop-up menu and click PPP. 6 Enter the information from your ISP and click Apply Now. To test your Internet configuration: 1 Open the Internet Connect application (in the Applications folder). 2 Click the Internal Modem icon, if necessary. 3 Enter your dial-up - Apple M9418LL | Getting Started - Page 81
a DSL or cable modem or Ethernet LAN, ask your ISP or network administrator how you should configure your Internet connection: • Manually. With a manual configuration, your ISP or network administrator provides a static IP address and other information that you enter in Network preferences. • Using - Apple M9418LL | Getting Started - Page 82
up Network preferences for the built-in Ethernet port: 1 Choose Apple (K) > System Preferences from the menu bar. 2 Click primary, network interface. Next, follow the instructions to configure your network manually, using DHCP, or using PPPoE, as instructed by your ISP or network administrator. 82 - Apple M9418LL | Getting Started - Page 83
subnet mask from your ISP ready (see page 77). To set up a manual configuration: 1 In Network preferences, choose Built-in Ethernet from the Show pop TCP/IP, if necessary. 3 In the Configure IPv4 pop-up menu, choose Manually. 4 Type the information into the corresponding fields. 5 Click Apply Now. - Apple M9418LL | Getting Started - Page 84
IPv4 pop-up menu. 4 Click Apply Now. Open your web browser (or another TCP/IP application) to test your Internet connection. Note: Unless your ISP instructs you to do otherwise, ignore the DHCP Client ID field and the Search Domains field. 84 Appendix C Connecting to the Internet - Apple M9418LL | Getting Started - Page 85
PPPoE Configuration Some DSL-based ISPs use Point-to-Point Protocol over Ethernet (PPPoE). If you use a DSL modem and need a user name and password to connect to the Internet, check with your ISP to determine if you should connect using PPPoE. To set up a PPPoE connection: Have your user name, - Apple M9418LL | Getting Started - Page 86
4 Click TCP/IP and choose either Using PPP or Manually from the Configure IPv4 pop-up menu, as instructed by your ISP. If you have a static IP address from your ISP, choose Manually and type the address in the IP Address field. 5 Type the domain name server (DNS) addresses in the DNS Servers field - Apple M9418LL | Getting Started - Page 87
Base Station Setup Guide that came with your base station. If your AirPort Extreme Base Station is already configured, in most cases your AirPort Extreme Card Manually Gather the following information from your system administrator if you'll be setting up a manual connection, which uses specific - Apple M9418LL | Getting Started - Page 88
AirPort Extreme connection: 1 Choose Apple (K) > System Preferences from the menu bar. 2 Click Network. 3 Choose Network Port Configurations from the Show pop-up menu. 4 Select the On checkbox next to AirPort. Next, follow the instructions to configure your network either manually or using DHCP, as - Apple M9418LL | Getting Started - Page 89
or Using DHCP. • If you chose Manually, type the other information into the corresponding fields. • If you chose Using DHCP, you don't need to enter any further information unless your system administrator has instructed you to do so. 8 Click AirPort and select options for joining an AirPort - Apple M9418LL | Getting Started - Page 90
Troubleshooting Your Connection Cable Modem, DSL, and LAN Internet Connections If you can't connect to the Internet using your cable modem, DSL, or local area network (LAN), see the following steps. Important: Instructions that refer to modems do not apply to LAN users. LAN users may have hubs, - Apple M9418LL | Getting Started - Page 91
one IP address among multiple computers. For information on using the AirPort Extreme Base Station, check the onscreen help or visit the Apple AirPort website at www.apple.com/airport. If you cannot resolve the issue using these steps, contact your ISP. Appendix C Connecting to the Internet 91 - Apple M9418LL | Getting Started - Page 92
- Apple M9418LL | Getting Started - Page 93
you through setting up an Internet connection. How do I set up my printer? Is it compatible with my iBook G4? Begin by connecting your printer and installing any software according to the instructions that came with your printer. Next, open System Preferences and click the Print & Fax icon. Use the - Apple M9418LL | Getting Started - Page 94
check the AppleCare Knowledge Base at www.apple.com/support. Warning: Inserting a nonstandard disc into the optical drive may damage the drive. How do I connect a monitor or TV to my iBook G4? Your iBook G4 comes with an external monitor port and an adapter for connecting devices with VGA connectors - Apple M9418LL | Getting Started - Page 95
for solving problems in the AppleCare Knowledge Base. To access the Knowledge Base on the web, go to www.apple.com/support. If you determine that you must reinstall Mac OS X, you'll find instructions in "Restoring Your Computer's Software" on page 65. I installed an application on my iBook G4, but - Apple M9418LL | Getting Started - Page 96
- Apple M9418LL | Getting Started - Page 97
is not installed and used properly-that is, in strict accordance with Apple's instructions-it may cause interference with radio and television reception. This equipment has been tested and found to comply with the limits for a Class B digital device in accordance with the specifications in Part 15 - Apple M9418LL | Getting Started - Page 98
may differ slightly from the ones shown here. Class 1 label Service warning label Laser Specifications for Combo Drive Laser on pickup unit when reading a DVD: • Type: Semiconductor laser GaAs/In(GaAI)P/InGaP • Wavelength: 655 ± 15 nm • Power out of objective lens: 0.33 mW • Beam divergence: 20 - Apple M9418LL | Getting Started - Page 99
people. If disconnecting the modem eliminates the problem, the modem itself may need service. See the service and support information that came with your Apple product for instructions on how to contact Apple or an Apple-authorized service provider for assistance. If you do not disconnect - Apple M9418LL | Getting Started - Page 100
Apple pour des informations supplémentaires: Apple Canada, Inc. 7495 Birchmount Road Markham, Ontario Canada L3R 5G2 Service à la clientèle d'Apple faire ces raccordements lui-même; il doit avoir recours à une service d'inspection des installations électriques ou à un électricien, selon le cas. • - Apple M9418LL | Getting Started - Page 101
. Above all, it provides no assurance that any item will work correctly in all respects with another item of Telepermitted equipment of a different make or model, nor does it imply that any product is compatible with all of Telecom's network - Apple M9418LL | Getting Started - Page 102
- Apple M9418LL | Getting Started - Page 103
37 a printer 25 a projector 40 a TV 41 a VCR 41 a video device 41 Bluetooth devices 37 external devices 32 FireWire devices 34 FireWire hard disk drives 34 headphones 26 to an Ethernet network 12 two computers 34, 35 USB printers 32 videocameras 34 wirelessly 36 conserving battery power 94 103 - Apple M9418LL | Getting Started - Page 104
and battery power 35 port 9, 34 Target Disk Mode 34, 35 Force Quit 29 frozen application 29 function key 7 G general safety 71 green light 21 H hand positions 73 headphone port 9 I image size 20 inserting a disc 42 installation instructions 5 installing AirPort Extreme Card 51 memory 55 internal - Apple M9418LL | Getting Started - Page 105
RJ-11 cable 39 S safety 71 power adapter 70 using your iBook G4 70 SDRAM specifications 51 security slot 9, 49 serial number 66 setting up 77 a printer 25, 93 to connect manually 78 setup assistant 12 shutting down 15 sleep 15 sleep indicator light 7 software installer 65 Software Update 26 speakers - Apple M9418LL | Getting Started - Page 106
Serial Bus (USB) 32 updating software 26 USB devices and battery power 33 hubs 33 multiple devices 33 ports 9, 32 using AirPort 36 Bluetooth devices 37 FireWire devices 34 multiple USB devices 33 your optical drive 41 using DHCP option 77 V VGA adapter 39 VGA connection 40 video playing 43 video - Apple M9418LL | Getting Started - Page 107
- Apple M9418LL | Getting Started - Page 108
-
 1
1 -
 2
2 -
 3
3 -
 4
4 -
 5
5 -
 6
6 -
 7
7 -
8
-
9
-
10
-
11
-
12
-
13
-
14
-
15
-
16
-
17
-
18
-
19
-
20
-
21
-
22
-
23
-
24
-
25
-
26
-
27
-
28
-
29
-
30
-
31
-
32
-
33
-
34
-
35
-
36
-
37
-
38
-
39
-
40
-
41
-
42
-
43
-
44
-
45
-
46
-
47
-
48
-
49
-
50
-
51
-
52
-
53
-
54
-
55
-
56
-
57
-
58
-
59
-
60
-
61
-
62
-
63
-
64
-
65
-
66
-
67
-
68
-
69
-
70
-
71
-
72
-
73
-
74
-
75
-
76
-
77
-
78
-
79
-
80
-
81
-
82
-
83
-
84
-
85
-
86
-
87
-
88
-
89
-
90
-
91
-
92
-
93
-
94
-
95
-
96
-
97
-
98
-
99
-
100
-
101
-
102
-
103
-
104
-
105
-
106
-
107
-
108
 |
 |

iBook G4
Getting Started
Includes setup, expansion, and
troubleshooting information for
your iBook G4 computer