Apple MC344LL Setup Guide - Page 10

Plugging In Your Time Capsule

Page 10 highlights

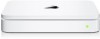
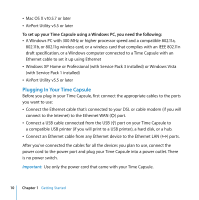
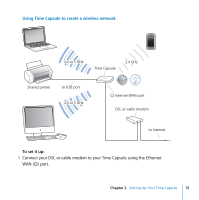
 Mac OS X v10.5.7 or later  AirPort Utility v5.5 or later To set up your Time Capsule using a Windows PC, you need the following:  A Windows PC with 300 MHz or higher processor speed and a compatible 802.11a, 802.11b, or 802.11g wireless card, or a wireless card that complies with an IEEE 802.11n draft specification, or a Windows computer connected to a Time Capsule with an Ethernet cable to set it up using Ethernet  Windows XP Home or Professional (with Service Pack 3 installed) or Windows Vista (with Service Pack 1 installed)  AirPort Utility v5.5 or later Plugging In Your Time Capsule Before you plug in your Time Capsule, first connect the appropriate cables to the ports you want to use:  Connect the Ethernet cable that's connected to your DSL or cable modem (if you will connect to the Internet) to the Ethernet WAN (

  • 1
  • 2
  • 3
  • 4
  • 5
  • 6
  • 7
  • 8
  • 9
  • 10
  • 11
  • 12
  • 13
  • 14
  • 15
  • 16
  • 17
  • 18
  • 19
  • 20
  • 21
  • 22
  • 23
  • 24
  • 25
  • 26
  • 27
  • 28
  • 29
  • 30
  • 31
  • 32
  • 33
  • 34
  • 35
  • 36
  • 37
  • 38
  • 39
  • 40

10
Chapter 1
Getting Started
Â
Mac OS X v10.5.7 or later
Â
AirPort Utility v5.5 or later
To set up your Time Capsule using a Windows PC, you need the following:
Â
A Windows PC with 300 MHz or higher processor speed and a compatible 802.11a,
802.11b, or 802.11g wireless card, or a wireless card that complies with an IEEE 802.11n
draft specification, or a Windows computer connected to a Time Capsule with an
Ethernet cable to set it up using Ethernet
Â
Windows XP Home or Professional (with Service Pack 3 installed) or Windows Vista
(with Service Pack 1 installed)
Â
AirPort Utility v5.5 or later
Plugging In Your Time Capsule
Before you plug in your Time Capsule, first connect the appropriate cables to the ports
you want to use:
Â
Connect the Ethernet cable that’s connected to your DSL or cable modem (if you will
connect to the Internet) to the Ethernet WAN (
<
) port.
Â
Connect a USB cable connected from the USB (
d
) port on your Time Capsule to
a compatible USB printer (if you will print to a USB printer), a hard disk, or a hub.
Â
Connect an Ethernet cable from any Ethernet device to the Ethernet LAN (
G
) ports.
After you’ve connected the cables for all the devices you plan to use, connect the
power cord to the power port and plug your Time Capsule into a power outlet. There
is no power switch.
Important:
Use only the power cord that came with your Time Capsule.