Asus P4GE-MX P4GE-MX User Manual E1722 English Edition - Page 44
Supervisor Password [Clear] / User Password [Clear], Drive A [1.44M, 3.5 in.], Floppy 3 Mode Support
 |
View all Asus P4GE-MX manuals
Add to My Manuals
Save this manual to your list of manuals |
Page 44 highlights
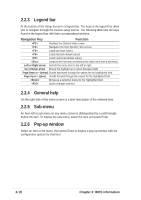
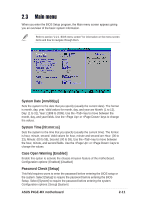
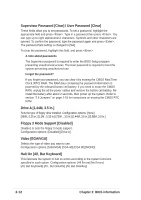
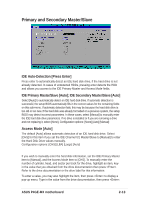
Supervisor Password [Clear] / User Password [Clear] These fields allow you to set passwords. To set a password, highlight the appropriate field and press . Type in a password then press . You can type up to eight alphanumeric characters. Symbols and other characters are ignored. To confirm the password, type the password again and press . The password field setting is changed to [Set]. To clear the password, highlight this field, and press . A note about passwords The Supervisor password is required to enter the BIOS Setup program preventing unauthorized access. The User password is required to boot the system preventing unauthorized use. Forgot the password? If you forget your password, you can clear it by erasing the CMOS Real Time Clock (RTC) RAM. The RAM data containing the password information is powered by the onboard button cell battery. If you need to erase the CMOS RAM, unplug the all the power cables and remove the button cell battery. Reinstall the battery after about 2 seconds, then power up the system. Refer to section "2.6 Jumpers" on page 2-18 for instructions on erasing the CMOS RTC RAM. Drive A [1.44M, 3.5 in.] Sets the type of floppy drive installed. Configuration options: [None] [360K, 5.25 in.] [1.2M , 5.25 in.] [720K , 3.5 in.] [1.44M, 3.5 in.] [2.88M, 3.5 in.] Floppy 3 Mode Support [Disabled] Disables or sets the floppy 3 mode support. Configuration options: [Disabled] [Drive A] Video [EGA/VGA] Selects the type of video you want to use. Configuration options: [EGA/VGA] [CGA 40] [CGA 80] [MONO] Halt On [All, But Keyboard] This field sets the system to halt on errors according to the system functions specified in each option. Configuration options: [All Errors] [No Errors] [All, But Keyboard] [All , But Diskette] [All, But Disk/Key] 2-12 Chapter 2: BIOS information
-
 1
1 -
2
-
3
-
4
-
5
-
6
-
7
-
8
-
9
-
10
-
11
-
12
-
13
-
14
-
15
-
16
-
17
-
18
-
19
-
20
-
21
-
22
-
23
-
24
-
25
-
26
-
27
-
28
-
29
-
30
-
31
-
32
-
33
-
34
-
35
-
36
-
37
-
38
-
 39
39 -
 40
40 -
 41
41 -
 42
42 -
 43
43 -
 44
44 -
 45
45 -
 46
46 -
 47
47 -
 48
48 -
 49
49 -
50
-
51
-
52
-
53
-
54
-
55
-
56
-
57
-
58
-
59
-
60
-
61
-
62
 |
 |
