Asus P4GE-MX P4GE-MX User Manual E1722 English Edition - Page 45
Primary and Secondary Master/Slave
 |
View all Asus P4GE-MX manuals
Add to My Manuals
Save this manual to your list of manuals |
Page 45 highlights
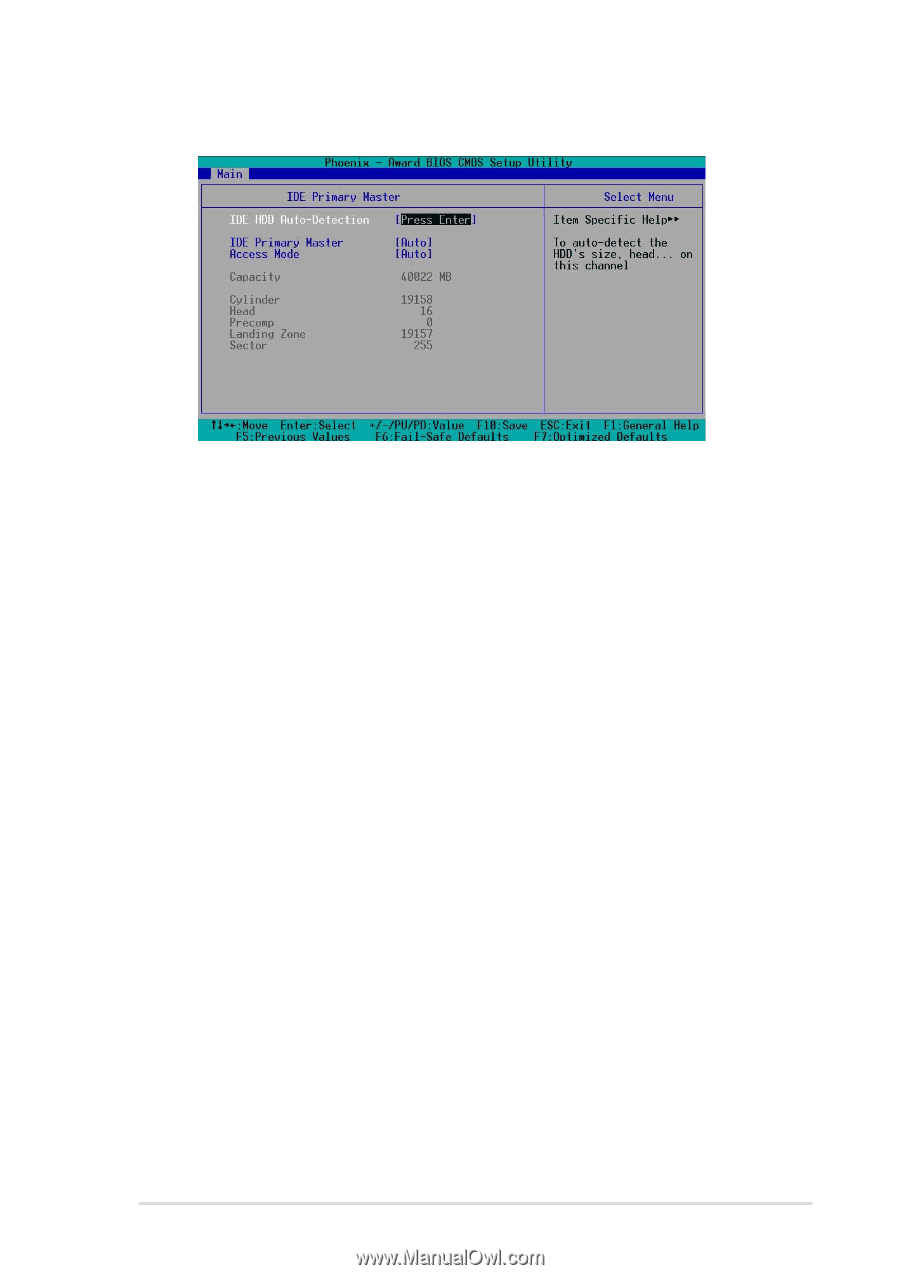
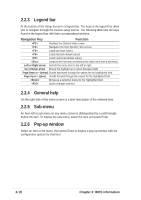
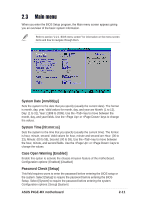
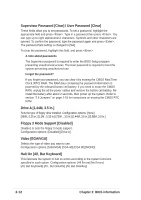
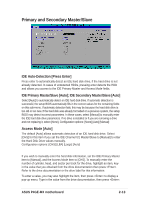
Primary and Secondary Master/Slave IDE Auto-Detection [Press Enter] Press enter to automatically detect an IDE hard disk drive, if the hard drive is not already detected. In cases of undetected HDDs, pressing enter detects the HDD and allows you access to the IDE Primary Master and Access Mode fields. IDE Primary Master/Slave [Auto]; IDE Secondary Master/Slave [Auto] Select [Auto] to automatically detect an IDE hard disk drive. If automatic detection is successful, the setup BIOS automatically fills in the correct values for the remaining fields on this sub-menu. If automatic detection fails, this may be because the hard disk drive is too old or too new. If the hard disk was already formatted on a previous system, the setup BIOS may detect incorrect parameters. In these cases, select [Manual] to manually enter the IDE hard disk drive parameters. If no drive is installed or if you are removing a drive and not replacing it, select [None]. Configuration options: [None] [Auto] [Manual] Access Mode [Auto] The default [Auto] allows automatic detection of an IDE hard disk drive. Select [CHS] for this item if you set the IDE Channel 0/1 Master/Slave to [Manual] to enter the Hard Disk Drive values manually. Configuration options: [CHS] [LBA] [Large] [Auto] Manual HDD type selection If you wish to manually enter the hard disk information, set the IDE Primary Master item to [Manual], and the Access Mode item to [CHS]. To manually enter the number of cylinder, head, and sector per track for the drive, highlight an item, keyin the value that you obtained from the drive documentation then press . Refer to the drive documentation or the drive label for this information. To enter a value, you may also highlight the item, then press to display a pop-up menu. Type in the value from the drive documentation, then press . ASUS P4GE-MX motherboard 2-13
-
 1
1 -
2
-
3
-
4
-
5
-
6
-
7
-
8
-
9
-
10
-
11
-
12
-
13
-
14
-
15
-
16
-
17
-
18
-
19
-
20
-
21
-
22
-
23
-
24
-
25
-
26
-
27
-
28
-
29
-
30
-
31
-
32
-
33
-
34
-
35
-
36
-
37
-
38
-
39
-
 40
40 -
 41
41 -
 42
42 -
 43
43 -
 44
44 -
 45
45 -
 46
46 -
 47
47 -
 48
48 -
 49
49 -
 50
50 -
51
-
52
-
53
-
54
-
55
-
56
-
57
-
58
-
59
-
60
-
61
-
62
 |
 |