Asus P5LD-MR User Manual - Page 110
Rebuilding the RAID
 |
View all Asus P5LD-MR manuals
Add to My Manuals
Save this manual to your list of manuals |
Page 110 highlights
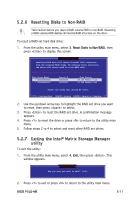
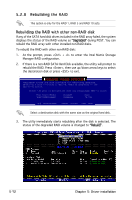
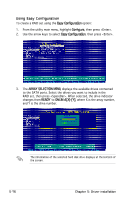
5.2.8 Rebuilding the RAID This option is only for the RAID 1, RAID 5 and RAID 10 sets. Rebuilding the RAID with other non-RAID disk If any of the SATA hard disk drives included in the RAID array failed, the system displays the status of the RAID volume as "Degraded" during POST. You can rebuild the RAID array with other installed non-RAID disks. To rebuild the RAID with other non-RAID disk: 1. At the prompt, press + to enter the Intel Matrix Storage Manager RAID configuration. 2. If there is a non-RAID SATA Hard Disk available, the utility will prompt to rebuild the RAID. Press , then use up/down arrow keys to select the destination disk or press to exit. DEGRADED VOLUME DETECTED "Degraded" volume and disk available for rebuilding detected. Selecting a disk initiates a rebuild. Rebuild completes in the operating system. Select the port of destination disk for rebuilding (ESC to exit): Port Drive Model 3HDS722580VLSA80 Serial# VN6Bxxxx Size 76.7GB [ ]- Previous/Next [Enter]- Selects [ESC]- Exit Select a destination disk with the same size as the original hard disk. 3. The utilty immediately starts rebuilding after the disk is selected. The status of the degraded RAID volume is changed to "Rebuild". 5-12 Chapter 5: Driver installation
-
 1
1 -
2
-
3
-
4
-
5
-
6
-
7
-
8
-
9
-
10
-
11
-
12
-
13
-
14
-
15
-
16
-
17
-
18
-
19
-
20
-
21
-
22
-
23
-
24
-
25
-
26
-
27
-
28
-
29
-
30
-
31
-
32
-
33
-
34
-
35
-
36
-
37
-
38
-
39
-
40
-
41
-
42
-
43
-
44
-
45
-
46
-
47
-
48
-
49
-
50
-
51
-
52
-
53
-
54
-
55
-
56
-
57
-
58
-
59
-
60
-
61
-
62
-
63
-
64
-
65
-
66
-
67
-
68
-
69
-
70
-
71
-
72
-
73
-
74
-
75
-
76
-
77
-
78
-
79
-
80
-
81
-
82
-
83
-
84
-
85
-
86
-
87
-
88
-
89
-
90
-
91
-
92
-
93
-
94
-
95
-
96
-
97
-
98
-
99
-
100
-
101
-
102
-
103
-
104
-
 105
105 -
 106
106 -
 107
107 -
 108
108 -
 109
109 -
 110
110 -
 111
111 -
 112
112 -
 113
113 -
 114
114 -
 115
115 -
116
-
117
-
118
-
119
-
120
-
121
-
122
-
123
-
124
-
125
-
126
-
127
-
128
-
129
-
130
-
131
-
132
-
133
-
134
-
135
-
136
-
137
-
138
-
139
-
140
-
141
-
142
-
143
-
144
-
145
-
146
-
147
-
148
-
149
-
150
-
151
-
152
-
153
-
154
-
155
-
156
-
157
-
158
-
159
-
160
 |
 |
