Asus P5Q Deluxe User Manual - Page 156
Configuring EZ Backup
 |
UPC - 610839162574
View all Asus P5Q Deluxe manuals
Add to My Manuals
Save this manual to your list of manuals |
Page 156 highlights
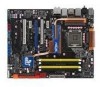
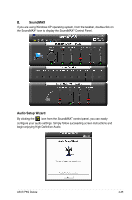
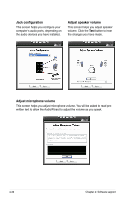
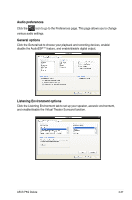
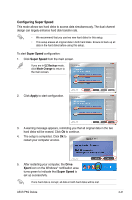
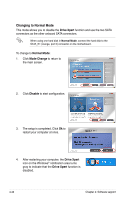
Configuring EZ Backup This mode allows one hard disk to backup the other hard disk automatically. This helps you to save your vital data even if one hard disk is damaged. • We recommend that you use two new hard disks for this setup. • This setup erases all original data in the hard disk connected to the SATA_E2 (white, port 1) connector on the motherboard. Ensure to back up the data in the hard disk before using this setup. To start EZ Backup configuration: 1. Click EZ Backup from the main screen. 2. Click Apply to start configuration. 3. A warning message appears, reminding you that all original data in the hard disk connected to the SATA_E2 (white, port 1) connector on the motherboard will be erased. Click Ok to continue. 4. The setup is completed. Click Ok to restart your computer at once. 5. After restarting your computer, the Drive Xpert icon on the Windows® notification area turns green to indicate that EZ Backup is set up successfully. 4-40 Chapter 4: Software support
-
 1
1 -
2
-
3
-
4
-
5
-
6
-
7
-
8
-
9
-
10
-
11
-
12
-
13
-
14
-
15
-
16
-
17
-
18
-
19
-
20
-
21
-
22
-
23
-
24
-
25
-
26
-
27
-
28
-
29
-
30
-
31
-
32
-
33
-
34
-
35
-
36
-
37
-
38
-
39
-
40
-
41
-
42
-
43
-
44
-
45
-
46
-
47
-
48
-
49
-
50
-
51
-
52
-
53
-
54
-
55
-
56
-
57
-
58
-
59
-
60
-
61
-
62
-
63
-
64
-
65
-
66
-
67
-
68
-
69
-
70
-
71
-
72
-
73
-
74
-
75
-
76
-
77
-
78
-
79
-
80
-
81
-
82
-
83
-
84
-
85
-
86
-
87
-
88
-
89
-
90
-
91
-
92
-
93
-
94
-
95
-
96
-
97
-
98
-
99
-
100
-
101
-
102
-
103
-
104
-
105
-
106
-
107
-
108
-
109
-
110
-
111
-
112
-
113
-
114
-
115
-
116
-
117
-
118
-
119
-
120
-
121
-
122
-
123
-
124
-
125
-
126
-
127
-
128
-
129
-
130
-
131
-
132
-
133
-
134
-
135
-
136
-
137
-
138
-
139
-
140
-
141
-
142
-
143
-
144
-
145
-
146
-
147
-
148
-
149
-
150
-
 151
151 -
 152
152 -
 153
153 -
 154
154 -
 155
155 -
 156
156 -
 157
157 -
 158
158 -
 159
159 -
 160
160 -
 161
161 -
162
-
163
-
164
-
165
-
166
-
167
-
168
-
169
-
170
-
171
-
172
-
173
-
174
-
175
-
176
-
177
-
178
-
179
-
180
-
181
-
182
-
183
-
184
-
185
-
186
-
187
-
188
-
189
-
190
-
191
-
192
 |
 |