Asus P9X79 PRO User Manual - Page 140
ASUS SSD Caching - ssd install
 |
View all Asus P9X79 PRO manuals
Add to My Manuals
Save this manual to your list of manuals |
Page 140 highlights
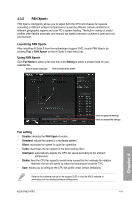
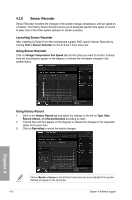
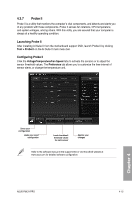
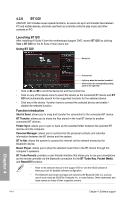
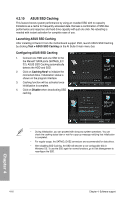
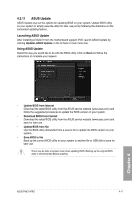
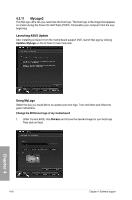
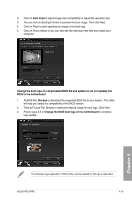
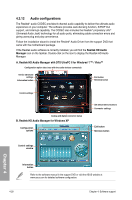
4.3.10 ASUS SSD Caching This feature boosts system performance by using an installed SSD with no capacity limitations as a cache for frequently accessed data. Harness a combination of SSD-like performance and response and hard drive capacity with just one click. No rebooting is needed with instant activation for complete ease of use. Launching ASUS SSD Caching After installing AI Suite II from the motherboard support DVD, launch ASUS SSD Caching by clicking Tool > ASUS SSD Caching on the AI Suite II main menu bar. Configuring ASUS SSD Caching 1. Connect one HDD and one SSD to the the Marvell® SATA ports (SATA6G_E1/ E2). ASUS SSD Caching automatically detects the HDD and SSD. 2. Click on Caching Now! to initialize the connected disks. Initialization status is shown on the program interface. 3. Caching function will be activated once initialization is complete. 4. Click on Disable when deactivating SSD caching. • During initialization, you can proceed with doing any system operations. You can check the caching status later or wait for a pop-up message notifying that initialization is completed. • For regular usage, the SATA6G_E1/E2 connectors are recommended for data drives. • After disabling SSD Caching, the SSD will become a non-configurable disk in Windows OS. To use the SSD again for normal functions, go to Disk Management to reconfigure the SSD. Chapter 4 4-16 Chapter 4: Software support
-
 1
1 -
2
-
3
-
4
-
5
-
6
-
7
-
8
-
9
-
10
-
11
-
12
-
13
-
14
-
15
-
16
-
17
-
18
-
19
-
20
-
21
-
22
-
23
-
24
-
25
-
26
-
27
-
28
-
29
-
30
-
31
-
32
-
33
-
34
-
35
-
36
-
37
-
38
-
39
-
40
-
41
-
42
-
43
-
44
-
45
-
46
-
47
-
48
-
49
-
50
-
51
-
52
-
53
-
54
-
55
-
56
-
57
-
58
-
59
-
60
-
61
-
62
-
63
-
64
-
65
-
66
-
67
-
68
-
69
-
70
-
71
-
72
-
73
-
74
-
75
-
76
-
77
-
78
-
79
-
80
-
81
-
82
-
83
-
84
-
85
-
86
-
87
-
88
-
89
-
90
-
91
-
92
-
93
-
94
-
95
-
96
-
97
-
98
-
99
-
100
-
101
-
102
-
103
-
104
-
105
-
106
-
107
-
108
-
109
-
110
-
111
-
112
-
113
-
114
-
115
-
116
-
117
-
118
-
119
-
120
-
121
-
122
-
123
-
124
-
125
-
126
-
127
-
128
-
129
-
130
-
131
-
132
-
133
-
134
-
 135
135 -
 136
136 -
 137
137 -
 138
138 -
 139
139 -
 140
140 -
 141
141 -
 142
142 -
 143
143 -
 144
144 -
 145
145 -
146
-
147
-
148
-
149
-
150
-
151
-
152
-
153
-
154
-
155
-
156
-
157
-
158
-
159
-
160
-
161
-
162
-
163
-
164
-
165
-
166
-
167
-
168
 |
 |
