Asus P9X79 PRO User Manual - Page 161
Installing the device drivers, Enabling the AMD, CrossFireX™, technology - drivers download
 |
View all Asus P9X79 PRO manuals
Add to My Manuals
Save this manual to your list of manuals |
Page 161 highlights
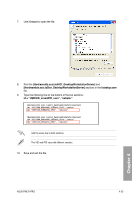
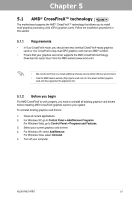
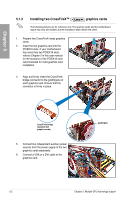
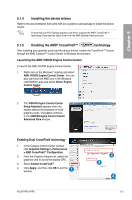
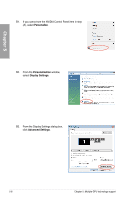
Chapter 5 5.1.4 Installing the device drivers Refer to the documentation that came with your graphics card package to install the device drivers. Ensure that your PCI Express graphics card driver supports the AMD® CrossFireX™ technology. Download the latest driver from the AMD website (www.amd.com). 5.1.5 Enabling the AMD® CrossFireX™ technology After installing your graphics cards and the device drivers, enable the CrossFireX™ feature through the AMD Catalyst™ Control Center in Windows environment. Launching the AMD VISION Engine Control Center To launch the AMD VISION Engine Control Center: 1. Right-click on the Windows® desktop and select AMD VISION Engine Control Center. You can also right-click the AMD icon in the Windows notificAMDon area and select Vision Engine Control Center. 2. The VISION Engine Control Center Setup Assistant appears when the system detects the existance of multigraphics cards. Click Go to continue to the VISION Engine Control Center Advanced View window. Enabling Dual CrossFireX technology 1. In the Catalyst Control Center window, click Graphics Settings > Performance > AMD CrossFireXTM Configuration. 2. From the Graphics Adapter list, select the graphics card to act as the display GPU. 3. Select Enable CrossFireXTM. 4. Click Apply, and then click OK to exit the window. 1 ASUS P9X79 PRO 2 3 4 5-3
-
 1
1 -
2
-
3
-
4
-
5
-
6
-
7
-
8
-
9
-
10
-
11
-
12
-
13
-
14
-
15
-
16
-
17
-
18
-
19
-
20
-
21
-
22
-
23
-
24
-
25
-
26
-
27
-
28
-
29
-
30
-
31
-
32
-
33
-
34
-
35
-
36
-
37
-
38
-
39
-
40
-
41
-
42
-
43
-
44
-
45
-
46
-
47
-
48
-
49
-
50
-
51
-
52
-
53
-
54
-
55
-
56
-
57
-
58
-
59
-
60
-
61
-
62
-
63
-
64
-
65
-
66
-
67
-
68
-
69
-
70
-
71
-
72
-
73
-
74
-
75
-
76
-
77
-
78
-
79
-
80
-
81
-
82
-
83
-
84
-
85
-
86
-
87
-
88
-
89
-
90
-
91
-
92
-
93
-
94
-
95
-
96
-
97
-
98
-
99
-
100
-
101
-
102
-
103
-
104
-
105
-
106
-
107
-
108
-
109
-
110
-
111
-
112
-
113
-
114
-
115
-
116
-
117
-
118
-
119
-
120
-
121
-
122
-
123
-
124
-
125
-
126
-
127
-
128
-
129
-
130
-
131
-
132
-
133
-
134
-
135
-
136
-
137
-
138
-
139
-
140
-
141
-
142
-
143
-
144
-
145
-
146
-
147
-
148
-
149
-
150
-
151
-
152
-
153
-
154
-
155
-
 156
156 -
 157
157 -
 158
158 -
 159
159 -
 160
160 -
 161
161 -
 162
162 -
 163
163 -
 164
164 -
 165
165 -
 166
166 -
167
-
168
 |
 |