Belkin F1DP108A User Manual - Page 26
Connecting Multiple SMB CAT5 KVM Switches, Daisy-Chaining
 |
UPC - 722868564004
View all Belkin F1DP108A manuals
Add to My Manuals
Save this manual to your list of manuals |
Page 26 highlights
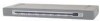
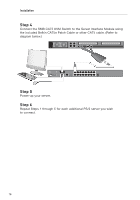
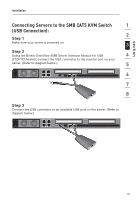
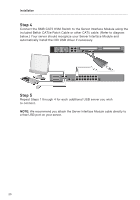
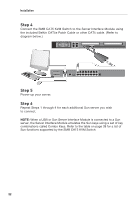
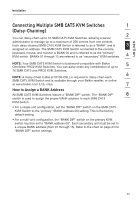
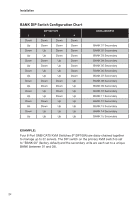
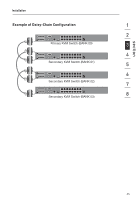
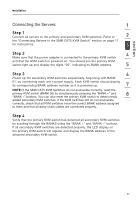
section Installation Connecting Multiple SMB CAT5 KVM Switches 1 (Daisy-Chaining) 2 You can daisy-chain up to 16 SMB CAT5 KVM Switches, allowing a server administrator to manage up to a maximum of 256 servers from one console. Each daisy-chained SMB CAT5 KVM Switch is referred to as a "BANK" and is 3 assigned an address. The SMB CAT5 KVM Switch connected to the console keyboard, mouse, and monitor is BANK 00 and is referred to as the "primary" KVM switch. BANKs 01 through 15 are referred to as "secondary" KVM switches. 4 NOTE: Your SMB CAT5 KVM Switch is backward-compatible with Belkin OmniView PRO2 KVM Switches. You can daisy-chain any combination of up to 5 16 SMB CAT5 and PRO2 KVM Switches. 6 NOTE: A Daisy-Chain Cable (F1D108-CBL) is required to daisy-chain each SMB CAT5 KVM Switch and is available through your Belkin reseller, or online at www.belkin.com (U.S. only). 7 How to Assign a BANK Address All SMB CAT5 KVM Switches feature a "BANK DIP" switch. The "BANK DIP" 8 switch is used to assign the proper BANK address to each SMB CAT5 KVM Switch. • For a single-unit configuration, set the "BANK DIP" switch on the SMB CAT5 KVM Switch to the "primary" (BANK address 00) setting. This is the factory default setting. • For a multi-unit configuration, the "BANK DIP" switch on the primary KVM switch must be set to "BANK address 00". Each secondary unit must be set to a unique BANK address (from 01 through 15). Refer to the chart on page 24 for "BANK DIP" switch settings. 23
-
 1
1 -
2
-
3
-
4
-
5
-
6
-
7
-
8
-
9
-
10
-
11
-
12
-
13
-
14
-
15
-
16
-
17
-
18
-
19
-
20
-
 21
21 -
 22
22 -
 23
23 -
 24
24 -
 25
25 -
 26
26 -
 27
27 -
 28
28 -
 29
29 -
 30
30 -
 31
31 -
32
-
33
-
34
-
35
-
36
-
37
-
38
-
39
-
40
-
41
-
42
-
43
-
44
-
45
-
46
-
47
-
48
-
49
-
50
-
51
-
52
-
53
-
54
-
55
-
56
-
57
-
58
-
59
-
60
-
61
-
62
-
63
-
64
-
65
-
66
-
67
-
68
-
69
-
70
-
71
-
72
-
73
-
74
-
75
-
76
-
77
-
78
-
79
-
80
-
81
-
82
-
83
-
84
-
85
-
86
-
87
-
88
-
89
-
90
-
91
-
92
-
93
-
94
-
95
-
96
-
97
-
98
-
99
-
100
-
101
-
102
-
103
-
104
-
105
-
106
-
107
-
108
-
109
-
110
-
111
-
112
-
113
-
114
-
115
-
116
-
117
-
118
-
119
-
120
-
121
-
122
-
123
-
124
-
125
-
126
-
127
-
128
-
129
-
130
-
131
-
132
-
133
-
134
-
135
-
136
-
137
-
138
-
139
-
140
-
141
-
142
-
143
-
144
-
145
-
146
-
147
-
148
-
149
-
150
-
151
-
152
-
153
-
154
-
155
-
156
-
157
-
158
-
159
-
160
-
161
-
162
-
163
-
164
-
165
-
166
-
167
-
168
-
169
-
170
-
171
-
172
-
173
-
174
-
175
-
176
-
177
-
178
-
179
-
180
-
181
-
182
-
183
-
184
-
185
-
186
-
187
-
188
-
189
-
190
-
191
-
192
-
193
-
194
-
195
-
196
-
197
-
198
-
199
-
200
-
201
-
202
-
203
-
204
-
205
-
206
-
207
-
208
-
209
-
210
-
211
-
212
-
213
-
214
-
215
-
216
-
217
-
218
-
219
-
220
-
221
-
222
-
223
-
224
-
225
-
226
-
227
-
228
-
229
-
230
-
231
-
232
-
233
-
234
-
235
-
236
-
237
-
238
-
239
-
240
-
241
-
242
-
243
-
244
-
245
-
246
-
247
-
248
-
249
-
250
-
251
-
252
-
253
-
254
-
255
-
256
-
257
-
258
-
259
-
260
-
261
-
262
-
263
-
264
-
265
-
266
-
267
-
268
-
269
-
270
-
271
-
272
-
273
-
274
-
275
-
276
-
277
-
278
-
279
-
280
-
281
-
282
-
283
-
284
-
285
-
286
-
287
-
288
-
289
-
290
-
291
-
292
-
293
-
294
-
295
-
296
-
297
-
298
-
299
-
300
-
301
-
302
-
303
-
304
-
305
-
306
 |
 |
