Bernina 740 Manual
Bernina 740 Manual
 |
View all Bernina 740 manuals
Add to My Manuals
Save this manual to your list of manuals |
Bernina 740 manual content summary:
- Bernina 740 | Manual - Page 1
I I C,3 BERNINA Model 740, BERNINA-Favorite Zigzag Sewing Machine with automatic ornamental stitch device Model 741 Zigzag Sewing Machine with automatic ornamental stitch device Model 742 Zigzag Sewing Machine without automatic ornamental stitch device FR. GEGAUF LTD. BERNINA SEWING MACHINE FACTORY - Bernina 740 | Manual - Page 2
models 744 and 741). The ornament indicator 64 Blindstiteh sewing sa Pintucking 57 Hemstitch sewing 60 Embroidering In Wale 65 Eyelet embroidery (broderie anglaise) 67 Bow to avoid machine trouble 70 Normal accessori ea for model 740 76 Normal accessories for model 741 76 Normal - Bernina 740 | Manual - Page 3
'I he ..ininty Certificate is sent to the Buyer direct by the Importers. Please complete and mail to them the card supplied with the machine. and they shall send yuu the Warranty Certificate. FR. GEGAUF LTD. BERNINA SEWING MACHINE FACTORY STECKBORN Switzerland - Bernina 740 | Manual - Page 4
(5) years in the machine, and during two (2> years in the motor of the Bernina Model 740. 711. or 712 sewing machine supplied by us. apply if the buyer does not treat the machine in the right way. as indicated in the instructions for use. if the machine is not properly cleaned and lubricated. nor in - Bernina 740 | Manual - Page 5
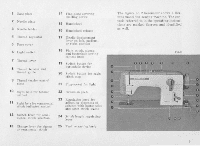
Fig. 1 hereunder shows a Bernina -Favorite sewing machine model 740 with horizontal motor. It is is zigzag sewing machine with ornamental stitch and buttonhole device. The controls referred to in the operating instructions are marked thereon and identified as well. 00 0 0 • BERNINA • r Yla I 4 - Bernina 740 | Manual - Page 6
Thread Irv. • a Thread tension and thrend guide Thread tension control plate 14 FInp•plate covering cli 10 Sight hole for tension control 11 Sight hole for ornamental alit/A indicator refitted figure no. 2 hereunder ashore a Bernina model 741 sewing machine. The controls referred to in the - Bernina 740 | Manual - Page 7
000 000 00 O 0 O - Bernina 740 | Manual - Page 8
bee a Bernina sewing machine of model 742, whereon the controls referred to In the operating instructions are marked thereon and identified as well. 1 Base plate 2 Needle plate 3 Needle holder 4 Thread regulator S Face cover 6 Light switch 7 Thread Inn 8 Thread tension and thread guide 9 Thread - Bernina 740 | Manual - Page 9
Motor 21 • 8 18 Ilandwheel release screw 26 Motor 27 V-belt 28 Belt protecting plate 29 3-pole coupling plug, combined for cable to supply circuit and for footstarter 30 Supply circuit plug 31 Date plate riff. 4 - Bernina 740 | Manual - Page 10
Bernina-Favorite sewing machines, models 740 and 74], as well as 142. are driven by a horizontal motor fixed at the back of the machine motor, is fixed on the casing. Prior to connecting the that they need no service at all. bi Corium the upper and lower brush support plates, Sittiated at the front - Bernina 740 | Manual - Page 11
51 and, holding said latch with thumb and fore- rig.. Spooling the under thread (see fig. 6 and 7) The winding of the bobbin bearing the under thread on the Bernina seving machines of the models 710. respectively 742 and 741, is done with an automatic winder. It is placed below the hinged cover - Bernina 740 | Manual - Page 12
the whole machine from running needlessly the bobbin 34 onto the bobbin guide bolt 32 to thread bobbin 34. Here ti., the thread should wind In clockwise direction on O. bobbin. Now push lever 33 against the bobbin bobbin is filled, whereupon the winder u II stop automatically. After the filled bobbin - Bernina 740 | Manual - Page 13
left hand hold the open hinged latch A in such a way that the opening of the bobbin case points upward and ran enter the recess in the shuttle race cover. Then place the bobbin case on the pin of the bobbin case finger until it strikes the bottom of the shuttle. Now release latch and make More - Bernina 740 | Manual - Page 14
needle end thread selection System 130 needles should be used exclusively on the Rerninn-Favorite, model 7O and model 741, as also on model 742. In order to groove. fills this latter well and can be freely moved to and fro. For Sewing the usual needle siVII are no. 80. 90 and 100, whereas for darning - Bernina 740 | Manual - Page 15
back of am, then into slot running across top Fit. roer- all • 11 hands take hold or a thread end and with the thumb turn thread towards to buy sewing and darning thread at the Bernina dealer's shop. There you will be sure to get all the products suitable for your Bernina sewing machine. arm. - Bernina 740 | Manual - Page 16
line on top arm and the dot on mobile part of thread tension device are set one above the other, the perfect thread tension is attained. - With Bernina sewing machines a graduated scale is not neceesary. By means of marked line moves to the left, the tension will be weaker. 111 11 10 9 4 15 11 as - Bernina 740 | Manual - Page 17
right of raid knob 25 are illustrating the actual position, i.e. to the right for sewing and to the left for darning. Fit IS Sewing darning 25 Thread colter The pressure foot holdb lag device on the Bern inn • sewing machines is deslimed in such a way that it can alsosene as thread cutter. This - Bernina 740 | Manual - Page 18
feed dog. Such fluff may detrimentally affect the proper function of the sewing machine and it Is absolutely necessary to remove it frequently. From time to of the stand and Introduce the tongue of the cover plate Into the guide provided in the stand. Then depress the cover plate at its foremost - Bernina 740 | Manual - Page 19
not after. wardn. Use clear oil which is free from resin and acitbsuch as is supplied by all the Bernina repres.cotalives. The use of inferior oils may cause your sewing machine to jam when the oil dries up and becomes tacky. The figures 1$. 1$ and 20 show the oiling points indicated by a series - Bernina 740 | Manual - Page 20
it can as AU me room temperature and allow the oil in the hearings to become liquid again. Far. 21 Os The shuttle The Bernina sewing machine* model 740, 741, and 742 are all furnished with a patented shuttle. This shuttle has been patented in many countries throughout the world. Its distinctive - Bernina 740 | Manual - Page 21
of the various presser feet. For this reason the Bernina sewing machines, inn. dels 740, 741 and 742, have been equipped with the plain stitching adjust the sewing machine as follows: 1. Raise thread lever to its uppermost position. 2. Insert zigzag foot. but if you intend to sew quite a lot of - Bernina 740 | Manual - Page 22
always directed towards the operator when turning the sewing machine. Forward and backward sewing, and adjustment of different stitch lenghts According To remove the wort from the machine Raise the thread lever to Its uppermost position. Then raise also the preeser foot by means of the lifting lever - Bernina 740 | Manual - Page 23
%Then the machine should be position. is. 5. Remove presser foot and insert darning or hopper foot. 6. Insert darning plate. 7. Threading of bobbin as for buttonholing; see fig. coma to lie directly along the other. It will be useful to guide the threads about ;its: beyond the edge of the hole, but - Bernina 740 | Manual - Page 24
ANA ^t .1 Ypi h After the stitching- has thus been performed, continue, as shown in fig. 24 b. to sew a second layer of threads over the first line of litItcheo, wherebyyou begin n bit outwards of the already stitched threads. This second layer should be it - Bernina 740 | Manual - Page 25
that the damaged arcs comes to lie in the middle of the apparatus. Now place the stretched stocking under the presser foot for darning and work a simple plain st itch row around the damaged area. This stitching will prevent laddering (see fig. 25a). Continue by stitching from - Bernina 740 | Manual - Page 26
approximately ay") Attach the hemmer in place of the ordinary presser foot, raising the prewar foot to this purpose. Fold the edge of the material over to the desired hem width and guide the so prepared fabric into the spiral-typo guide tongue of the raised hemmer till under the needle; then lower - Bernina 740 | Manual - Page 27
extra charge) Pte. M. LA Ate Introduce gathering foot and adjust sewing machine upon plain stitch sewing. Put the material to be gathered under the gathering foot and not into the transverse slot. Lower the gathering foot by means of the pressor foot lever and Introduce the piece of material to be - Bernina 740 | Manual - Page 28
Adjust the sewing machine upon plain stitch sewing and introduce the edger lintead of the standard presser foot. The edger with Its stitch hole farthest to the right of foot Is specially suited for edge stitching. For this. Purpose the edge stitcher is employed wilkout the quilting guide. The edger - Bernina 740 | Manual - Page 29
THE ZIPPER FOOT Monilable only tannin extra rhorget j. Pie. 12 When inserting zippers be sure that for the stitching of the left side of the zipper the needle - Bernina 740 | Manual - Page 30
Layer of fabric Zipper Presser foot base Presser foot bassi Zipper •• layer of fabric :{ - N. e, Needle insertion to the right Presser foot base Needle insertion to the !eft P resser foot base ter. 63 ti 29 - Bernina 740 | Manual - Page 31
Zigzag sewing Zigzag sowing, with service by hand Adjustment et stitch width At the right-hand top of the body of the sewing machine the adjustment knob 18 (set fig. 2i will be found. It serVe6 to regulate the stitch width. When turning the teflon adjustment knob 18 the - Bernina 740 | Manual - Page 32
(Never use G.ply threads. but only 2- or 3-ply. For zigzag sewing adjust the sewing machine as follows: I. Itaise thread lever 7 to its uppermost position. 2. Insert zigzag foot, not to be mistaken for the zigzag embroidery foot which hits its lower surface hollow ground. When raised, leave zigzag - Bernina 740 | Manual - Page 33
Elastic Sewing of Knitted Goods ▪ Always use darning thread for basting tricot and other knitted goods. Never do it with bagting thread. ■ Use perfectly straight and pointed needles. Size 70 or 80. ■ The thinnest area of material should be placed always under and to the left of presser foot. If the - Bernina 740 | Manual - Page 34
Stitch a zigzag seam along patchwork edge about the depth of presser foot towards inside. Adjustment of machine: Zigzag width upon 3 or 4 Stitch length upon I Vet Irian wen With ordinary tricot it seams schisable to make a fold with all seams and then only - Bernina 740 | Manual - Page 35
edge. instead of basting, whereby the material and the seam are prevented at the same time from being distorted. 2:1147:1y width upon WM mark -I '11-7h ripen no. 3 Tic 41 Finish with a zigzag seam. Zigveg width upon 3 to 4 C.• 110, 1..111.11h 111 - Bernina 740 | Manual - Page 36
seam II I I 14 IN dl Mee both pictes of eloth I/II top of rmc• another and stitch a first seam about the depth of the prerser foot from the cut edge. Zigzag width upon 1.5 Stitch length upon 1 Cut off projecting edge at. about IA distance from seam. Now stilt), another seam actress - Bernina 740 | Manual - Page 37
sewn, approximately to V: Inside edge, in order to facilitate sewing on. Now attach the lime with zigzag stitches and then cut operated in the same manner as the or. dinary hemmer foot. The sink.. knob 18 trim fig. 1) Is net at (tricot) Is inserted in the spiral guide as is the ease when using the - Bernina 740 | Manual - Page 38
stiff fabric• such as Poplin, Rep., or Wool a.s.o., a pearl yam no. 8 should be intnaluzed into the guide hole of the embnildering foot and stitched onto the underside of the fabric. sewing a zigzag stitch with a width of 1.5, with a stitch length of from 1.5 to a At a distance of 1:.," a second row - Bernina 740 | Manual - Page 39
this higher bottom thread tension without changing the lower tension itself, which is correctly set for normal sewing fsec fig. 50), a hole has been drilled through the finger of the bobbin CSSe. For normal sew- ing the bobbin case is threaded tut explained on page 12. 38 favorit Fi ef. Si 9 - Bernina 740 | Manual - Page 40
should be adjusted as follows: 1 Insert buttonhole presser foot. 2. reed drop knob 25 tett fig. I must stand nn symbol "sewing 3 Draw zigzag knob grip lever 18 downwards. so that it can work together with the fixed stops on sewing machine stand. res. st 4. To engage the buttonhole device proceed - Bernina 740 | Manual - Page 41
of the buttonhole is performed as follows: 1. Sewing tits IiftAand edge Slam the machine; then the lefthand edge is swen with backward stitches. A reale on the buttonhole presser foot see ens for determining the length of said buttonhole. After the wished for length of the tefthand edge has been - Bernina 740 | Manual - Page 42
stop II - towards the Crone: then push it entirely to the right. passing thereby over stop I (gee fig. 601. In this position the sewing machine sews now the plain stitch, In order to make fastening threads. When stitching these securing threads, it is recommended to hold the fabric slightly back - Bernina 740 | Manual - Page 43
fig. 69 and frOr. Regulating the closeness of stitches The Bernina sewing machines, models 740, respectively 741 and 742. are provided with a patented device the fabric will differ when sewing buttonhole edges. The stronger and softer the material, the more the favorit feed should be increased. This - Bernina 740 | Manual - Page 44
As inlay use thin cotton cord and place it, as is shown In fig. 63, on the Tame at the back of the buttonhole presser foot, and sew the buttonhole in the manner described hercabove. The cord loop protruding beyond the back end of the finished buttonhole is tightened in such a way - Bernina 740 | Manual - Page 45
thread will be new:wary for the bobbin (1. i. no. 6012i. Adjusting the sewing machine from automatic buttonhole sewing to zigzag or straight plain stitch li presser foot marked with three black lines on its shaft. 2. The lever la isee fig. 1 and 511 remains in Its position as with zigzag sewing. S. - Bernina 740 | Manual - Page 46
stitch to the left. 12. Set zigzag knob 144 an Zen, petition and sew a few fastening stitches, again pulling the fabric lightly forwards, towards you. always to shorten the feed. 13. Finally lay the work on the wooden support and cut the cloth between both edges by means of the buttonhole blade. - Bernina 740 | Manual - Page 47
. 66. 4. Adjust zigzag stitch width according to the distance between the stitch holes in the button and now sew on button with six or eight stitches. When darning with wool, use the patented darning foot for wool. Proceed as follows: 1. Lower feet dog by turning reversible knob 25 (see flg. 21 to - Bernina 740 | Manual - Page 48
from fig. 67a. the wool is introduced in the slot of the presser foot. whereby the thread is allowed to project over the rear edge of the presser with wool. the wool thread should be cut off at the darning presser foot. Now fasten the wool cowls with zigzag stitches across them as is shown in - Bernina 740 | Manual - Page 49
to the cloth. Appliqué work is mainly used on collars, ladies' and children's dresses, linen and the like. The buttonhole presser foot will be advantageously employed for this kind of sewing work. VW 45 First draw the shapes to the underside of the fabric. The cloth from which the denim are cut - Bernina 740 | Manual - Page 50
Ornamental stitches, hand-operated Zigzag ciubroidering foot I I red line) Zigzag sewing foot _ 70 The zigzag decorative etitai With the Bernina zigzag sewing machine device on the Model+ no. 704, 741 and 742, the mint various decorative stitches can be produced in the simplest passible of ways. - Bernina 740 | Manual - Page 51
SATIN STITCH CONTROL favorit 50 The adjustment of the right stitch length for decorative stitches and buttonholes is very easy on the Bernina sewing machines, thanks to the patented satin stitch control. Suppose the stitch length regulation lever is on no. 2 and the stitch length must be adjusted - Bernina 740 | Manual - Page 52
whatsoever. Just select the desired pattern, set the control lever, and then simply concentrate on guiding the fabric through the sewing machine with both hands free to do so. The Bernina sewing machine of the model no. 741 is equipped with an automatic ornamental stitch device for four different - Bernina 740 | Manual - Page 53
performed in the following manner: Pull lever 12 to the right in its guiding slot, until a neietance will be felt, and displace it until the stitch width. After threading the machine, ornamental stitching can be started exactly in the same way as with ordinary sewing. 'When switching back to normal - Bernina 740 | Manual - Page 54
A further variation ix possible when combining Individual decorative 'dishes during the sewing itself, as can be seen from the opposite example.. a) Patterns combined two needles (fig.76) Lifter stitches arc equally poss.ble when sewing With two needles. However, make sure t hat on Principle the - Bernina 740 | Manual - Page 55
THE ORNAMENT INDICATOR The Iternina sewing machine:. of the models no. 740 and 741 have been equipped with a passes through. As soon as the front end of the decorative stitch Is cutting the mark, the sewing machine begins to VW. 77 O S. S. stitch a new ornament. When one half of the ornament - Bernina 740 | Manual - Page 56
cloth guide between the fingers on its base, but is iL otherwise identical with a normal presser foot. Blindatitch sewing can also be accomplished with the ordinary zigzag stitch or by means of the automatic device with built-in blindstitch cam. I. Setting of machine when sewing with ordinary - Bernina 740 | Manual - Page 57
guide • Position ofneedlestitch to the right After having threaded the sewing machine, put the lower flat piece of cloth underneath the blindstitch presser foot: of the Moth used. 2. Adluatraent al sonfitig pt00tting fur walking with the blindatItch cam Whereas, when blindstitching with the normal - Bernina 740 | Manual - Page 58
comprises the following Parts: I pintucking stitch plate with oval stitch hole I feed dog 3 double needles for pintucks of approximately Ito". 3/s". and '/m" 3 pintuckera with 3, 5 and 7 groove; I pintuck tongue I pintucking device for cord inlay When preparing the sewing machine for pintucking - Bernina 740 | Manual - Page 59
pin 7 Thread take-up lever 44 Thread guide slit 8 Thread Icaxion 45 Needle bolder eyelet sowing mnchino for pintucking, proceed as for normal sewing (see fig. 81). Place the two reels of machine arm. Now pass the thread of the front reel through pretension 43, equally at the back of machine - Bernina 740 | Manual - Page 60
passed from the ball slipped on a thread reel pin of the accessory case through the groove in the flap, up through the hole In the stitch plate teeth rows of the feed dog, and guided away from operator below and to the hack of the pintucking presser foot. Ornamental seam with double needle When employing - Bernina 740 | Manual - Page 61
. together with instructions as to the choice of threads to be used and the adjustment of the sewing machine. 2. With the patented double needle. using the Bernina zigzag sewing machines. 1. Hemstitch sewing with the single hemstitch needle on Bernina zigzag sewing machines Introduce the hemstitch - Bernina 740 | Manual - Page 62
00000 •••' Arno • ..tt ••.11 it OOP , For fine fabrics, such as C i. organdy, organza a. s. as adjust zigzag lever to stitch width 2 and stitch length adjusting lever tot. After having brought up the under thread, lay the fabric under the prmser foot and begin to sew in the well known manner - Bernina 740 | Manual - Page 63
scam. Leave the needle stuck into the fabric at the side where the second seam la wanted. Then turn the fabric by 180degreea and sew the second scam alongside the first one. Stitch length: 1.5 Stitch width: 3.5 The two outer seams are decorative stitch no. 19. Stitch length: 1 Stitch width - Bernina 740 | Manual - Page 64
with the patented double needle on Bernina zigzag and plain stitch sowing machines with transversely set shuttle, zigzag stitch plate. and zigzag presser loot Insert the double hemstitch needle into the machine instead of the normal sewing needle. The threading of the upper threads is made in - Bernina 740 | Manual - Page 65
If a hemstitch known as a termseedle hemstitch must be made. a second working operation will be needed. After having sewn the single hemstitch, turn the fabric by ISO degrees, allowing the point of the large needle to touch the cloth when it is turned round that point. Now the second seam can be - Bernina 740 | Manual - Page 66
guiding the embroidery frame by hand. 2. Embroidering with the feed dog. using the automatic satin stitch control executed by the ❑achine. In both cases up. Lower presser foot. Start sewing machine and keep it running smoothly at a fair speed. thus getting the hest results. Guide the embroidery frame - Bernina 740 | Manual - Page 67
, after having reached the required length. let the needle in the left stitch and turn embroidery frame into the novel direction. In that case you must not sew over the already finished edge, but leave a gap, thus producing a break in the outlines: this will he necessary for shaping many letters of - Bernina 740 | Manual - Page 68
06 94. 1 eyelet embroidery Dresser foot no. 53 06 62' 3 punches no. 611107 for eyelet diameters of Vol ', 14.-. and II4°. 1 wooden block no. 54 11 Ott. This simple device allows the sewing of fashionable eyelet and circular embroideries on the Bernina-Favourite sewing machine. With its aid different - Bernina 740 | Manual - Page 69
plate must bo changed against the eyelet embroidery stitch plate which is equipped with exchangeable slides provided with guide journals, whereby also the special embroidery presser foot must be inserted. Always use the embroidery frame. We recommend winding strips of cloth around 1st outer ring - Bernina 740 | Manual - Page 70
the fabric. Then place the material under the eyelet embroidery presser foot, so that the guide journal of the elide should come to lie in the hole. An allow the sewing machine to operate at regular speed and turn the embroidery ring at the same time three or four times around the guide journal in - Bernina 740 | Manual - Page 71
cases troubles are resulting from faulty manipulationa of the sewing machine. However, if other causes arc presumed, the machine are jammed under the bobbin ease tension spring: g) the sewing machine can easily he alerted should always be purchased at a Bernina shop; bl Needle incorrectly set. - Bernina 740 | Manual - Page 72
thread tenqion t.s. tight; III under thread badly wound on bobbin; c1 Bobbin is deformed and jams in the bobbin ease: Stitch plate hole has been damaged by the needle and requires re-polishing. Call for a skilled sewing machine mechanic. 4. Missing stitches May be caused by: al using unsuitable - Bernina 740 | Manual - Page 73
discs; 2. if there are thread ends under the bobbin case tension spring; 3. if the bobbin is deformed and jams in the bobbin case; 4. if the thread is not always evenly thick in all its length; 5. if the shuttle is not regularly oiled. b; When sewing trivet or other knitted good:. make aura of the - Bernina 740 | Manual - Page 74
machine will be idle for come time. you should do su alike. In order to avoid thread jamming. make sure that after every sewing operation the thread take-up lever Is raised to its uppermost position. The precaution will greatly help to avoid any trouble. Modification of cosstriottin ea against - Bernina 740 | Manual - Page 75
Notes 01 Bernina Representative regarding inritructiona% home calls. and eventual warranty ivurli One N„te, 74 - Bernina 740 | Manual - Page 76
53 11 1200 in searing kit: slung presser foot embroidery foot (marked with I red line) broad hemmer edger with quilting guide blIndoctilch presser foot buttonhole presser font buttonhole knife wooden support darning presser font small darning plate 6 bobbins. one of which being on machine I small - Bernina 740 | Manual - Page 77
wooden support 1 darning presser foot I small darning plate 6 bobbins, one of them being on machine 1 special screwdriver 1 small srewdriver 1 oiler 1 package of assorted needles of the 130 system 54 12 01 00 53 11 10 00 1 embroidery ring I connecting cable to the mains 1 instruction book 5306 11 - Bernina 740 | Manual - Page 78
(311 12 00 64 1201 00 In sewing kit: 1 zigzag presser foot 1 embroidery presser foot 1 epeeist buttonhole presser foot I buttonhole knife 1 wooden support I darning presser foot I small darning plate 6 bobbins. one of them being I It machine I Small acrowdriver 1 special screwdriver oiler 1 package - Bernina 740 | Manual - Page 79
FR. GEGAUF LTD. BERNINA SEWING MACHINE FACTORY ST ECK BORN Switzerland • • -0 ti
-
 1
1 -
 2
2 -
 3
3 -
 4
4 -
 5
5 -
 6
6 -
 7
7 -
8
-
9
-
10
-
11
-
12
-
13
-
14
-
15
-
16
-
17
-
18
-
19
-
20
-
21
-
22
-
23
-
24
-
25
-
26
-
27
-
28
-
29
-
30
-
31
-
32
-
33
-
34
-
35
-
36
-
37
-
38
-
39
-
40
-
41
-
42
-
43
-
44
-
45
-
46
-
47
-
48
-
49
-
50
-
51
-
52
-
53
-
54
-
55
-
56
-
57
-
58
-
59
-
60
-
61
-
62
-
63
-
64
-
65
-
66
-
67
-
68
-
69
-
70
-
71
-
72
-
73
-
74
-
75
-
76
-
77
-
78
-
79
 |
 |

BERNINA
C
C
I
C
I
I
C,3
Model
740,
BERNINA-Favorite
Zigzag
Sewing
Machine
with
automatic
ornamental
stitch
device
Model
741
Zigzag
Sewing
Machine
with
automatic
ornamental
stitch
device
Model
742
Zigzag
Sewing
Machine
without
automatic
ornamental
stitch
device
FR.
GEGAUF
LTD.
BERNINA
SEWING
MACHINE
FACTORY
STECKDORN
Switurlond