Bernina 740 Manual - Page 40
buttonhole
 |
View all Bernina 740 manuals
Add to My Manuals
Save this manual to your list of manuals |
Page 40 highlights
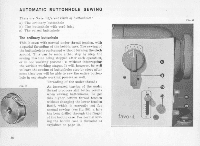
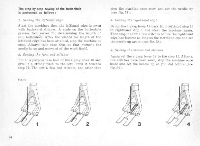
Far sewing buttonholes. the machine should be adjusted as follows: 1 Insert buttonhole presser foot. 2. reed drop knob 25 tett fig. I must stand nn symbol "sewing 3 Draw zigzag knob grip lever 18 downwards. so that it can work together with the fixed stops on sewing machine stand. res. st 4. To engage the buttonhole device proceed as explained hereafter. Draw the upper lever 19. which is marked with a buttonhole .v..unbol, with a light movement towards you and then upwards. Now Let It go: the buttonhole device is now engaged in its working position. To disengage the buttonhole device proceed in the revenge order. 6. The stitch length adjusting lever 22 is pushed upwarda as far as potsible. 6. After the stop has been brought into working poli• lion by moving the grip lever of the xigzag knob LS. get hold of it and swivel it in such a way that the pawl comes to lie against stop pin I. This is done by moving said grip lever slightly to the right. Now the pointer pin of zigzag knob 18 will be appmxima- tely oppoeite stale number 1,5. 7. Adjust needle position regulating knob IT (see fig. 2). The lever is turned so far to the left, until the white mark at the top end Is lying exactly opposite the mark on the zigzag lever 18. Now the machine is perfectly adjusted for buttonhole sewing. • nem • 89
-
 1
1 -
2
-
3
-
4
-
5
-
6
-
7
-
8
-
9
-
10
-
11
-
12
-
13
-
14
-
15
-
16
-
17
-
18
-
19
-
20
-
21
-
22
-
23
-
24
-
25
-
26
-
27
-
28
-
29
-
30
-
31
-
32
-
33
-
34
-
 35
35 -
 36
36 -
 37
37 -
 38
38 -
 39
39 -
 40
40 -
 41
41 -
 42
42 -
 43
43 -
 44
44 -
 45
45 -
46
-
47
-
48
-
49
-
50
-
51
-
52
-
53
-
54
-
55
-
56
-
57
-
58
-
59
-
60
-
61
-
62
-
63
-
64
-
65
-
66
-
67
-
68
-
69
-
70
-
71
-
72
-
73
-
74
-
75
-
76
-
77
-
78
-
79
 |
 |
