Bernina 740 Manual - Page 25
order, connect, pieces
 |
View all Bernina 740 manuals
Add to My Manuals
Save this manual to your list of manuals |
Page 25 highlights
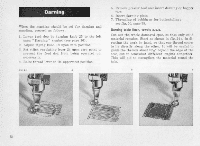
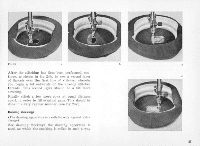
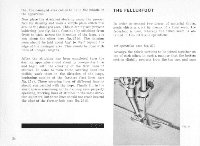
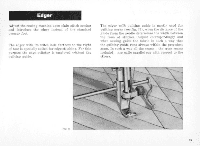
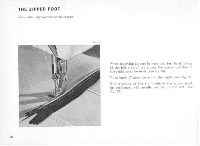
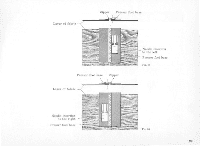
that the damaged arcs comes to lie in the middle of the apparatus. Now place the stretched stocking under the presser foot for darning and work a simple plain st itch row around the damaged area. This stitching will prevent laddering (see fig. 25a). Continue by stitching from fmnt to hark, across the direction of the loops, one row along the other twee fig. 25 hi. The darning rows should be laid about sin" to It'sr heyond the edge of the damaged army This should be done wit h lines of unequal lengths. After the stitching has been completed turn the darning apparatus round about by one-quarter turn and begin with the covering of the first lines of stitches. In order to make these covering lines less visible, work them In the direction of the loops. beginning outside of the farthest net lines (see fig. 25e1. Thane tottering lines of different lengths should run parallel with the loom. Finally fill in the small spaces remaining in the darning AM: properly speaking, working lines of stitches in the same direction as before, but these lines should not reach beyond the edge of the former hole (see fig.25d1. THE FELLERFOOT In order lo connect two pieces of material (linen. rots shirts a. 5. 0.) by means of a firm seam. the fellerfoot is used, whereby the felled seam is obtained in two different 1:perntions. Ist operation (see fig. 271 Arrange the fabric sections to be joined together on top of each other, in such a manner that the bottom section slightly projects from the top one, and pass es • IS raze tt 24
-
 1
1 -
2
-
3
-
4
-
5
-
6
-
7
-
8
-
9
-
10
-
11
-
12
-
13
-
14
-
15
-
16
-
17
-
18
-
19
-
 20
20 -
 21
21 -
 22
22 -
 23
23 -
 24
24 -
 25
25 -
 26
26 -
 27
27 -
 28
28 -
 29
29 -
 30
30 -
31
-
32
-
33
-
34
-
35
-
36
-
37
-
38
-
39
-
40
-
41
-
42
-
43
-
44
-
45
-
46
-
47
-
48
-
49
-
50
-
51
-
52
-
53
-
54
-
55
-
56
-
57
-
58
-
59
-
60
-
61
-
62
-
63
-
64
-
65
-
66
-
67
-
68
-
69
-
70
-
71
-
72
-
73
-
74
-
75
-
76
-
77
-
78
-
79
 |
 |
