Brother International 3034D User Manual - French
Brother International 3034D Manual
 |
View all Brother International 3034D manuals
Add to My Manuals
Save this manual to your list of manuals |
Brother International 3034D manual content summary:
- Brother International 3034D | User Manual - French - Page 1
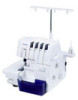
English HANDBOOK FOR COMPACT OVERLOCK MACHINE MANUAL DE INSTRUCCIONES DE LA MAQUINA COMPACTA OVERLOCK Español - Brother International 3034D | User Manual - French - Page 2
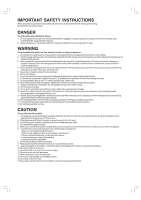
needle area, such as threading needle, changing needle, or changing presser foot, etc. 15. Always unplug the sewing machine from the electrical outlet when removing covers, lubricating, or when making any other user servicing adjustments mentioned in the instruction manual. 16. This sewing machine - Brother International 3034D | User Manual - French - Page 3
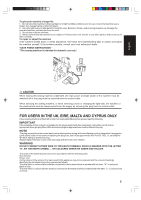
this manual before you replace or fit the presser foot, needle, or any other parts to make sure you fit them correctly. To repair or adjust the machine If the machine breaks down or needs adjustment, first follow the troubleshooting table to inspect and adjust the machine yourself. If the problem - Brother International 3034D | User Manual - French - Page 4
machine, your nearest authorized dealer is always happy to be of service. Enjoy yourself! CAUTION When threading, replacing needle or light bulb, the main power and light switch of the machine of continuous operation. - Continuous operation of the sewing machine can cause heat to build in the motor - Brother International 3034D | User Manual - French - Page 5
chain ...22 If threads break during sewing 23 To sew fine materials ...23 Narrow overlock/ Rolled hemming stitch 23 Chart of narrow overlock/ rolled hemming stitch 25 Chapter 6: Troubleshooting ...26 Chapter 7: Maintenance ...27 Cleaning ...27 Oiling ...27 Changing the light bulb ...27 Chapter - Brother International 3034D | User Manual - French - Page 6
looper P Upper knife Q Lower looper R Stitch finger S Knife lever t Front cover compartment You can hold the included accessories and the removed stitch finger in this front cover compartment. : Needle set, : Stitch finger (when removed, see CHAPTER 5 "Narrow overlock/ Rolled hemming stitch - Brother International 3034D | User Manual - French - Page 7
English Accessories Included accessory 1 Soft cover: X77871000 2 Accessory bag: 122991052 3 Tweezers: XB1618001 4 Thread net (4): X75904000 5 Thread spool cap (4): X77260000 6 Cleaning brush: X75906001 7 Hexagonal driver: XB0393001 8 Needle set (SCHMETZ 130/705H): X75917001 #80: 2 pcs., #90: 2 - Brother International 3034D | User Manual - French - Page 8
-1902 This foot controller can be used for sewing machine models 3034D. Turning direction of hand wheel The hand wheel turns in a counterclockwise direction (direction of arrow). This is the same direction as an ordinary home sewing machine. The needles move to their highest positions by turning - Brother International 3034D | User Manual - French - Page 9
bed extension) Free-arm sewing enables tubular pieces to be sewn more easily. 1. Remove the bed extension . To install: Insert the trim trap until it contacts the front cover. NOTE: Be sure to position the positioning guide to the one on the machine. To remove: Slowly pull - Brother International 3034D | User Manual - French - Page 10
knife To sew without cutting the fabric edge, you need to retract the knife as follows. CAUTION Do not touch the knife. Move the knife lever only while the needle is at its lowest point. Be sure to unplug the power supply cord from the wall outlet before retracting the knife. 1. Pull up the knife - Brother International 3034D | User Manual - French - Page 11
to find the correct adjustment. CAUTION When sewing thick non-stretchable material such as denim, do not use the differential feed as it may damage the fabric. Adjusting the presser foot pressure Turn the pressure adjustment screw on the top left of the machine. You can adjust by reffering the value - Brother International 3034D | User Manual - French - Page 12
tension dial for each needle thread, the lower looper thread and the upper looper thread. The correct thread tension may vary according to the type and thickness of the fabric and the type of thread used. Thread tension adjustments may be necessary for any change in sewing materials. 1 234 1 Yellow - Brother International 3034D | User Manual - French - Page 13
C: Left needle thread D: Right needle thread E: Upper looper thread F: Lower looper thread A C Left needle thread is loose. Tighten left needle thread. B (yellow) A D B A C D B A F E B A F E B A F E B Right needle thread is loose. Left needle thread is tight. Right needle thread is - Brother International 3034D | User Manual - French - Page 14
Chart of thread tension adjustment, One-needle (Three-thread) A: Reverse B: Surface C: Needle thread D: Upper looper thread E: Lower looper thread C A B Needle thread is loose. Tighten needle thread. (yellow or pink) C E A D B E A D B Needle thread is tight. Upper looper thread is tight. - Brother International 3034D | User Manual - French - Page 15
English Needle This machine uses a standard home sewing machine needle. The recommended needle is SCHMETZ 130/ 705H (#80 or #90). Needle description 1 Back (flat side) 2 Front 3 Groove 1 2 3 How to check the needle 4 Flat surface 5 Place the needle on its flat side and check to see if the space - Brother International 3034D | User Manual - French - Page 16
tree 2 Spool pin 3 Correct position Before threading 1. Turn off the main power and light switch for safety. 3 1 2. Raise the presser foot using presser foot 2 lever. How to use the thread spool cap When using sewing thread spools, the thread spool cap should be used as illustrated below - Brother International 3034D | User Manual - French - Page 17
by sliding to the right and guiding the top toward you. 2. Pull the thread off the spool and directly up through the thread holder 1 and the thread plate 2 on the thread tree from back to front. 3. Pass the thread thourgh the hole 3 on the top of machine. 4. Pass the thread through the tension disc - Brother International 3034D | User Manual - French - Page 18
. NOTE: If the lower looper thread breaks during sewing, cut and remove thread from both of the needles. Before re-threading the lower looper, make sure that the lower looper re-threading is done exactly as diagrammed. The machine will not operate properly if the threading is not done in the proper - Brother International 3034D | User Manual - French - Page 19
by sliding to the right and guiding the top toward you. 2. Pull the thread off the spool and directly up through the thread holder 1 and the thread plate 2 on the thread tree from back to front. 3. Pass the thread thourgh the hole 3 on the top of machine. 4. Pass the thread through the tension disc - Brother International 3034D | User Manual - French - Page 20
guide and through the right needle 8 from front to back. (: two needles/ : one needle) 8 8 1. Pull the thread off the spool and directly up through the thread holder 1 and the thread plate 2 on the thread tree from back to front. 2. Pass the thread thourgh the hole 3 on the top of machine - Brother International 3034D | User Manual - French - Page 21
705H #80 SCHMETZ 130/705H #80 #90 Medium materials: Broad cloth Narrow over lock/ R-2.0 Rolled hemming stitch Heavy materials: Tweed Denim Knits Overlock stitch 3.0-4.0 Needle thread : Spun #60-80 Tetron #60-80 Looper thread : Woolly nylon thread Spun #60-80 Tetron #60-80 Cotton #50-60 Spun #60 - Brother International 3034D | User Manual - French - Page 22
overlock/ Rolled hemming stitch" in this chapter for details. NOTE: You can use the optional accessory foot for even more varieties of stitches. See CHAPTER 8 for details. Test sewing Test-sew before you start sewing. 1. Set all the thread tension to "4". 2. Thread the machine and pull all threads - Brother International 3034D | User Manual - French - Page 23
machine and pull all threads out about 15 cm (6 inches) behind the presser foot. 2. Lift the presser foot and place the material well underneath the presser foot before starting to sew. Slowly sew a few stitches by turning the hand wheel. 3. The fabric will be fed automatically. You need only guide - Brother International 3034D | User Manual - French - Page 24
be secured in the same manner. 1. Tie the thread unpicked from chain. At the end of a stitch 1. At the end of the seam, sew one stitch out of the fabric before stopping the machine. 2. Insert the chain into the end of the seam, using a hand sewing needle with large eye. 2. Raise the presser foot - Brother International 3034D | User Manual - French - Page 25
and using the 3-thread overlock stitch. Instructions for both narrow overlock/ Rolled hemming stitches CAUTION Turn off the main power and light switch before removing/ installing a needle. 1. Remove the left needle. CAUTION Do not leave straight pins in the fabric when sewing as they will damage - Brother International 3034D | User Manual - French - Page 26
finger when sewing regular overlock stitches. 4. Adjust the stitch width dial up to the "R" position. Selection mark 5. Adjust the stitch length. Set the stitch length adjustment dial to "R to 2" position (for narrow overlock stitch: R to 2, for rolled hemming stitch: R). 3 Selection - Brother International 3034D | User Manual - French - Page 27
narrow overlock/ Rolled hemming stitch Rolled hemming stitch Underside of material Narrow overlock stitch Underside of material English Materials Needle thread Upper looper thread Lower looper thread Stitch Length Stitch Width Stitch Finger Thread Tension Needle Thread Upper looper Thread Lower - Brother International 3034D | User Manual - French - Page 28
CHAPTER 6 TROUBLESHOOTING This sewing machine is designed for trouble-free operation. However, the following chart indicates trouble which may occur if basic adjustments are not made properly. Trouble 1. Does not feed Cause Presser foot pressure too loose Remedy Turn the pressure adjustment screw - Brother International 3034D | User Manual - French - Page 29
hand wheel and move the needles down. Periodically clean dust, trimmed fabric and thread with the included cleaning brush. Changing the light bulb CAUTION Turn off the main power and light switch and unplug the machine before you change the light bulb. If the main power and light switch is on when - Brother International 3034D | User Manual - French - Page 30
off the machine while replacing the presser foot. Blind stitch foot Features When using the blind stitch presser foot (multi purpose foot), you can sew blind stitches and overlock at the same time. This is ideal when sewing cuffs, trouser bottoms, pockets, and hemming skirts etc. The stitch guide on - Brother International 3034D | User Manual - French - Page 31
foot"). 2. Set up the machine for narrow overlock stitching. (Refer to CHAPTER 5 "Narrow overlock/ Rolled hemming stitch".) 3. Draw equally spaced lines on the fabric with a fabric pencil as guides for pin tuck placement. Fold the fabric along one of the lines and press in place lightly with an iron - Brother International 3034D | User Manual - French - Page 32
8. Align the fold with the guide and insert the fabric up to the needle position. Machine setting (type of stitch): ! " 3 Adjusting screw 4 Fabric guide 9. Guide the fold in the fabric to sew half way between the needle and the upper knife. 10. Continue sewing until all marked lines have been sewn - Brother International 3034D | User Manual - French - Page 33
foot. Preparation 1. Retract the knife (see CHAPTER 1 "Retracting knife"). 2. Attach the pearl sequence foot (see CHAPTER 1 "Attaching/ Removing presser foot"). 3. Set up the machine for 3 thread overlock stitch with one needle in the left position. The right needle should be removed. 1 ~ 1.5mm - Brother International 3034D | User Manual - French - Page 34
Attach the piping foot (see CHAPTER 1 "Attaching/ Removing presser foot"). Machine setting (type of stitch): - 2 needle 4 thread overlock - 1 needle 3 thread overlock (the right needle should be removed) How to adjust the machine 1. Set stitch length at 3mm. (standard position) 2. Set stitch width - Brother International 3034D | User Manual - French - Page 35
Machine setting (type of stitch): 4. Adjust the other settings to those used during normal overlock sewing. 5. Sew while keeping the fabric aligned with the fabric guide or stretch the fabric. - 2 needle 4 thread overlock - 1 needle 3 thread overlock (Either needle can be used.) How to set fabric - Brother International 3034D | User Manual - French - Page 36
Free presser type Presser foot lift 5 mm to 6 mm (3/16 to 15/64 inch) Needle SCHMETZ 130/705H No. of needles and threads Three/Four threads convertible Two needles or single needle Machine net weight 5.2 kgs. Machine dimensions 33.5 cm (W) x 29.8 cm (H) x 27.9 cm (D) (Approx. 13-2/5 (W) x 11-24/25 - Brother International 3034D | User Manual - French - Page 37
- Brother International 3034D | User Manual - French - Page 38
o cuando vaya a realizar cualquier tipo de ajuste de mantenimiento indicado en este manual de instrucciones. 16. Esta máquina de coser no ha sido diseñada para cose. No toque la ruedecilla, las agujas, las cuchillas ni otras partes móviles. 6. Desconecte la alimentación y desenchufe el cable en las - Brother International 3034D | User Manual - French - Page 39
dañar la carcasa y la máquina, por lo que nunca se deben usar. 3. No deje caer ni golpee la máquina. 4. Consulte siempre este manual antes de cambiar o ajustar el prensatelas, la aguja o cualquier otro elemento para asegurarse de que se ajustan correctamente. Para reparar o ajustar la máquina Si - Brother International 3034D | User Manual - French - Page 40
MAQUINA OVERLOCK Su máquina es de una eficacia y calidad excelentes; así pues, a fin de disfrutar completamente de todas las características incorporadas, le sugerimos que lea cuidadosamente el manual importante mantener las aberturas de ventilación de la parte trasera y de los lados de la máquina - Brother International 3034D | User Manual - French - Page 41
Español Contenido Capítulo 1: Nombres de las partes y sus funciones 40 Accesorios ...41 Encendido de la rompen al coser 59 Para coser tejidos finos ...59 Puntada overlock estrecha/de dobladillo enrollado 59 Tabla de puntada overlock estrecha/de dobladillo enrollado 61 Capítulo 6: Guía de - Brother International 3034D | User Manual - French - Page 42
CAPÍTULO 1 NOMBRES DE LAS PARTES Y SUS FUNCIONES 1 Árbol del hilo 2 Placa del hilo 3 Tornillo de ajuste de Uñeta de puntadas (si se extrae, véase el CAPÍTULO 5 "Puntada overlock estrecha/de dobladillo enrollado"), : Pinzas, : Llave hexagonal * Aberturas de ventilación de la - Brother International 3034D | User Manual - French - Page 43
Español Accesorios Accesorios incluidos 1 Funda: X77871000 2 Bolsa de accesorios: 122991052 3 Pinzas: XB1618001 4 Malla para hilo (4): X75904000 5 Tope del carrete (4): X77260000 6 Cepillo limpiador: X75906001 7 Llave hexagonal: XB0393001 8 Juego de agujas (SCHMETZ 130/705H): X75917001 n° 80: 2 - Brother International 3034D | User Manual - French - Page 44
KD-1902 Este pedal se puede utilizar para los modelos de máquina de coser 3034D. Cambio de la dirección de la ruedecilla La ruedecilla funciona en el sentido canal situado en la parte inferior del soporte del prensatelas quede alineado y atrape la barra de la parte superior del prensatelas - Brother International 3034D | User Manual - French - Page 45
Español Orificio de corte El orificio de corte opcional sostiene el hilo y el tejido cortado generados al coser. Costura de mangas (extracción del suplemento para la mesa) La costura sin brazo permite coser trozos tubulares de tejido de forma más sencilla. 1. Extraiga el suplemento - Brother International 3034D | User Manual - French - Page 46
. 2 Alargue la puntada a un máximo de 4 mm. Marca de selección Ancho de las puntadas El ajuste normal del ancho de puntada para una puntada overlock corriente es de 5 mm. Para cambiar el ancho de puntada, gire el disco de ajuste del ancho de las puntadas. 3. Repliegue la cuchilla completamente - Brother International 3034D | User Manual - French - Page 47
para no deteriorar el material. Ajuste de la presión del prensatelas Gire el tornillo de ajuste de la presión situado en la parte superior izquierda de la máquina. Puede realizar el ajuste haciendo referencia al valor del tornillo. El ajuste normal es "2". 1 2 1 Menos presión 2 Más presi - Brother International 3034D | User Manual - French - Page 48
Disco de ajuste de la tensión Existe un disco de tensión para el hilo de cada aguja, el hilo del áncora superior y el del áncora inferior. La tensión de hilo correcta puede variar dependiendo del tipo y grosor del tejido así como del tipo de hilo utilizado. Ajustes de tensión del hilo pueden - Brother International 3034D | User Manual - French - Page 49
Tabla de ajuste de tensión de los hilos, dos agujas (cuatro hilos) A: Revés B: Derecho C: Hilo de la aguja izquierda D: Hilo de la aguja derecha E: Hilo del áncora superior F: Hilo del áncora inferior A C El hilo de la aguja Tense el hilo de izquierda está la aguja izquierda B suelto. ( - Brother International 3034D | User Manual - French - Page 50
Tabla de ajuste de tensión de los hilos, una aguja (tres hilos) A: Revés B: Derecho C: Hilo de las agujas D: Hilo del áncora superior E: Hilo del áncora inferior C A B El hilo de la aguja está suelto. Tense el hilo de la aguja (amarillo o rosado). C E A D B E A D B El hilo de la aguja está - Brother International 3034D | User Manual - French - Page 51
OFF). 2. Gire la ruedecilla hasta que la línea de la misma queda alineada con la línea de la máquina. 3. Sujete la aguja con la parte plana alejada de usted e insértela hacia arriba hasta el tope. 4. Apriete firmemente el tornillo de instalación de la aguja girando la llave hexagonal incluida - Brother International 3034D | User Manual - French - Page 52
CAPÍTULO 2 PREPARACIÓN ANTES DEL ENHEBRADO Árbol del hilo Levante el árbol telescópico del hilo hasta su posición más alta. Compruebe que los portahilos quedan alineados sobre los portabobinas como se ilustra a continuación. 1 Portahilos en el árbol del hilo 2 Portabobinas 3 Posición correcta - Brother International 3034D | User Manual - French - Page 53
. 1. Abra la tapa delantera deslizándola hacia la derecha y guiando la parte superior hacia usted. 2. Saque el hilo del carrete y páselo directamente por hilo desde detrás a delante. 3. Pase el hilo por el orificio 3 de la parte superior de la máquina. 4. Pase el hilo por el disco de tensión 4, - Brother International 3034D | User Manual - French - Page 54
3. Pase el hilo por el ojo del áncora inferior. 4. Gire lentamente la ruedecilla y asegúrese de que vuelve a su posición inicial. NOTA: Si el hilo del áncora inferior se rompe al coser, corte y deseche el hilo de ambas agujas. Antes de volver a enhebrar el áncora inferior, asegúrese de que este - Brother International 3034D | User Manual - French - Page 55
6 7 1. Abra la tapa delantera deslizándola hacia la derecha y guiando la parte superior hacia usted. 2. Saque el hilo del carrete y páselo directamente por el desde detrás a delante. 3. Pase el hilo por el orificio 3 de la parte superior de la máquina. 4. Pase el hilo por el disco de tensión 4, - Brother International 3034D | User Manual - French - Page 56
del hilo desde detrás a delante. 2. Pase el hilo por el orificio 3 de la parte superior de la máquina. 3. Pase el hilo por el disco de tensión 4, que del hilo desde detrás a delante. 2. Pase el hilo por el orificio 3 de la parte superior de la máquina. 3. Pase el hilo por el disco de tensión 4, que - Brother International 3034D | User Manual - French - Page 57
TEJIDOS, HILOS Y AGUJAS DE COSTURA Tejido Puntada Largo de las Hilo puntadas (mm) Aguja Tejidos finos: Georgette Lino Organdí Tricot Puntada overlock 2,0-3,0 Hilo de hilvanar n° 80-90 Algodón n° 100 Tetron n° 80-100 SCHMETZ 130/705H n° 80 Tejidos finos: Georgette Lino Organdí Tricot - Brother International 3034D | User Manual - French - Page 58
en trajes, blusas, pantalones, etc. Ideal para tejidos medios y gruesos. NOTA: Retire la aguja derecha para coser con esta puntada overlock. Puntada overlock estrecha 2,0 mm y Puntada de dobladillo enrollada 2,0 mm Se utilizan con fines decorativos o en las puntadas de acabado. Véase "Puntada - Brother International 3034D | User Manual - French - Page 59
Español 4. Mientras sujeta todos los hilos con la mano izquierda, gire la ruedecilla despacio varias veces hacia usted y compruebe que los hilos se entrelazan antes de utilizar el pedal para coser. Cadeneta Después de la costura de prueba, siga apretando el pedal ligeramente y haga una cadeneta de - Brother International 3034D | User Manual - French - Page 60
, cosa una puntada fuera del tejido antes de detener la máquina. 2. Inserte la cadeneta en el final de la costura con una aguja de costura manual con un ojo grande. 2. Levante el prensatelas y las agujas, y dé la vuelta al tejido. 3. Remate la cadeneta con una gota de pegamento para tela y corte - Brother International 3034D | User Manual - French - Page 61
tejidos, hilos y agujas de costura". 2. Enhebre la máquina para puntadas overlock de tres hilos, usando la aguja derecha. 3. Retire la uñeta de 1 Levante la palanca del prensatelas. 2 Tire de todos los hilos hacia la parte trasera de la máquina. 3 Compruebe que el hilo no queda enrollado alrededor - Brother International 3034D | User Manual - French - Page 62
puntadas se guarda en el interior de la tapa delantera. NOTA: Asegúrese de instalar la uñeta de puntadas antes de coser con puntadas overlock normales. 4. Ajuste el disco de ancho de las puntadas hacia arriba en la posición "R". Marca de selección 5. Ajuste el largo de las puntadas - Brother International 3034D | User Manual - French - Page 63
estrecha/de dobladillo enrollado Estilo de puntada Puntada de dobladillo enrollado Parte inferior del tejido Puntada overlock estrecha Parte inferior del tejido Español Tejidos Parte superior del tejido Véase el CAPÍTULO 4 "Tabla de relación entre los distintos tejidos, hilos y agujas de - Brother International 3034D | User Manual - French - Page 64
CAPÍTULO 6 GUÍA DE LOCALIZACIÓN DE PROBLEMAS Esta máquina de coser ha sido concebida para un funcionamiento sin problemas. Sin embargo, la siguiente tabla le indica los problemas que podrían presentarse si los ajustes básicos no fueron realizados correctamente. Problema 1. No se alimenta el tejido - Brother International 3034D | User Manual - French - Page 65
. Español Engrasado Para conseguir un funcionamiento suave y silencioso de la máquina, sus partes móviles (indicadas con flechas) se deberán engrasar periódicamente. PRECAUCIÓN Apague la antes de proceder al engrasado. Engrase la maquina una o dos veces al mes para un uso normal. Si se utiliza la - Brother International 3034D | User Manual - French - Page 66
e inserte el tejido con el borde doblado a la izquierda para que la aguja perfore justo el borde doblado al coser. Puntadas overlock planas Las puntadas overlock planas se usan principalmente para lograr un acabado decorativo en un trabajo. Una vez terminadas, las puntadas pueden parecerse a una - Brother International 3034D | User Manual - French - Page 67
Español Procedimiento 1. Conecte el prensatelas para puntadas invisibles (véase el CAPÍTULO 1 "Instalación/ desmontaje del prensatelas"). 2. Ajuste la máquina para puntada overlock de 3 hilos con una aguja en la posición izquierda. La aguja de la derecha se debe quitar. 3. Doble el tejido como se - Brother International 3034D | User Manual - French - Page 68
ásticos para puños, cuellos, etc. - overlock de 2 agujas y 4 hilos - overlock de 1 aguja y 3 hilos (se puede utilizar cualquier aguja ranura 3. 6. Introduzca la cinta o el elástico 5 por la ranura 3 para que la parte derecha de las cintas o elásticos se ajuste a lo largo de la guía 4. 7. - Brother International 3034D | User Manual - French - Page 69
la cuchilla"). 2. Conecte el prensatelas para tira de perlas (véase el CAPÍTULO 1 "Instalación/ desmontaje del prensatelas"). 3. Ajuste la máquina para puntada overlock de 3 hilos con una aguja en la posición izquierda. La aguja de la derecha se debe quitar. 1 ~ 1.5mm 2 1 3 1. Doblar el tejido seg - Brother International 3034D | User Manual - French - Page 70
2. Ajuste el ancho de las puntadas de 5 a 6 mm 3. Ajuste la tensión de los hilos para puntadas overlock normales (véase el CAPÍTULO 5 "Selección de las distintas puntadas"). 3mm 3mm Cómo ajustar el tejido y la de ribetear es ancha, debe coserla cortando la parte sobrante. 5 ~ 6mm 5 ~ 6mm 68 - Brother International 3034D | User Manual - French - Page 71
TULO 1 "Instalación/desmontaje del prensatelas"). Ajuste de la máquina (tipo de puntada): 4. Ajuste los demás parámetros a los que utiliza durante la costura overlock normal. 5. Cosa manteniendo el tejido alineado con la guía del tejido 3. - Cambie el tamaño de los frunces ajustando el largo de las - Brother International 3034D | User Manual - French - Page 72
ESPECIFICACIONES Especificaciones Uso Tejidos finos a gruesos Velocidad de costura 1.300 puntadas por minuto como máximo Ancho de las puntadas 2,3 mm a 7 mm Largo de las puntadas (altura) 2 mm a 4 mm Movimiento de la barra de las agujas 25 mm Prensatelas Tipo de prensatelas libre Elevación del - Brother International 3034D | User Manual - French - Page 73
SETTING RECORD / NOTAS DE AJUSTES FABRIC TEJIDO THREAD HILO NEEDLE AGUJA THREAD TENSION TENSION DE HILO left right upper- lowerneedle needle looper looper aguja aguja áncora áncora izquier- derecha superior inferior da NOTE NOTA STITCH TYPE TIPO DE PUNTADA 71 - Brother International 3034D | User Manual - French - Page 74
- Brother International 3034D | User Manual - French - Page 75
- Brother International 3034D | User Manual - French - Page 76
3034D XB1621001 Printed in Taiwan
-
 1
1 -
 2
2 -
 3
3 -
 4
4 -
 5
5 -
 6
6 -
 7
7 -
8
-
9
-
10
-
11
-
12
-
13
-
14
-
15
-
16
-
17
-
18
-
19
-
20
-
21
-
22
-
23
-
24
-
25
-
26
-
27
-
28
-
29
-
30
-
31
-
32
-
33
-
34
-
35
-
36
-
37
-
38
-
39
-
40
-
41
-
42
-
43
-
44
-
45
-
46
-
47
-
48
-
49
-
50
-
51
-
52
-
53
-
54
-
55
-
56
-
57
-
58
-
59
-
60
-
61
-
62
-
63
-
64
-
65
-
66
-
67
-
68
-
69
-
70
-
71
-
72
-
73
-
74
-
75
-
76
 |
 |
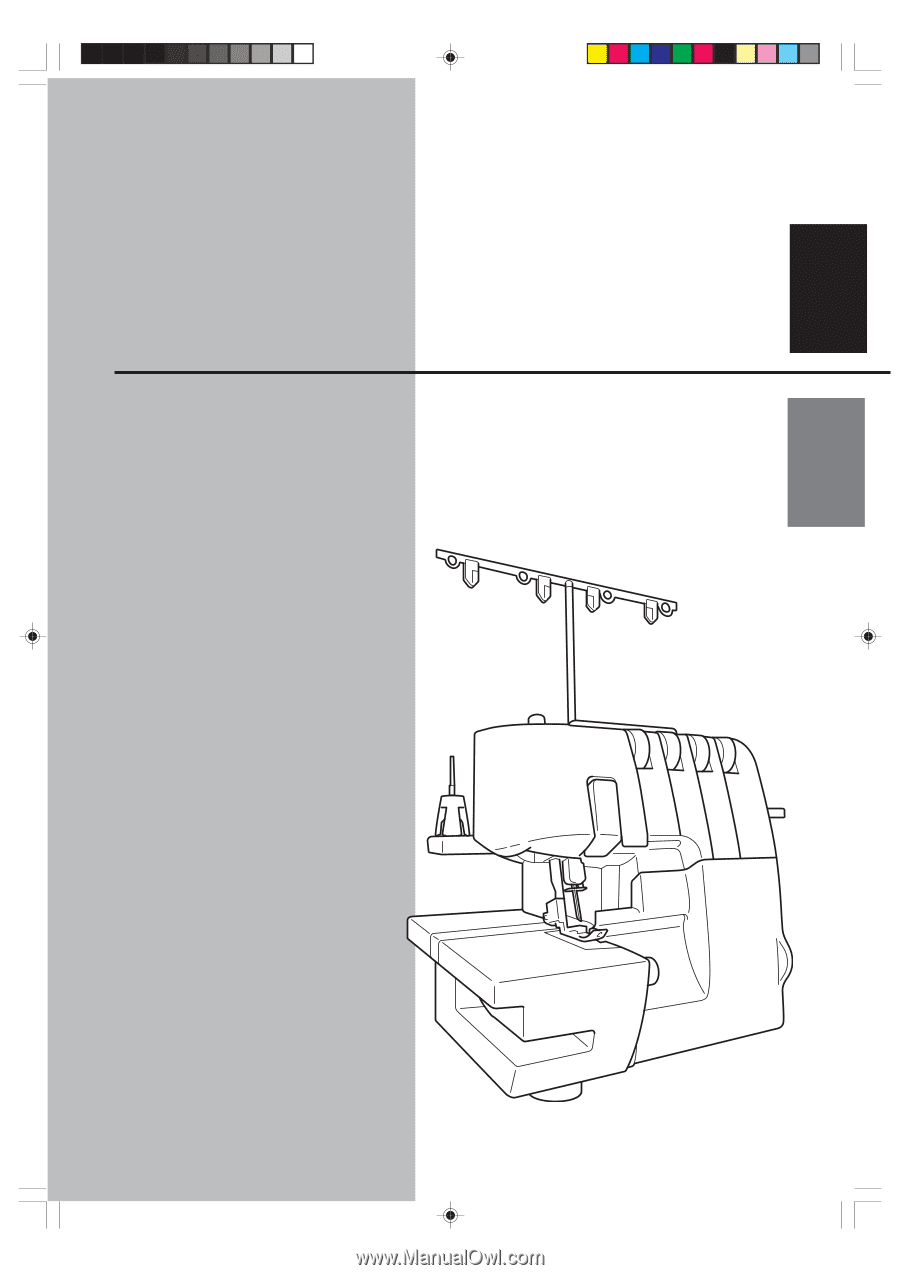
HANDBOOK FOR COMPACT
OVERLOCK MACHINE
MANUAL DE INSTRUCCIONES DE LA
MAQUINA COMPACTA OVERLOCK
English
Español