Brother International 3034D User Manual - French - Page 20
Threading the right needle, Threading the left needle
 |
View all Brother International 3034D manuals
Add to My Manuals
Save this manual to your list of manuals |
Page 20 highlights
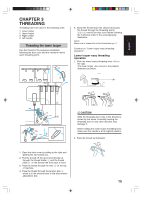
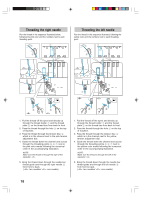
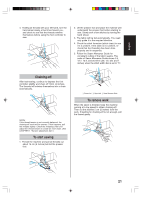
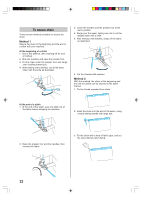
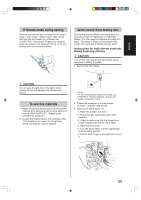
Threading the right needle Run the thread in the sequence illustrated below, following the pink color and the numbers next to each threading point. 3 1 2 4 3 4 6 7 5 8 7 Threading the left needle Run the thread in the sequence illustrated, following the yellow color and the numbers next to each threading point. 3 1 2 4 3 4 6 7 5 8 7 8 8 1. Pull the thread off the spool and directly up through the thread holder 1 and the thread plate 2 on the thread tree from back to front. 2. Pass the thread thourgh the hole 3 on the top of machine. 3. Pass the thread through the tension disc 4 which is in the channel next to the pink tension adjustment dial. 4. Guide the thread down the channel and across through the threading points 5 6 7 next to the pink color marks following the numerical order in the accompanying illustration. NOTE: Make sure the thread is through the right of the separater . 5. Bring the thread down through the needle bar thread guide and through the right needle 8 from front to back. (: two needles/ : one needle) 8 8 1. Pull the thread off the spool and directly up through the thread holder 1 and the thread plate 2 on the thread tree from back to front. 2. Pass the thread thourgh the hole 3 on the top of machine. 3. Pass the thread through the tension disc 4 which is in the channel next to the yellow tension adjustment dial. 4. Guide the thread down the channel and across through the threading points 5 6 7 next to the yellow color marks following the numerical order in the accompanying illustration. NOTE: Make sure the thread is through the left of the separater . 5. Bring the thread down through the needle bar thread guide and through the left needle 8 from front to back. (: two needles/ : one needle) 18
-
 1
1 -
2
-
3
-
4
-
5
-
6
-
7
-
8
-
9
-
10
-
11
-
12
-
13
-
14
-
 15
15 -
 16
16 -
 17
17 -
 18
18 -
 19
19 -
 20
20 -
 21
21 -
 22
22 -
 23
23 -
 24
24 -
 25
25 -
26
-
27
-
28
-
29
-
30
-
31
-
32
-
33
-
34
-
35
-
36
-
37
-
38
-
39
-
40
-
41
-
42
-
43
-
44
-
45
-
46
-
47
-
48
-
49
-
50
-
51
-
52
-
53
-
54
-
55
-
56
-
57
-
58
-
59
-
60
-
61
-
62
-
63
-
64
-
65
-
66
-
67
-
68
-
69
-
70
-
71
-
72
-
73
-
74
-
75
-
76
 |
 |
