Brother International 3034D User Manual - French - Page 25
If threads break during sewing, To sew fine materials - overlocker sewing machine
 |
View all Brother International 3034D manuals
Add to My Manuals
Save this manual to your list of manuals |
Page 25 highlights
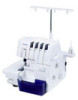
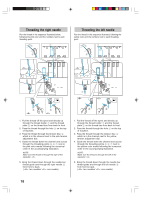
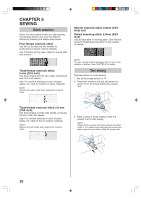
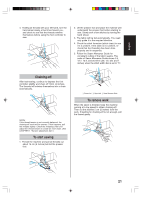
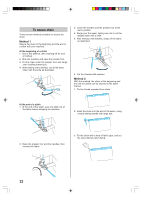
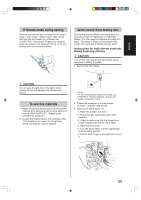
English If threads break during sewing Remove the material and re-thread in the correct order, Lower looper, Upper looper, right needle and then the left needle (to re-thread, see CHAPTER 3 "Threading"). Replace the material under the presser foot and sew 3-5 cm (1-1/8 to 2 inches) over the previous stitches. Narrow overlock/ Rolled hemming stitch The Narrow overlock/Rolled hemming stitch is a decorative finish for lightweight to midweight fabrics. It is often used to complete the edge of a fabric. This stitch is sewn by removing the left needle and using the 3-thread overlock stitch. Instructions for both narrow overlock/ Rolled hemming stitches CAUTION Turn off the main power and light switch before removing/ installing a needle. 1. Remove the left needle. CAUTION Do not leave straight pins in the fabric when sewing as they will damage the needles and knives. To sew fine materials 1. Adjust the presser foot pressure to prevent the material from puckering and to allow sewing of curves. (See CHAPTER 1 "Adjusting the presser foot pressure".) 2. Loosen the thread tension, but remember that if the tension is too loose, the thread may break and stitches may be skipped. NOTE: For the recommended thread and needle, see CHAPTER 4 "Sewing materials, threads, and needles comparison chart". 2. Thread the machine for a three thread overlock, using the right needle. 3. Remove the stitch finger . 1 Raise the presser foot lever. 2 Pull all threads toward the back of the machine. 3 Check to make sure that the thread is no longer wrapped around the stitch finger. 4 Open the front cover. 5 Turn the hand wheel until the upperlooper is at its lowest position. 6 Pull the stitch finger to the right and remove it. 23
-
 1
1 -
2
-
3
-
4
-
5
-
6
-
7
-
8
-
9
-
10
-
11
-
12
-
13
-
14
-
15
-
16
-
17
-
18
-
19
-
 20
20 -
 21
21 -
 22
22 -
 23
23 -
 24
24 -
 25
25 -
 26
26 -
 27
27 -
 28
28 -
 29
29 -
 30
30 -
31
-
32
-
33
-
34
-
35
-
36
-
37
-
38
-
39
-
40
-
41
-
42
-
43
-
44
-
45
-
46
-
47
-
48
-
49
-
50
-
51
-
52
-
53
-
54
-
55
-
56
-
57
-
58
-
59
-
60
-
61
-
62
-
63
-
64
-
65
-
66
-
67
-
68
-
69
-
70
-
71
-
72
-
73
-
74
-
75
-
76
 |
 |