Brother International BAS-341F Instruction Manual - English - Page 10
PREPARATION, 3-1. Before setting up
 |
View all Brother International BAS-341F manuals
Add to My Manuals
Save this manual to your list of manuals |
Page 10 highlights
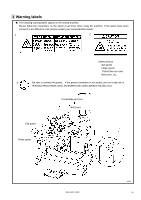
3. PREPARATION 3. PREPARATION CAUTION Machine installation should only be carried out by a qualified technician. Contact your Brother dealer or a qualified electrician for any electrical work that may need to be done. The sewing machine head weighs more than 200 kg. The installation should be carried out by two or more people. Do not connect the power cord until installation is complete, otherwise the machine may operate if the foot switch is depressed by mistake, which could result in injury. Be sure to connect the ground. If the ground connection is not secure, you run the risk of receiving a serious electric shock. Hold the machine head with both hands by two or more peple when tilting it back or returning it to its original position. Furthermore, after tilting back the machine head, do not push the face plate side or the pulley side from above, as this could cause the machine head to topple over, which may result in personal injury or damage to the machine. Install the belt cover and the frame side cover to the machine head and motor. If using a work table which has casters, the casters should be secured in such a way so that they cannot move. Be sure to wear protective goggles and gloves when handling the lubricating oil and grease, so that they do not get into your eyes or onto your skin, otherwise inflammation can result. Furthermore, do not drink the oil or eat the grease under any circumstances, as they can cause vomiting and diarrhoea. keep the oil out of the reach of children. 3-1. Before setting up 1. Install the Y driving shaft guard (1) to the rear of the arm with the bolt (2) and the spring washer (3). 2. Install the guard (4) to the table rear cover (5) with the bolt (6), spring washer (7), flat washer (8) and nut (9). 1919S BAS-341F, 342F 3
-
 1
1 -
2
-
3
-
4
-
 5
5 -
 6
6 -
 7
7 -
 8
8 -
 9
9 -
 10
10 -
 11
11 -
 12
12 -
 13
13 -
 14
14 -
 15
15 -
16
-
17
-
18
-
19
-
20
-
21
-
22
-
23
-
24
-
25
-
26
-
27
-
28
-
29
-
30
-
31
-
32
-
33
-
34
-
35
-
36
-
37
-
38
-
39
-
40
-
41
-
42
-
43
-
44
-
45
-
46
-
47
-
48
-
49
-
50
-
51
-
52
-
53
-
54
-
55
-
56
-
57
-
58
-
59
-
60
-
61
-
62
-
63
-
64
-
65
-
66
-
67
 |
 |
