Brother International DCP-7065DN Users Manual - English - Page 50
Drum Error, Replace Drum, Drum Stop, Replacing the drum unit - replace toner error
 |
UPC - 012502627128
View all Brother International DCP-7065DN manuals
Add to My Manuals
Save this manual to your list of manuals |
Page 50 highlights
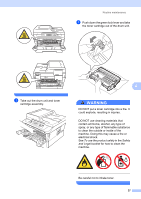
• Printing with a non-Brother drum unit may reduce not only the print quality but also the quality and life of the machine itself. Warranty coverage does not apply to problems caused by the use of a nonBrother drum unit. Drum Error A Drum Error The corona wire has become dirty. Clean the corona wire in the drum unit. (See Cleaning the corona wire on page 34.) If you cleaned the corona wire and Drum Error was not cleared, replace the drum unit with a new one. Replace Drum A Replace Drum Please replace the drum unit with a new one. We recommend a genuine Brother drum unit be installed at this time. After replacement, reset the drum counter by following the instructions included with the new drum unit. Drum Stop A Drum Stop We cannot guarantee the print quality. Please replace the drum unit with a new one. We recommend a genuine Brother drum unit be installed at this time. After replacement, reset the drum counter by following the instructions included with the new drum unit. Replacing the drum unit A IMPORTANT • While removing the drum unit, handle it carefully because it may contain toner. If toner scatters on your hands or clothes, immediately wipe or wash it off with cold water. • Every time you replace the drum unit, clean the inside of the machine. (See Cleaning and Checking the machine in Appendix A of the Advanced User's Guide.) a Make sure that the machine is turned on. b Open the front cover and leave the machine turned on for 10 minutes to cool down. WARNING HOT SURFACE After you have just used the machine, some internal parts of the machine will be extremely hot. When you open the front or back cover (back output tray) of the machine, DO NOT touch the shaded parts shown in the illustration. If you do this, you may burn yourself. 36
-
 1
1 -
2
-
3
-
4
-
5
-
6
-
7
-
8
-
9
-
10
-
11
-
12
-
13
-
14
-
15
-
16
-
17
-
18
-
19
-
20
-
21
-
22
-
23
-
24
-
25
-
26
-
27
-
28
-
29
-
30
-
31
-
32
-
33
-
34
-
35
-
36
-
37
-
38
-
39
-
40
-
41
-
42
-
43
-
44
-
 45
45 -
 46
46 -
 47
47 -
 48
48 -
 49
49 -
 50
50 -
 51
51 -
 52
52 -
 53
53 -
 54
54 -
 55
55 -
56
-
57
-
58
-
59
-
60
-
61
-
62
-
63
-
64
-
65
-
66
-
67
-
68
-
69
-
70
-
71
-
72
-
73
-
74
-
75
-
76
-
77
-
78
-
79
-
80
-
81
-
82
-
83
-
84
-
85
-
86
-
87
-
88
-
89
-
90
-
91
-
92
-
93
-
94
-
95
-
96
-
97
-
98
-
99
-
100
-
101
-
102
-
103
-
104
-
105
-
106
-
107
-
108
-
109
-
110
-
111
-
112
 |
 |
