Brother International HL 4040CN Quick Setup Guide - English - Page 9
Getting Started, What is in the box? - drum unit
 |
UPC - 012502617785
View all Brother International HL 4040CN manuals
Add to My Manuals
Save this manual to your list of manuals |
Page 9 highlights
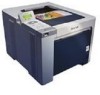
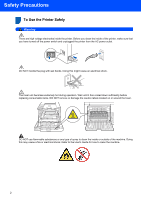
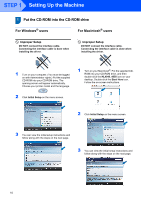
Getting Started 1 What is in the box? 1 Carton components may vary from one country to another. Save all packing materials and the printer carton in case for any reason you must ship your printer. 1 8 7 2 3 4 6 5 9 1 Front cover release button 5 Paper tray 2 Control panel 1 3 USB direct interface 4 Front cover 6 Power switch 7 Face-down output tray 8 Face-down output tray support flap (Support flap) 9 Multi -purpose tray (MP tray) 1 You can adjust the angle of the LCD display by tilting it up or down. CD-ROM (including User's Guide) Quick Setup Guide AC power cord Belt Unit (pre-installed) Waste Toner Box (pre-installed) Toner cartridges (Black, Cyan, Magenta and Yellow) Drum Unit (pre-installed) Insertion sheet and Plastic bags for repacking The interface cable is not a standard accessory. Buy the appropriate cable for the interface you are going to use. „ USB cable Do not use a USB interface cable that is longer than 6 feet (2.0 meters). Do not connect the USB cable to a non-powered hub or a Macintosh® keyboard. Make sure that you connect it to the USB connector of your computer. „ Parallel cable (For HL-4050CDN users) Do not use a parallel interface cable that is longer than 6 feet (2.0 meters). Use a shielded interface cable that is IEEE 1284-compliant. „ Network cable Use a straight-through Category5 (or greater) twisted-pair cable for 10BASE-T or 100BASE-TX Fast Ethernet Network. 7
-
 1
1 -
2
-
3
-
 4
4 -
 5
5 -
 6
6 -
 7
7 -
 8
8 -
 9
9 -
 10
10 -
 11
11 -
 12
12 -
 13
13 -
 14
14 -
15
-
16
-
17
-
18
-
19
-
20
-
21
-
22
-
23
-
24
-
25
-
26
-
27
-
28
-
29
-
30
-
31
-
32
-
33
-
34
-
35
 |
 |
