Brother International Quattro 2 6700D Circular Attachment Instruction Manual - - Page 6
the attachment.
 |
View all Brother International Quattro 2 6700D manuals
Add to My Manuals
Save this manual to your list of manuals |
Page 6 highlights
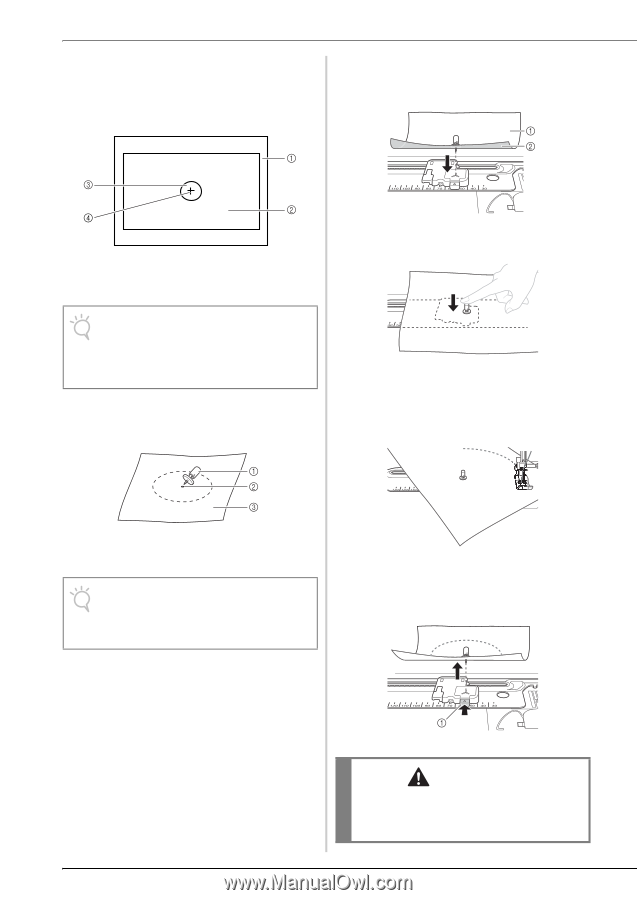
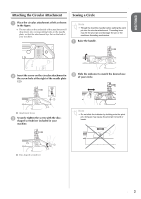
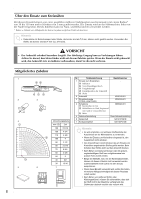
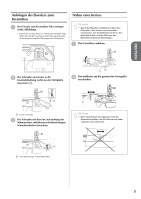
c Use a piece of stabilizer that is larger than your design area, reinforcing with a smaller piece of the stabilizer at the center of the circle when using fine fabric or the same pivot pin area repeatedly. e Pressing the top of the pivot pin, insert the point of the pivot pin into the "Y" mark on the attachment. a Wrong side of Fabric b Stabilizer c Reinforcement Stabilizer d Pivot Pin area Note • A stabilizer is always required when sewing on any fabric or garment to prevent stretching or puckering. Depending on the type of fabric being sewn, will determine wether you use permanent, iron on, temporary or a sticky stabilizer. d Insert the pivot pin at the center of circle from the right side of fabric. a Right side of Fabric b Wrong side of Fabric f Select the desired stitch and sew allowing the fabric to feed smoothly, making sure that you do not push or pull your fabric causing an uneven circle. a Pivot Pin b Center of circle c Right side of Fabric Note • When sewing a small diameter circle, we recommend that you first pin the fabric to the attachment and then set the indicator to your desired size. g After sewing, always press the release button to remove the pin and fabric from the circular attachment. a Release button CAUTION • Do not leave the pivot pin inserted in your fabric and not attached to the circular attachment. To do so may result in accidental injury or machine damage. 4
-
 1
1 -
 2
2 -
 3
3 -
 4
4 -
 5
5 -
 6
6 -
 7
7 -
 8
8 -
 9
9 -
 10
10 -
 11
11 -
 12
12 -
13
-
14
-
15
-
16
-
17
-
18
-
19
-
20
-
21
-
22
-
23
-
24
-
25
-
26
-
27
-
28
-
29
-
30
-
31
-
32
-
33
-
34
-
35
-
36
-
37
-
38
-
39
-
40
 |
 |