Brother International Quattro 2 6700D Circular Attachment Instruction Manual - - Page 7
Using the Quarter Circle Template, Using the Included Presser Feet, BRAIDING FOOT
 |
View all Brother International Quattro 2 6700D manuals
Add to My Manuals
Save this manual to your list of manuals |
Page 7 highlights
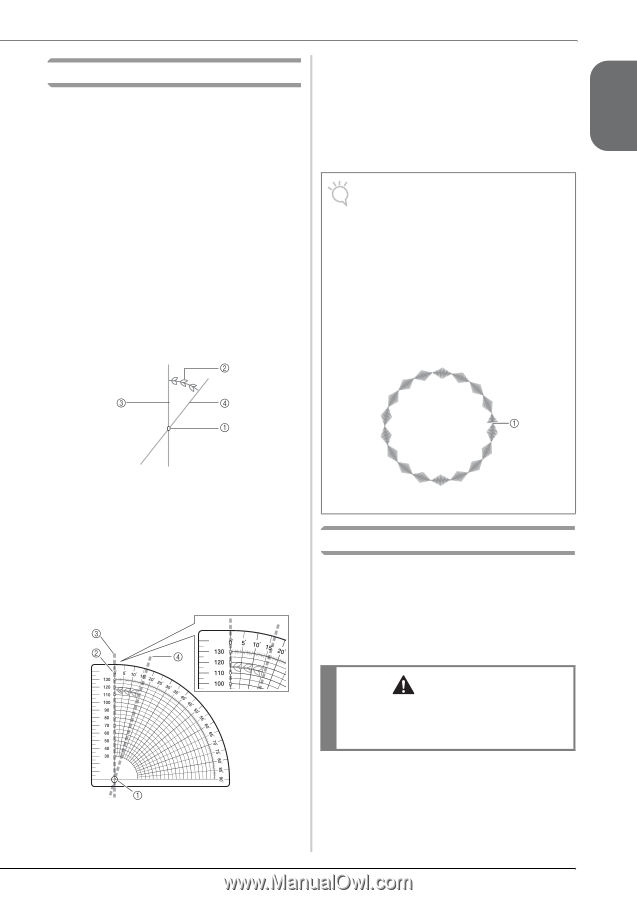
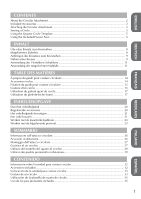
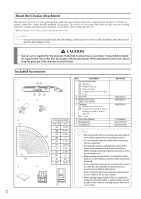
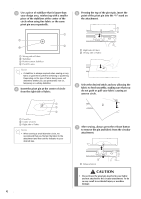
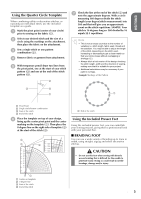
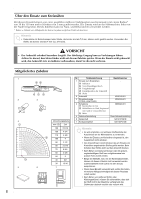
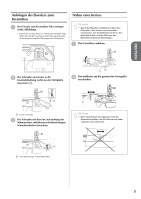
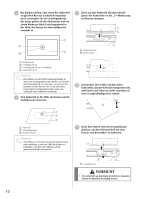
ENGLISH Using the Quarter Circle Template When combining utility or decorative stitches, or repeating an individual stitch, use the included template as a guide. a Mark the pivot point (center of your circle) prior to sewing on the fabric (a). b Select your desired stitch and the size of a circle using the markings on the attachment, then place the fabric on the attachment. c Sew a single stitch or one pattern combination (b). d Remove fabric or garment from attachment. e With temporary pencil draw two lines from the pivot point, one at the start of your stitch pattern (c) and one at the end of the stitch pattern (d). g Check the line at the end of the stitch (d) and note the approximate degrees. With a circle measuring 360 degrees divide the stitch length (your degree/stitch measurement) into 360 and that will give you an approximate count on the stitch repetitions. SAMPLE: Your stitch is 16 degrees long so: 360 divided by 16 equals 22.5 repetitions. Note • This is not an exact count due to the number of variables i.e. stitch length, fabric used, thread and the stabilizer. You may be able to adjust the length of the stitch, depending on the stitch used, increasing or decreasing to get a closer match so that your circle closes without overlapping or shortage (a). • Always stitch a trial version of the design checking the stitch length, width and the direction of sewing, making sure that it is suitable for your project. • Additional calculations may be necessary if your pattern overlaps. Example: Shortage of the Pattern a Pivot Point b Single stitch/Pattern combination c Start of the stitch d End of the stitch f Place the template on top of your design, lining up the center pivot point and the center marking on the template (a). Then place the 0 degree line on the right side of template (b) at the start of the stitch (c). a End of the stitch Using the Included Presser Feet Using the included presser feet, you can embellish your sewing projects, giving them a professional look with your personal flair. ■ BRAIDING FOOT You can use a wide variety of braiding up to 5mm in width, using straight, zigzag and select decorative stitches. CAUTION • Do not use this foot when sewing with densely woven braiding that is difficult for the needle to penetrate easily. Doing so could result in needle breakage, damage and/or injury. a Center on template b 0 degree line c Start of the stitch d End of the stitch 5
-
 1
1 -
 2
2 -
 3
3 -
 4
4 -
 5
5 -
 6
6 -
 7
7 -
 8
8 -
 9
9 -
 10
10 -
 11
11 -
 12
12 -
13
-
14
-
15
-
16
-
17
-
18
-
19
-
20
-
21
-
22
-
23
-
24
-
25
-
26
-
27
-
28
-
29
-
30
-
31
-
32
-
33
-
34
-
35
-
36
-
37
-
38
-
39
-
40
 |
 |