Canon 2MC Elura 2 and Elura 2MC Instruction Manual - Page 17
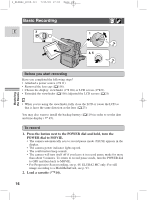
Press and release the start/stop button once to begin recording.
 |
UPC - 013803606294
View all Canon 2MC manuals
Add to My Manuals
Save this manual to your list of manuals |
Page 17 highlights
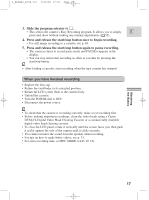
2_ELURA2_E(08-32) 7/25/00 17:03 Page 17 3. Slide the program selector to [. • This selects the camera's Easy Recording program. It allows you to simply E point and shoot without making any manual adjustments ( 55). 4. Press and release the start/stop button once to begin recording. • For still image recording to a cassette, see p. 49. 5. Press and release the start/stop button again to pause recording. • The camera returns to record pause mode and PAUSE reappears in the display. • You can stop and restart recording as often as you like by pressing the start/stop button. • After loading a cassette, start recording when the tape counter has stopped. When you have finished recording • Replace the lens cap. • Return the viewfinder to its retracted position. • Return the LCD screen flush to the camera body. • Unload the cassette. • Turn the POWER dial to OFF. • Disconnect the power source. Mastering the Basics • To check that the camera is recording correctly, make a test recording first. • Before making important recordings, clean the video heads using a Canon DVM-CL Digital Video Head Cleaning Cassette or a commercially available digital video head cleaning cassette. • To close the LCD panel, rotate it vertically until the screen faces you, then push it in flat against the side of the camera until it clicks securely. • You cannot monitor the sound from the speaker when recording. • For tips on how to make better videos, see p. 31. • For extra recording time, set REC MODE to LP ( 18). 17
-
 1
1 -
2
-
3
-
4
-
5
-
6
-
7
-
8
-
9
-
10
-
11
-
 12
12 -
 13
13 -
 14
14 -
 15
15 -
 16
16 -
 17
17 -
 18
18 -
 19
19 -
 20
20 -
 21
21 -
 22
22 -
23
-
24
-
25
-
26
-
27
-
28
-
29
-
30
-
31
-
32
-
33
-
34
-
35
-
36
-
37
-
38
-
39
-
40
-
41
-
42
-
43
-
44
-
45
-
46
-
47
-
48
-
49
-
50
-
51
-
52
-
53
-
54
-
55
-
56
-
57
-
58
-
59
-
60
-
61
-
62
-
63
-
64
-
65
-
66
-
67
-
68
-
69
-
70
-
71
-
72
-
73
-
74
-
75
-
76
-
77
-
78
-
79
-
80
-
81
-
82
-
83
-
84
-
85
-
86
-
87
-
88
-
89
-
90
-
91
-
92
-
93
-
94
-
95
-
96
-
97
-
98
-
99
-
100
-
101
-
102
-
103
-
104
-
105
-
106
-
107
-
108
-
109
-
110
-
111
-
112
-
113
-
114
-
115
-
116
-
117
-
118
-
119
-
120
-
121
-
122
-
123
-
124
-
125
-
126
-
127
-
128
-
129
-
130
-
131
-
132
-
133
-
134
-
135
-
136
-
137
-
138
-
139
-
140
-
141
-
142
-
143
-
144
-
145
-
146
-
147
 |
 |