Canon 2MC Elura 2 and Elura 2MC Instruction Manual - Page 90
If Audio In.
 |
UPC - 013803606294
View all Canon 2MC manuals
Add to My Manuals
Save this manual to your list of manuals |
Page 90 highlights
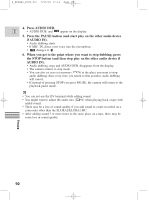
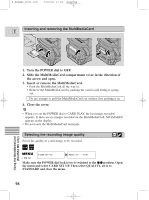
4_ELURA2_E(80-92) 7/25/00 17:16 Page 90 4. Press AUDIO DUB. E • AUDIO DUB. and appear on the display. 5. Press the PAUSE button (and start play on the other audio device if AUDIO IN). • Audio dubbing starts. • If MIC. IN, direct your voice into the microphone. • changes to . 6. When you get to the point where you want to stop dubbing, press the STOP button (and then stop play on the other audio device if AUDIO IN). • Audio dubbing stops and AUDIO DUB. disappears from the display. • The camera returns to stop mode. • You can also set zero set memory ( 79) at the place you want to stop audio dubbing, then every time you return to that position, audio dubbing will cancel. • If instead of pressing STOP you press PAUSE, the camera will return to the playback pause mode. • You can not use the DV terminal while adding sound. • You might want to adjust the audio mix ( 91) when playing back a tape with added sound. • There may be a loss of sound quality if you add sound to a tape recorded on a camcorder other than the ELURA2/ELURA2 MC. • After adding sound 3 or more times to the same place on a tape, there may be some loss in sound quality. Editing 90
-
 1
1 -
2
-
3
-
4
-
5
-
6
-
7
-
8
-
9
-
10
-
11
-
12
-
13
-
14
-
15
-
16
-
17
-
18
-
19
-
20
-
21
-
22
-
23
-
24
-
25
-
26
-
27
-
28
-
29
-
30
-
31
-
32
-
33
-
34
-
35
-
36
-
37
-
38
-
39
-
40
-
41
-
42
-
43
-
44
-
45
-
46
-
47
-
48
-
49
-
50
-
51
-
52
-
53
-
54
-
55
-
56
-
57
-
58
-
59
-
60
-
61
-
62
-
63
-
64
-
65
-
66
-
67
-
68
-
69
-
70
-
71
-
72
-
73
-
74
-
75
-
76
-
77
-
78
-
79
-
80
-
81
-
82
-
83
-
84
-
 85
85 -
 86
86 -
 87
87 -
 88
88 -
 89
89 -
 90
90 -
 91
91 -
 92
92 -
 93
93 -
 94
94 -
 95
95 -
96
-
97
-
98
-
99
-
100
-
101
-
102
-
103
-
104
-
105
-
106
-
107
-
108
-
109
-
110
-
111
-
112
-
113
-
114
-
115
-
116
-
117
-
118
-
119
-
120
-
121
-
122
-
123
-
124
-
125
-
126
-
127
-
128
-
129
-
130
-
131
-
132
-
133
-
134
-
135
-
136
-
137
-
138
-
139
-
140
-
141
-
142
-
143
-
144
-
145
-
146
-
147
 |
 |
